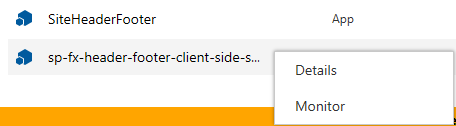
If you are using the modern page experiences in SharePoint Online, perhaps you’ve run into a moment of frustration when you go to the Site Contents screen to remove an installed app (err, add-in?) and discover you can’t.
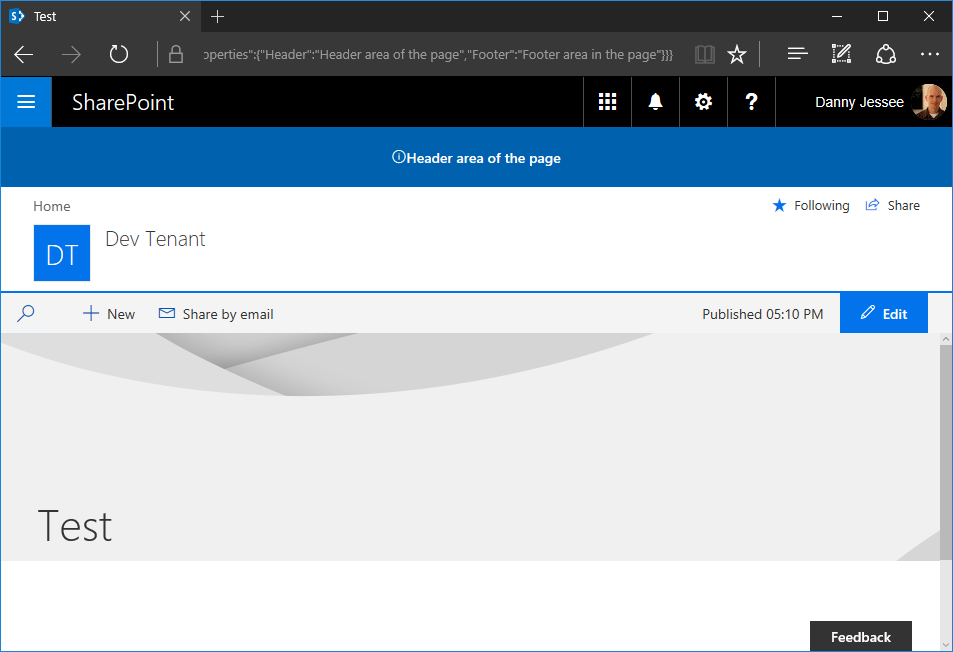
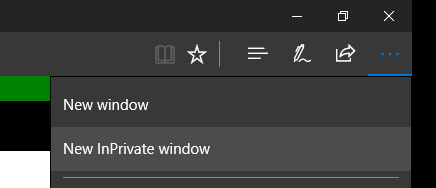
Clicking the … brings up a context menu with only two options, Details and Monitor. Hmmm…no Remove here:
Uh oh, how do I remove this thing?
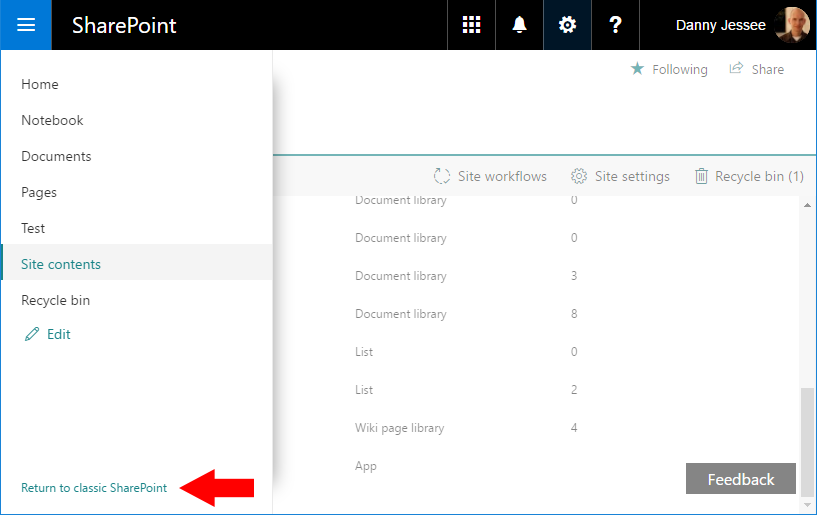
It turns out that you have to switch the Site Contents page back to the classic page experience in order to remove an app. This little nugget is buried in an Office support article:
Glad I scrolled all the way to the bottom of this article.
Sure enough, once you return to the classic page experience, the Remove link is there as you would expect.
You may need to expand the left navigation to see this link at the bottom.
After clicking Return to classic SharePoint, apps can be removed from the classic Site Contents screen.
There was only one problem: despite the support article’s guidance to “use the Back button in the browser to return from classic view,” at least when I pressed my browser’s back button, my browser retained the classic page experience. I navigated away from the Site Contents page and back to it again…still classic. And when I went to a list view page that was formerly using the modern page experience, that page now had the classic experience as well. Only some document libraries and site pages were still using the modern page experience.
What’s going on here?
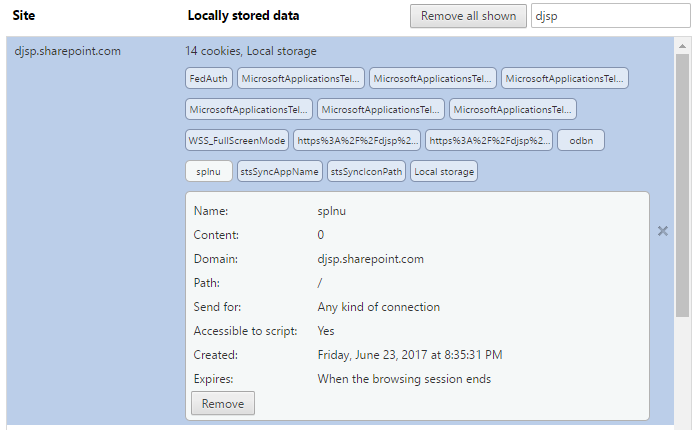
The good news is that clicking Return to classic SharePoint doesn’t actually change any SharePoint Online settings, nor does it change any user settings (not even your own). This is why you won’t find a link anywhere to “Return to modern SharePoint” after you’ve switched to classic view. Switching to classic view simply sets a session cookie that changes your default page experience. You can locate and remove this cookie to switch back immediately or just wait until your session expires. For the intellectually curious, the cookie is named splnu (anyone want to guess what that stands for?) and contains this information:
Removing this cookie will return you to the modern page experience. However, for the duration of your session, the presence of this cookie will cause pages to be rendered with the classic page experience on all sites within your tenant subdomain.
To avoid this problem altogether, I prefer to take advantage of my browser’s “private browsing” or “incognito” mode. This allows me to log in to my SharePoint Online site, go to my Site Contents page, switch to classic view, and remove the app, all without interfering with any existing cookies on my machine and eliminating the hassle of having to potentially locate and remove the splnu cookie after the fact.
Hopefully this will help the next time you need to remove an app from SharePoint Online!
This post is part 1 of what is currently a 3 part series of updates to my SharePoint Framework application customizer as the capability has evolved since entering developer preview in June. Please see the links to parts 2 and 3 below.
Back in 2015, I published a post on this blog detailing the steps for implementing a custom site header and footer using a SharePoint-hosted add-in. The add-in contained:
1. An add-in part that provides an interface to configure the text and colors associated with the custom header and footer, storing the necessary values in the property bag of the site.
2. Custom JavaScript that is embedded on every (classic) page through the use of user custom actions that reads the values set by the add-in part from the property bag and renders the header and footer on each page.
An add-in part is used to display and update the site header and footer configuration information, which is stored in the site property bag. User custom actions are then used to embed the JavaScript that reads this information and renders the header and footer on all (classic) pages within a site.
Issues with current add-in solution
While the add-in solution from that blog post worked great in SharePoint Online in 2015 (and still works great for SharePoint Online classic pages and SharePoint 2013/2016 on-premises today), SharePoint Online has evolved somewhat over the past two years.
Since late 2016, Microsoft has been rolling out new modern page experiences across SharePoint Online. These include new modern team site pages as well as list and library view pages. The technique I used for embedding custom JavaScript on every page–namely, user custom actions–are not supported on modern pages. Therefore, even with the add-in deployed and configured you will not see a header or footer on any modern page. So how are we supposed to customize them?
Enter SharePoint Framework
The SharePoint Framework gives us a new way to deploy JavaScript-based customizations to SharePoint. These include web parts (for both classic and modern pages) and now Extensions such as Application Customizers that allow you to embed JavaScript on modern pages.
To extend the functionality of my SharePoint-hosted add-in to modern pages using the SharePoint Framework, I created a new SharePoint client-side solution containing an application customizer extension to handle the rendering of the header and footer on all modern pages, reading the same configuration values from the site property bag that are set by the add-in part from my original SharePoint-hosted add-in.
Modern pages contain useful placeholders
When creating the original add-in, I had to do some manipulation of the DOM to insert the
elements representing the custom header and footer in the appropriate places on the page using jQuery’s .insertBefore() and .insertAfter() methods. These kinds of customizations are fragile and could break if Microsoft changed the IDs or locations of existing page elements I was referencing such as suiteBarTop or s4-bodycontainer. I was hoping to get away from this in my modern page solution.
Unfortunately, in my initial experiments with page placeholders, I identified some shortcomings that would prevent me from building a complete modern page header/footer solution that leverages them. Most notably, modern site pages do not contain the PageFooter placeholder at all. Also, since my current solution renders the header at the very top of the page, I wasn’t a fan of the PageHeader placeholder location beneath the #suiteBarTop
instead of above it at the very top of the page.
SharePoint Framework page placeholders render the PageHeader below the suiteBarTop
and do not render a PageFooter on modern site pages, as shown above.
Approach
NOTE: This approach still relies on DOM manipulation and is a fragile and unsupported way to make user interface customizations to modern pages because of dependencies on page elements with specific IDs and CSS classes. In your solutions, please make every effort to leverage the supported page placeholders if possible.
With these limitations in mind and for the sake of a consistent look and feel across all pages (both classic and modern), I decided to stick with my jQuery-based approach of using .insertBefore() and .insertAfter() to inject my custom header and footer at the top and bottom of the page. While investigating the DOM on modern pages to determine where I would need to inject my header and footer, I realized that not all modern pages are created alike. Perhaps this is part of the reason why modern site pages do not contain a PageFooter placeholder…
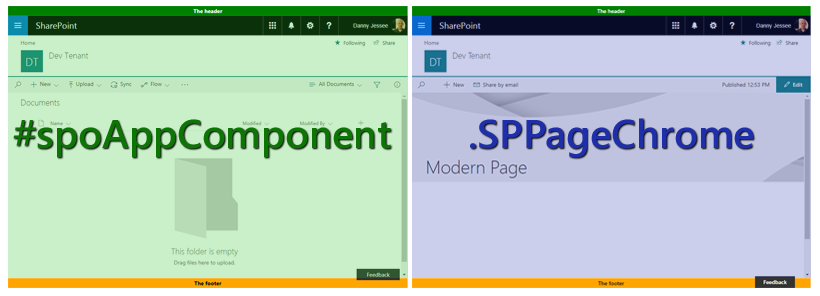
The
element representing the page content on modern list and library view pages (and the modern Site Contents page) has an ID of spoAppComponent. This
does not exist on modern site pages. On modern site pages, the
element representing the page content has a class of SPPageChrome. (NOTE: modern list and library view pages also contain a
with a class of SPPageChrome, but this
does not represent the main content area on those pages.)
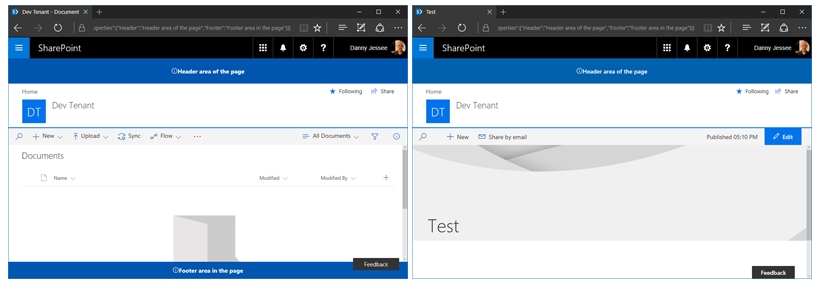
Page content areas on a modern list/library view page (left) and a modern site page (right) with the custom header and footer injected around them.
In my code, you will see that I test for the existence of #spoAppComponent on the page. If it exists, I know I’m on a modern list or library view page and I inject the custom header and footer around that
. Otherwise, I add the header and footer around the
with class SPPageChrome.
Building the Application Customizer
I followed the step-by-step instructions from the four-part Office Dev Center article series Build your first extension to generate, build, and deploy my application customizer. The following notes may be useful to you:
– If you have already installed a previous version of Microsoft’s Yeoman SharePoint Client-side Solution Generator, you will need to update it by running npm update -g @microsoft/generator-sharepoint. The current version of the generator (as of the publishing of this post) is now 1.1.1.
– If you haven’t updated your SharePoint Framework development environment in awhile, you may want to run npm update -g to ensure the rest of your global packages are up-to-date as well.
– I added jQuery (npm install –save jquery) and sp-pnp-js (npm install –save sp-pnp-js) to my project and used the PnP JavaScript Core library to simplify the API query for the header and footer configuration values from the site property bag.
– Since I didn’t make use of any ClientSideComponentProperties, I removed that attribute from my ./sharepoint/assets/elements.xml file.
– If you download this code, you will need to update the CDN URL in the ./config/write-manifests.json file to match the location where you deploy the assets from the ./temp/deploy folder in your environment. More information about working with the Office 365 CDN may be found here.
– Remember that you must upload the .sppkg file from the ./sharepoint/solution folder to your tenant’s app catalog site, then add the associated app on your site. This will provision and activate the feature that deploys the application customizer to your site.
The code
My code is posted to GitHub at the following location:
I encourage you to download it, try it out in your environment, and let me know if you run into any issues with it. Please keep the following things in mind:
– You must also install the SharePoint-hosted add-in located here in order to configure the header and footer property bag values and render them on classic pages.
– Although the above dependency on my SharePoint-hosted add-in currently exists, it should be possible to move all of these capabilities into a SharePoint Framework solution (i.e., by building a client-side web part to read and write the property bag configuration values and apply the user custom actions to classic pages within the site using the REST API, JSOM, or the PnP JavaScript Core library).
Stay tuned!
This is a very exciting time to be doing modern SharePoint development. SharePoint Framework extensions reached GA in September 2017 and even more new capabilities and options for modern SharePoint customizations are still in the pipeline. Keep an eye on the SharePoint Framework wiki for more announcements and updates!
UPDATE 8/13/2017: As of August 11, 2017, all modern site pages also contain the PageFooter placeholder.
The original post from June 9, 2017 appears below.
We finally received some much anticipated news this week: SharePoint Framework Extensions are now available in developer preview! For a full overview of the new capabilities that are now available in your Office 365 developer tenant, I encourage you to read through the official documentation and labs here.
As someone who developed a SharePoint-hosted add-in a couple years ago that renders a custom site header and footer on every page, I was especially excited to begin playing with the new page placeholders that were available to use within Application Customizer Extensions. According to the definition of an Application Customizer Extension, they “allow developers to add script to the page, as well as access well-known HTML element placeholders and extend them with custom renderings.” The sample walkthrough shows how to render a custom header and footer using placeholders on a modern list view page.
Once you have updated your SharePoint Framework packages (in particular the Yeoman generator for SharePoint, which is now version 1.1.1 as of June 8) and scaffolded your first Application Customizer Extension, you can follow the steps in the walkthrough and see how to inject custom HTML into these page placeholders without too much effort.
I was curious to see which placeholders are available–namely if there were any others besides PageHeader and PageFooter, the two used in the sample walkthrough–and how they would look. I tested the walkthrough code on each of the modern page experiences:
Modern library view page
Modern list view page
Modern Site Contents page
Modern page in SitePages library
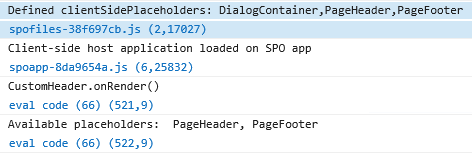
For experiences 1-3, I saw the same results in my console:
The “defined” clientSidePlaceholders were:
DialogContainer(I haven’t been able to successfully find or use this one anywhere yet)
PageHeader
PageFooter
After the onRender() method was called, the “available” placeholders were:
PageHeader
PageFooter
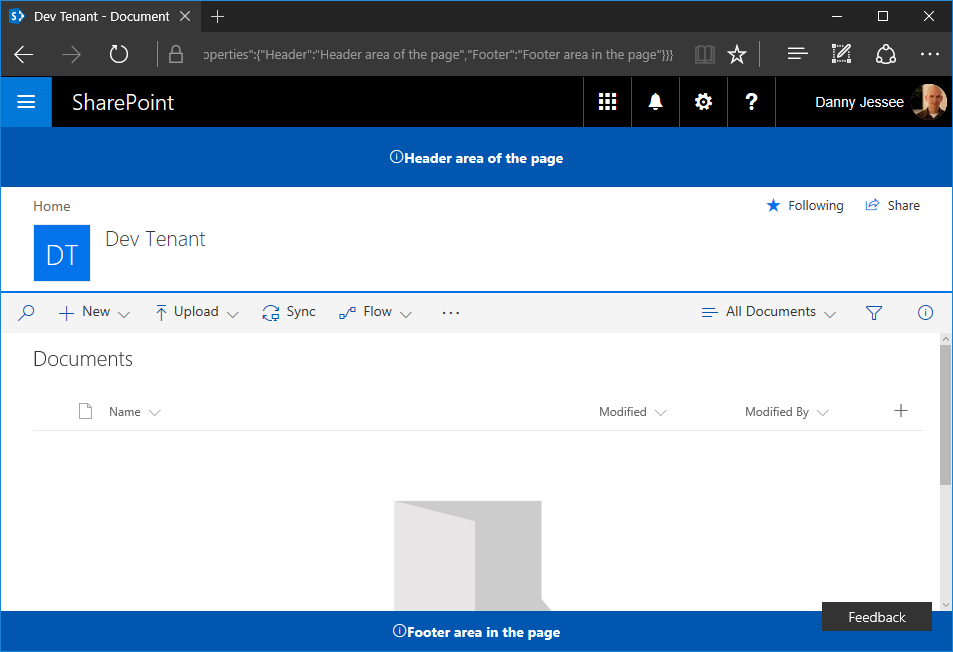
Consequently, the header and footer rendered properly on each of these page types as shown in the walkthrough (modern library view shown below, the others looked exactly the same):
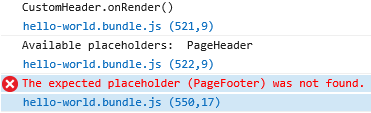
However, for a modern page in the SitePages library, my console showed something a little different:
For whatever reason, modern site pages do not appear to contain a PageFooter placeholder. As you can see, only the PageHeader rendered on this page:
(8/13/2017) NOTE: All modern site pages now also contain the PageFooter placeholder.
This may be intentional and by design or it may be subject to change in the future. There will no doubt be many updates, fixes, and enhancements to page placeholders, Application Customizer Extensions, and the SharePoint Framework in general over the weeks and months ahead.
Going back to my blog post from 2015, the advent of modern page experiences in SharePoint Online has produced some new challenges to overcome if your objective is to apply a custom header and footer across all pages in a SharePoint Online site as things stand today:
My SharePoint-hosted add-in solution from 2015 uses customization techniques (e.g., user custom actions that inject JavaScript on every page) that are not supported in modern page experiences.
SharePoint Framework Application Customizer Extensions only work on modern page experiences (and as seen above, modern site pages do not currently contain a PageFooter placeholder).
Over a year ago, Microsoft first announced the SharePoint Framework (SPFx) at the Future of SharePoint event. Accompanying the introduction was this blog post describing the SharePoint Framework as “an open and connected platform” that represents the next step in a natural evolution toward client-side development and customization on top of SharePoint. The SharePoint Framework allows developers to use modern web paradigms and JavaScript frameworks and moves away from the more Microsoft-specific legacy server-side customizations of the past.
The SharePoint Framework finally reached GA in February 2017 and is currently available in SharePoint Online. SharePoint Framework support will be available to SharePoint 2016 on-premises users with the release of Feature Pack 2 later this year.
Getting started with the new developer toolchain
Perhaps the largest barrier to entry when it comes to getting started with development using the SharePoint Framework is the new developer toolchain, which bears very little resemblance to any SharePoint development tools you may have used in the past. Gone are the days of just cracking open Visual Studio to build a SharePoint solution (although Eric Shupps has just announced the SharePoint Framework Extension for Visual Studio, so definitely check that out if you want to continue leveraging Visual Studio as part of your development workflow).
In exchange for the added complexity introduced by this new toolchain we get a set of modern, open-source, cross-platform tools and technologies that finally levels the playing field between SharePoint development and modern web development (try leveraging React or Angular in a Script Editor Web Part!) and opens the door for developers on Linux and Mac OS to build SharePoint customizations. It also eliminates the need for a local SharePoint farm on the developer workstation for on-premises development. Moving forward, the SharePoint Framework is your only option for building custom web parts that can be added to the new modern page experiences.
Even if you decide to leverage the SharePoint Framework Extension for Visual Studio, you will still need to install–and have a basic understanding of–all of the prerequisite tools and technologies that comprise this developer toolchain, which include:
Feeling overwhelmed? I recently published a Pluralsight course that contains short, easy-to-digest modules and demos, each introducing a different item in the toolchain: Tooling up for SharePoint Framework. The course is geared toward “newbies” with little to no prior experience using any of these new tools and technologies. If you follow along with the course, within about an hour you will be able to stand up a new, fully-configured SharePoint Framework development workstation and create, build, and test your first client-side web part. The clip below is a demo from the course showing how to use the Workbench that is included with the SharePoint Framework to test customizations locally without having to deploy anything to SharePoint (another advantage over “legacy” SharePoint development).
What the future holds
Client-side web parts are the first of what will ultimately be many types of JavaScript customizations supported by the SharePoint Framework. According to this blog post from the Office Team, we can expect to see support for the following customizations coming to the SharePoint Framework soon:
Web Part Connections that allow client-side web parts to communicate and exchange information with each other
ApplicationCustomizers to embed JavaScript on pages within SharePoint sites
FieldCustomizers to update the way data is displayed in a list view, similar to JSLink
CommandSets to add custom ECB actions, toolbar buttons, etc.
Finally: SPFx vs. the Add-in Model
As the SharePoint Framework continues to evolve and mature, you may encounter scenarios where you cannot use it to achieve a particular objective. In these cases (and many other cases, such as those where server-side code is still necessary), the Add-in model is still viable and fully supported. Microsoft intends for the SharePoint Framework to be complementary to the Add-in model, not a replacement for it. If you’re interested in learning more about updating your legacy SharePoint customizations to take advantage of the Add-in model, please check out my blog post and Pluralsight course.
If you follow this blog, you have probably read many of my posts through the years dedicated to the Add-in (formerly app) model for SharePoint 2013, 2016, and SharePoint Online. Microsoft introduced the Add-in model in SharePoint 2013 to address the various shortcomings associated with running custom code on the SharePoint server — most notably, of course, that custom code cannot be deployed to SharePoint Online in Office 365. SharePoint-hosted Add-ins are great for simple functionality that can be achieved with 100% client-side solutions (HTML, CSS, and JavaScript), while provider-hosted Add-ins allow you to run custom server-side code in Azure or anywhere other than the SharePoint server.
Using the Add-in model is a no-brainer for most new development efforts, especially if you are developing for SharePoint Online and still need to write server-side code. (At the time of this writing, the new SharePoint Framework is still in Developer Preview but is definitely worth adding to your repertoire for client-side SharePoint development in the years to come!)
But what about your existing solutions? Many organizations using SharePoint maintain large portfolios of custom code solutions that leverage different legacy development approaches advocated by Microsoft through the years, and most of the custom code developed for earlier versions of SharePoint cannot be directly migrated to the cloud. If your organization decided to move to the cloud tomorrow, where would you begin?
Taking inventory of your customizations
I have found that most legacy SharePoint customizations can be placed into the following categories:
User interface enhancements (master page, branding, themes, custom web parts)
Declarative items (XML for custom site columns, list instances, and content types)
Timer jobs (and other administrative extensions to the platform) running in SharePoint Central Administration on-premises
These customizations may take the form of farm or sandboxed solutions that depend on SharePoint’s legacy feature framework. In the case of some user interface customizations, custom HTML markup, CSS, or even JavaScript might be embedded directly within a site’s master page file. For the most part, these are situations we should try to avoid as much as possible when migrating our customizations to the cloud for the following reasons:
Farm solutions cannot be deployed to SharePoint Online.
Sandboxed solutions that contain managed code can no longer be deployed to SharePoint Online (note that sandboxed solutions contain a managed code assembly by default, even if the solution does not contain any managed code).
Custom master pages, while still supported in SharePoint Online, should be avoided unless absolutely necessary. (Microsoft has a history of making significant changes to the default master page in SharePoint Online, such as the addition of the app launcher/waffle/Hollywood Squares in the upper left corner. Sites with heavily customized master pages may not always have access to these changes as they are introduced in the future.)
The role of the Add-in model
When migrating these customizations, keep in mind that you will not necessarily be building and deploying a SharePoint Add-in to replace each customization. In fact, in many cases, you will simply be leveraging techniques from the Add-in model. These include paradigms that were introduced and/or popularized with the introduction of the Add-in model:
Using client-side script wherever possible
Remote provisioning of assets (everything from CSS/JavaScript files to site columns, content types, etc.) using the .NET Managed client object model (CSOM) or PowerShell
Running server-side code outside the SharePoint server that communicates with SharePoint via its APIs
In some cases, all you may need to do is build and deploy a “throwaway” provider-hosted Add-in within a local development environment that performs some one-time remote provisioning tasks, but is not intended to be accessed by end users and can be removed after its work is done.
Add-in model techniques enable us to make our SharePoint customizations with a “lighter touch.” By lighter touch, I am referring to a lighter footprint and/or impact on the SharePoint server. As we decrease the burden on the SharePoint server, we enable SharePoint to run more reliably and efficiently while also making it easier to administer and upgrade (at least on-premises…yes, these techniques all work on-prem as well!) To better explain this concept, I put together the table below contrasting legacy SharePoint development approaches with their modern lighter touch equivalents:
Legacy Approach
Lighter Touch
Farm solutions with custom code running in the SharePoint IIS worker process
Farm or sandboxed solutions that deploy declarative artifacts such as site columns, content types, and list instances
Remote provisioning these artifacts from a provider-hosted Add-in using CSOM
Custom master pages with embedded markup, styles, and script
Remote provisioning of branding assets, embedding of JavaScript UI customizations using ScriptLink custom actions
Custom timer jobs running in Central Administration using the SharePoint server object model
Remote timer jobs running as Windows scheduled tasks or Azure WebJobs using CSOM
SharePoint Developer PnP: here to help!
Because the Add-in model represents such a strong departure from the way things were done in the past with full-trust code in SharePoint, Microsoft started the SharePoint Developer Patterns and Practices (or PnP) initiative to assist developers with transforming their existing solutions to be cloud-ready as they migrate to SharePoint Online in Office 365.
The PnP team maintains several Github repositories that include reusable, production-ready components, templates, and solution starters that demonstrate the preferred modern approach to SharePoint development — making customizations with a lighter touch wherever possible.
Eric Overfield just published a great blog post detailing the PnP initiative and how you can get involved.
My Pluralsight course
If you are interested in learning more, I recently published a Pluralsight course with lots of demos: Updating Legacy SharePoint Customizations to the Add-in Model. The course covers the process of migrating a heavily customized on-premises SharePoint site to SharePoint Online from start to finish. The clip below is a demo from the course showing how a legacy timer job customization can be made cloud-ready with the help of the PnP Timer Job Framework and Azure WebJobs.
In this course, you will see me leverage the PnP Core Component to drastically simplify writing .NET Managed CSOM code. I also use several great samples and solution starters from the PnP team, all with the objective of easing the pain associated with migrating legacy SharePoint customizations to the Add-in model.
This April, I will be joining SharePoint experts from around the world at SharePoint Fest DC 2017! I am very excited to be debuting a new session this year:
Many organizations using SharePoint maintain large portfolios of custom code solutions that leverage different legacy development approaches advocated by Microsoft through the years, and most of the custom code developed for earlier versions of SharePoint cannot be directly migrated to the cloud. In this session, you will learn how the SharePoint Add-in model allows you to develop maintainable customizations that have traditionally been accomplished using custom server-side code. You will learn how to categorize the types of user interface, declarative, and timer job customizations you may have performed with farm and sandboxed solutions in the past and understand how to approach developing each of them using techniques from the Add-in model.
If you register now and use code JesseeDC200 at checkout, you can save $200 off the purchase of a Gold, Platinum, or Diamond pass!
This will be my third SharePoint Fest event and my second SharePoint Fest DC. I absolutely love this conference and the DC location is as convenient as it gets for mass transit…just step off the train and you are there! I look forward to seeing you there.
In this post, I will show you how to create a custom site header and footer for SharePoint Online/Office 365 that will render on all pages using a SharePoint-hosted add-in. This could be used to post critical alerts or to specify the level of business impact of the content stored within a particular site (e.g., high, medium, or low).
This add-in will accomplish the following, all without a single line of server-side code:
Upon installation, deploy 3 JavaScript files to the Style Library of the host web
Register 3 user custom actions in the host web to ensure these JavaScript files are loaded on every page
Via an add-in part, provide a mechanism for users to enable/disable and set properties of the custom header and footer (e.g., message text, background/text color)
Store and retrieve configuration parameters for the site header and footer in the host web’s property bag
Rendering a custom header and footer
We might be tempted to edit the master page directly to add a header and a footer, but this is not considered a best practice (especially in SharePoint Online, where master page changes can be rolled out quite frequently). Instead, our add-in will make use of JavaScript techniques to insert
elements at the top and bottom of the page for our header and footer:
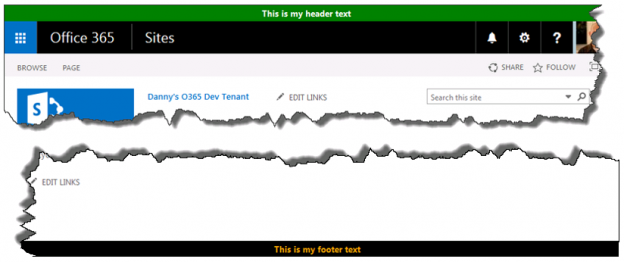
In SharePoint Online/Office 365, our header
(with ID customHeader) will be inserted above the
with ID suiteBarTop(for SharePoint 2013 on-premises, you’ll need to update the script to reference ID suiteBar instead).
Our footer
(with ID customFooter) will be inserted below the
with ID s4-bodyContainer.
NOTE: The
IDs in SharePoint Online are never set in stone and could change at any time. If they do, you will need to update HeaderFooter.js to reference the new
IDs.
jQuery makes it easy to create our custom header and footer
elements and insert them in the appropriate location within the DOM with its .insertBefore() and .insertAfter() functions following this approach:
to the bottom of the page (or the bottom of the browser window if the available screen real estate exceeds the amount of content on a given page). I only needed to make one change to Randy’s StickyFooter.js implementation, and that was to account for the height offset imposed by the addition of our customHeader
For anyone following the OfficeDev PnP, the concept of remote provisioning to allow add-ins to deploy files to the host web should be a familiar one. However, the PnP examples make use of the .NET Managed CSOM to do this, which is a perfectly valid technique but would require us to develop a provider-hosted add-in (allowing that code to run in Azure or some other web server). Since I wanted to create a SharePoint-hosted add-in, I had to find a way to accomplish this using only JavaScript. Thankfully, I found Chris O’Brien’s post with code showing how to provision files to the host web using JavaScript. You will see that my code is based heavily on the example he provides and provisions the following files from the add-in web to the host web:
jQuery-1.9.1.min.js – jQuery
HeaderFooter.js – our logic to read the header/footer configuration data from the host web property bag and render the header
and footer
elements
StickyFooter.js – Randy Drisgill’s Sticky Footer implementation for SharePoint 2013 (with the one tweak described above)
Add-in part for setting configuration values
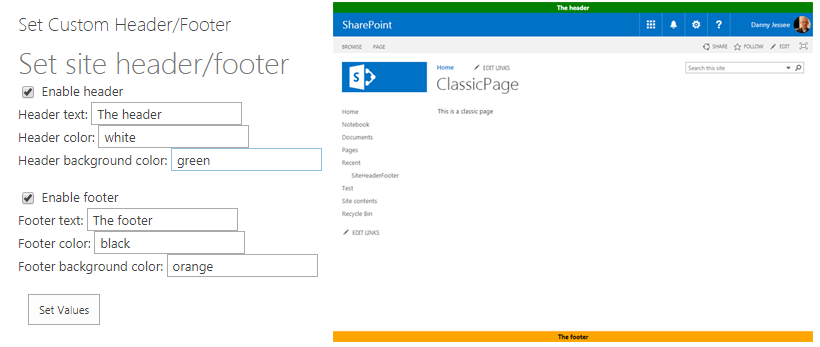
The add-in also includes an add-in part (deployed to and rendered from the add-in web) that allows users to enable/disable the header/footer and set the text and colors:
When the add-in part loads, it uses JavaScript to query the property bag of the host web to see if these settings already exist and if so, prepopulates the values in the form. Once the user has made the necessary changes, clicking Set Values will save the changes back to the property bag (again, using JavaScript).
NOTE: The need for our add-in to read and write data to and from the host web property bag requires us to request the FullControl permission at the Web scope in our add-in manifest (AppManifest.xml):
What about MDS?
SharePoint 2013 introduced the Minimal Download Strategy (MDS), which reduces page load time by sending only the differences when users navigate to a new page. While this is a wonderful benefit, it wreaks havoc with solutions that need to manipulate the DOM every time a new page is loaded. In other words, our header and footer may render perfectly on the home page when we first load it, but thanks to MDS when we navigate to the “Documents” library, only part of the page will actually be re-rendered. Our header and footer will not display properly (if at all) when only part of the page is re-rendered to support a new page request.
For much deeper reading on this subject, I encourage you to go through Wictor Wilen’s blog posts introducing the MDS and explaining the correct way to execute JavaScript functions on MDS-enabled sites. My code is based on Wictor’s solution and works properly in scenarios where MDS is enabled and where it is not (e.g., on Publishing sites or any site where the MDS feature has been deactivated).
We handle MDS by calling RegisterModuleInit() with the function we need to execute on every page load in HeaderFooter.js:
if (typeof _spPageContextInfo != "undefined" && _spPageContextInfo != null) {
    // MDS enabled
    RegisterModuleInit(_spPageContextInfo.siteServerRelativeUrl + 'Style Library/Headerfooter.js', DJ.HeaderFooter.Render.initializeHeaderFooter);
}
// Run now on this page (and non-MDS scenarios)
DJ.HeaderFooter.Render.initializeHeaderFooter();
The code
I have posted the code for this add-in to GitHub at the following location:
I encourage you to download it, try it out in your environment, and let me know if you run into any issues with it. My sincere thanks go out to Chris O’Brien, Randy Drisgill, and Wictor Wilen for giving me the building blocks needed to put this add-in together.
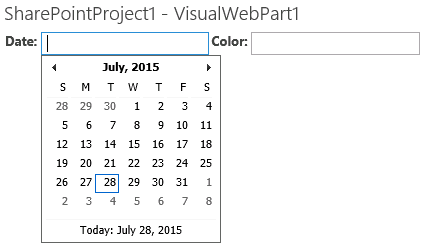
For years, it seems developers have struggled with finding exactly the right set of steps to leverage the AjaxControlToolkit in their SharePoint applications. In SharePoint 2010, you had to download a specific legacy version of the toolkit and make a handful of entries in your solution manifest (obviously we can only use the AjaxControlToolkit on-premises since it requires deploying a DLL to the Global Assembly Cache). You also had to update your master page to leverage the toolkit’s own ToolkitScriptManager. If you’re looking for a verified set of steps for using the AjaxControlToolkit with SharePoint 2010, see Sohel’s blog post here. It was a lifesaver for me a few years ago.
But what if you’re stuck having to upgrade a solution that depends on the AjaxControlToolkit to SharePoint 2013 today? I found myself in precisely this situation not too long ago. Based on my web searching, there doesn’t appear to be a great deal of interest surrounding this topic anymore, but in case you find yourself in my predicament, here is what to do:
Download the latest version of the AjaxControlToolkit here. At the time of this writing, I have verified these steps with the May 2015 update – v15.1.2.
Run the installer in your development environment.
Find the location where the files were installed and grab a copy of AjaxControlToolkit.dll from the ASP.NET AJAX Control Toolkit\Bin directory. Place this file somewhere you can easily reference it from your SharePoint project. I like to make an “External References” folder at the same level as my .sln file to keep the path references simple.
In Visual Studio, create a new empty SharePoint 2013 project as a Farm Solution.
Add a reference to AjaxControlToolkit.dll by right-clicking References and selecting Add Reference…
Browse to the location of AjaxControlToolkit.dll. This will allow you to reference the toolkit controls in your code.
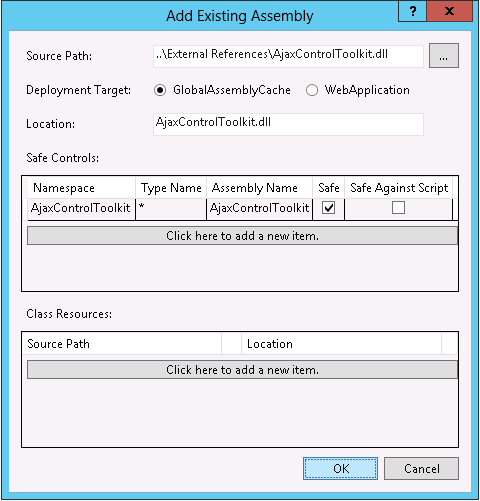
We need to ensure that AjaxControlToolkit.dll is deployed to the GAC with our farm solution. To do this, we must update the package manifest. In Solution Explorer, expand the Package folder and double-click Package.package. Go to the Advanced tab and click Add, then Add Existing Assembly…
In the Source Path area, navigate to the location of AjaxControlToolkit.dll and ensure GlobalAssemblyCache is selected as the Deployment Target. Press Click here to add a new item. Enter AjaxControlToolkit in the Namespace and Assembly Name areas. When complete, the dialog should look like this:
Deploy your solution. You can verify the AjaxControlToolkit assembly has been deployed to the GAC (C:\Windows\Microsoft.NET\assembly\GAC_MSIL).
Anywhere you would like to leverage the toolkit, ensure you add the following declaration to your page/visual web part user control:
Although the AjaxControlToolkit may be waning in popularity among modern SharePoint developers, it still contains some pretty useful controls (CalendarExtender, ColorPickerExtender, etc.) For any developers who need to update a legacy solution leveraging the AjaxControlToolkit for SharePoint 2013 without the budget or resources to adopt a different approach, know that it can be done without many of the headaches that existed in the past.
As you probably know by now, the following message started appearing on all MSDN pages related to apps for SharePoint in early May (the wording has recently been tweaked; the latest version of the message is shown below):
My initial reaction to this news was something to the effect of, “OK, that’s interesting but no biggie. I’ll just make a mental note to say Add-in now instead of app (oh, and do a global search and replace in all my slide decks)…”
Basically just did a global find and replace from “app” to “Add-in” for my #SPSBMORE slide deck. This is going to be fun to talk through!
The more I thought about it, though, this simple name change was going to pose many challenges for customers and consultants alike. I have been speaking about “apps for SharePoint” for almost three years now and one of the most trivial, yet biggest stumbling blocks seemed to be:
“So when I want to add a custom list to my site, I go to ‘Add an app’ now?”
“Well, yes, but doesn’t that at least make more sense than going to ‘More Options…’?” “I guess. But do I need to configure the app domain and do all that other stuff you talked about just to add a list now?”
“No, you only need to do that if you will be connecting to the Office Store or if your developers will be leveraging the app model.”
It’s already been more than a little awkward as I feel the need to interject whenever someone says something about “apps for SharePoint” or the “SharePoint app model.”
Along with a few other developers and consultants, I shared my concerns about the name change in semi-public discussions on Facebook and Yammer. As a result, Jeremy Thake was kind enough to publish a blog post containing the Office 365 ‘App Model’ rename cheat sheet. This post is fantastic and gives some more background about why the name change was necessary. Jeremy has certainly taken a beating from some of the folks out there who are frustrated, confused, and/or bewildered by the name change, and I applaud his efforts in listening to our concerns and providing this level of information to us.
Having spent the better part of the last three years educating our customers and development teams about the “app model,” we must now update our vocabulary to ensure we are speaking with accuracy and precision about the many facets of custom development for SharePoint and Office 365. The “cheat sheet” is a good start, but it omits at least a few relevant “app-isms” that I have listed below by what I assume will be their new names:
Add-in prefix
Add-in domain
Add-in catalog
The file extension of the generated Add-in package (currently *.app)
Add-in registration and management pages (currently /_layouts/15/AppRegNew.aspx, AppInv.aspx, AppPrincipals.aspx)
Countless other Add-in-related PowerShell cmdlets and APIs (NOTE: word on the street is that the app-related names referenced in the APIs will not be changing)
After three years, there is obviously a great deal of sample code and documentation out there that references the “app model.” The Office 365 PnP repository is no exception:
Started updating “SharePoint App” to “SharePoint Add-In” in PnP repo. 1111 hits for “SharePoint App”. This is going to be a very long day.
People who are willing to invest the time and energy to ensure that documentation and tooling around SharePoint Add-ins is up-to-date with the proper naming should be lauded, as there will no doubt be a great deal of confusion among customers and developers as they figure out what terminology to use and which examples are relevant when searching for accurate, up-to-date information about building SharePoint Add-ins. It appears that folks who are fortunate enough to be under NDA with Microsoft also have a better sense of why this name change was necessary, so let’s hope that information makes its way out to the rest of the community soon so we can answer the inevitable questions from our customers about “Why?” or “What’s the difference between an app and an Add-in?” or “Now where do I go to add a custom list to my site?”
(Yes, you guessed it…to add a custom list to your site, you will soon have to go to “Add an Add-in.”)
What are your thoughts on this change? Let’s keep the discussion going. I will be updating this post as we experience the impact of these changes over time.
I was clearing the dust off an old demo for my session on cloud-hosted apps at SharePointFest DC next month when I ran into a problem. As I walked through the demo (which I had given three times before at SPS Events in Boston, Baltimore, and DC), I was getting an error when testing my ability to query for list data in my cloud-hosted app’s app web in my Office 365 developer tenant using JSOM:Knowing this script had worked for months in the past, I turned to the Internet. Sure enough, others appeared to be experiencing the same problem. One app developer even worked around the problem by abandoning the use of JSOM altogether in favor of the REST APIs.
What’s the problem here?
In a cloud-hosted app, the app’s business logic is deployed to a remote web (separate from its app web, which resides in SharePoint). This remote web is likely on a different domain (and is definitely on a different domain if you are using SharePoint Online). Querying for data that resides in the app web from a script running in your remote web requires the use of cross-domain JavaScript calls, which are generally blocked for security reasons. To work around this requires the use of the JavaScript Cross-Domain Library (sp.requestexecutor.js).
My demo script looked like this:
var clientContext = new SP.ClientContext(appweburl);
var appWeb = clientContext.get_web();

appWebList = appWeb.get_lists().getByTitle(listname);
var camlQuery = new SP.CamlQuery();
camlQuery.set_viewXml("50");
appWebListItems = appWebList.getItems(camlQuery);
clientContext.load(appWebList);
clientContext.load(appWebListItems);
clientContext.executeQueryAsync(onAppWebGetListDataSuccess, onJSOMError);
Once I initialized the ProxyWebRequestExecutorFactory object and set it as the factory of my ClientContext object, everything worked as expected. (NOTE: The script in my demo that queried for data in the host web was already making proper use of the cross-domain library.)
Here is the proper script to initialize the ClientContext and associate the appropriate ProxyWebRequestExecutorFactory with it:
var clientContext = new SP.ClientContext(appweburl);
var factory = new SP.ProxyWebRequestExecutorFactory(appweburl);
clientContext.set_webRequestExecutorFactory(factory);
var appWeb = clientContext.get_web();

// Remaining code is the same as above
Conclusion
I’m not sure exactly what changed that would cause this problem to start occurring. Common sense dictates that the ProxyWebRequestExecutorFactory should be needed for all cross-domain calls, whether they be to the host web or the app web. I’m less concerned about that than why the old code ever worked (that did not make use of it). Nonetheless, if you find yourself in a situation where a script that definitely worked in the past now fails with an “Unexpected response data from server” error when using the JSOM, ensure you are making proper use of the cross-domain library as well.


When the add-in part loads, it uses JavaScript to query the property bag of the host web to see if these settings already exist and if so, prepopulates the values in the form. Once the user has made the necessary changes, clicking Set Values will save the changes back to the property bag (again, using JavaScript).
Although the AjaxControlToolkit may be waning in popularity among modern SharePoint developers, it still contains some pretty useful controls (CalendarExtender, ColorPickerExtender, etc.) For any developers who need to update a legacy solution leveraging the AjaxControlToolkit for SharePoint 2013 without the budget or resources to adopt a different approach, know that it can be done without many of the headaches that existed in the past.
The Note above links to New name for apps for Office and SharePoint.
Knowing this script had worked for months in the past, I turned to the Internet. Sure enough, others appeared to be experiencing the same problem. One app developer even worked around the problem by abandoning the use of JSOM altogether in favor of the REST APIs.