Tagged: SharePoint Framework

Deploy SharePoint Framework client-side web parts to SharePoint 2016 on-premises
Earlier this month, Microsoft released Feature Pack 2 for SharePoint 2016. With this release came the long-awaited introduction of some SharePoint Framework capabilities on-premises, beginning with client-side web parts on classic pages (of course, there are no modern page experiences on-premises…yet).
So what do you need to do to start using client-side web parts on-premises? Follow the steps below!
Download and apply the September 2017 Public Update for SharePoint 2016
Of course it all starts with downloading and applying Feature Pack 2 (also known as the September 2017 Public Update for SharePoint 2016), which can be downloaded here. Once you’ve applied the Feature Pack, verify your configuration database version is 16.0.4588 in Central Administration:
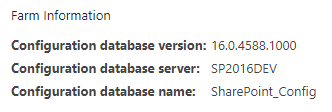
Farm information shown on the Central Administration “Servers in Farm” screen.
Verify the farm configuration for apps/add-ins
If you are already using SharePoint add-ins and have completed the necessary steps to configure your on-premises environment for apps, you can skip this section. Otherwise, there is some infrastructure work that needs to be done before you can leverage the app/add-in model. Since SharePoint Framework packages must be uploaded to an app catalog, your on-premises farm must be configured for apps in order to use the SharePoint Framework. This is true even if you do not intend to leverage the add-in model (although you should definitely should consider it, as SharePoint Framework capabilities are complementary to–and not a wholesale replacement for–the add-in model).
At a high level, the steps you must perform include:
1. Creating the forward lookup zone and CNAME alias in DNS.
2. Configuring the Subscription Settings and App Management service applications.
3. Setting up app URLs in Central Administration.
4. Granting access to the app catalog to user(s) who may install your client-side web parts to a site (this is an important one and is definitely the first place to look if users trying to add them to a site don’t see them on the Add an app screen).
These steps are outlined in further detail here.
Update the Yeoman generator
Assuming you have already configured your SharePoint Framework development environment, ensure your Yeoman generator has been updated to version 1.3.0 or later. You can also develop client-side web parts for SharePoint 2016 on-premises using version 1.0.2 of the generator, but I would highly encourage you to update to the latest version of the generator using this command:
npm i -g @microsoft/generator-sharepoint
Beginning with v1.3.0 of the generator, you are given the option to choose whether your solution needs to support SharePoint 2016 on-premises and/or SharePoint Online:
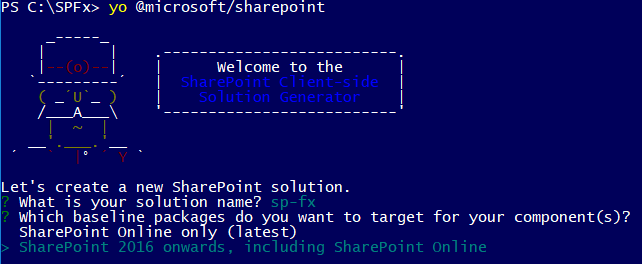
Version 1.3.0 of the Yeoman generator now prompts you to choose between targeting SharePoint on-premises and/or SharePoint Online.
This is important because SharePoint Online will always have support for newer SharePoint Framework capabilities than what will be available on-premises and will therefore target different dependencies within its baseline packages.
Build, package, and deploy the client-side web part
This process is largely the same as developing client-side web parts for SharePoint Online. There is even a live online workbench for local testing available within your on-premises sites at _layouts/15/workbench.aspx (in addition to the local workbench that is always available when you run gulp serve).
Before you build and package your solution, remember to update the cdnBasePath value in config/write-manifests.json to match the location where you intend to deploy your client-side web part’s assets. The files you will need to deploy are one .json and two .js files. NOTE: If you intend to deploy these assets to a SharePoint document library, you may need to remove .json files from the list of blocked file types. This may be done in Central Administration under Manage web applications by selecting Blocked File Types in the ribbon and removing json from the list:
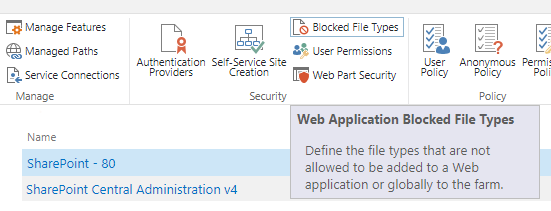
Ensure that json does NOT appear in the list of blocked file type extensions if you intend to deploy your solution’s assets to SharePoint.
After you have deployed your solution’s assets, upload the .sppkg file from the sharepoint/solution directory to your app catalog. This will then make the solution available to install on sites where you wish to add the client-side web part.
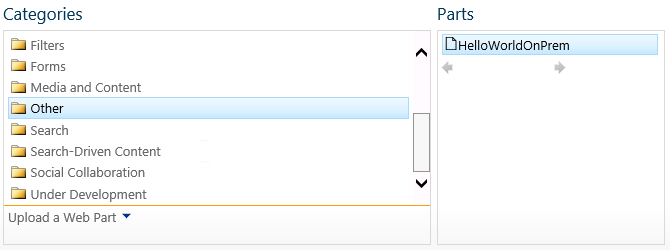
Add the client-side web part to a site
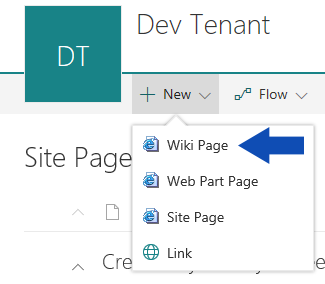
From the Add an app screen, select your solution. You will then be able to add the web part to a page by selecting Web Part from the Insert tab of the ribbon on a wiki or web part page. By default, your client-side web part will appear in the Other category:
SharePoint Framework client-side web parts can be added to the page just like any classic web part.
The web part will then appear on the page.

SharePoint Framework client-side web part added to a SharePoint 2016 on-premises wiki page.
Other notes
– Remember that you cannot add an app to a site when logged in as the System Account. Ensure you are signed in as a different user when adding the app to your site.
– The web part file’s properties, including its group, title, and description, can be changed by updating the [web part name].manifest.json file in the src/webparts/[web part name] directory.
– There will always be some capability gap between SharePoint Online and on-premises. The SharePoint team has committed to merging new SharePoint Framework capabilities into future on-premises releases, but don’t expect to see support for things like SharePoint Framework Extensions on-premises anytime soon.
– There is no on-premises support for tenant/farm-scoped deployment of client-side web parts. You must upload the .sppkg file to your on-premises app catalog(s) and manually add the app on each site where you need to leverage your client-side web part.
– If you have completed all of the appropriate farm configuration to support the add-in model but users don’t see your SharePoint Framework solutions from the Add an app screen, ensure you have explicitly granted those users access to your app catalog.
It is so exciting to have the first set of SharePoint Framework capabilities now available to on-premises users. Happy coding!

Custom modern page header and footer using SharePoint Framework, part 3
This post is part 3 of what is currently a 3 part series of updates to my SharePoint Framework application customizer as the capability has evolved since entering developer preview. I have updated this code a number of times since publishing part 1 back in June. You can follow the history of these updates by reading my earlier posts:
In this post, I will update my custom header and footer SharePoint Framework extension based on the changes required for RC0 (SPFx 1.2.0) as well as to support the new tenant-scoped deployment option for SharePoint Framework solutions.
Release Candidate now available
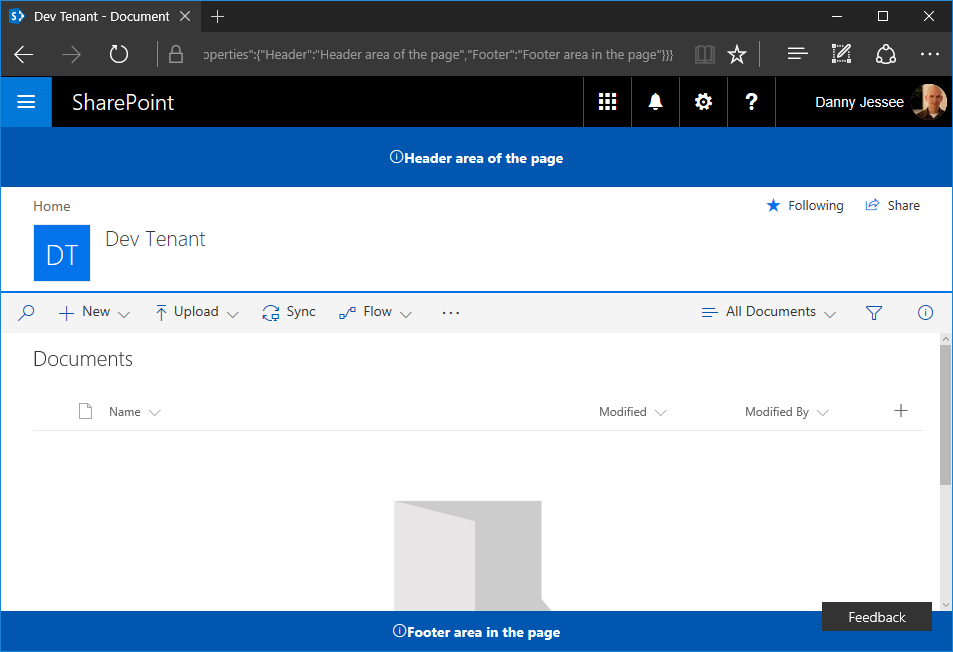
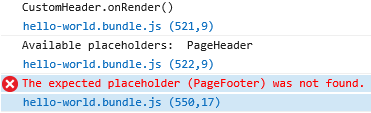
Changes are coming fast in the SharePoint Framework world! Last week, Microsoft announced the Release Candidate (RC0) for SharePoint Framework Extensions with SPFx v1.2.0. A few days prior, I noticed some page placeholder names had changed and my extension’s onRender() method was no longer being called:
Looks like big changes are happening with #SPFx page placeholders this morning! I'm seeing new names (Top, Bottom) on pages in modern sites.
— Danny Jessee (@dannyjessee) August 24, 2017
I noticed my header/footer extension stopped working this morning and saw this in the console. pic.twitter.com/Lfgjgd9eiA
— Danny Jessee (@dannyjessee) August 24, 2017
Still seeing PageHeader and PageFooter on modern page experiences in classic sites but my extension isn't working on them now, either. #SPFx https://t.co/nS4IsrIOt2
— Danny Jessee (@dannyjessee) August 24, 2017
Sure enough, my suspicions were confirmed in this Github issue and just a few short days later we had a new release candidate!
You can read the details about all of the changes in the RC release notes. Here’s a quick summary of what I needed to do to update my extension project:
1. Update package.json to reflect the updated versions of SPFx dependencies and devDependencies. Mikael Svenson has a great write-up of this process in this blog post. I essentially had to change any dependency on 1.1.1 to 1.2.0 instead.
2. Run gulp –upgrade (dash dash upgrade) to update my project’s config.json file.
3. Update my HeaderFooterApplicationCustomizer.ts to do the following:
– Leverage the updated placeholderProvider.
– Use updated placeholder names Top and Bottom as well as new types PlaceholderName and PlaceholderContent.
– Explicitly call onRender() from my onInit() method.
You can examine all the differences in my code changes here.
Update for tenant-scoped deployment
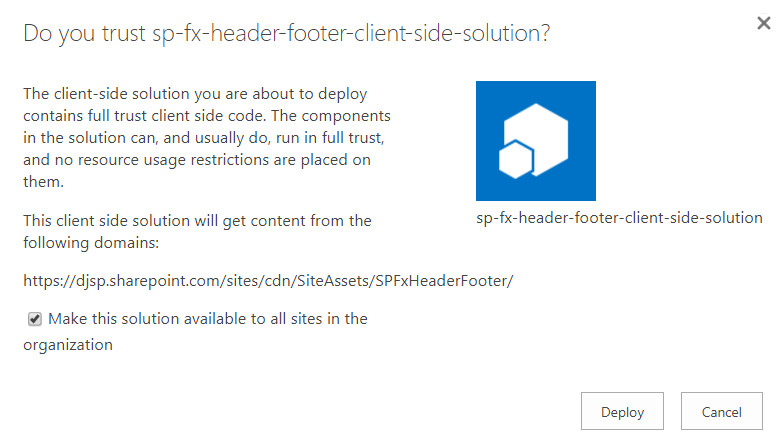
Even before this week’s RC0 announcement, I knew I already had to do some work to update my extension. While I was attending SharePoint Fest Seattle last month, Microsoft announced the ability to perform tenant-scoped deployments for SharePoint Framework parts and extensions. This is a great update that eliminates the need to manually install the “app” associated with my extension on every site. Instead, when deploying the package to my tenant’s app catalog, I can check a box to automatically make the solution available to all sites within my tenant (or “organization”):
To add support for tenant-scoped deployment, I added the following line to my package-solution.json file:
“skipFeatureDeployment”: true
This marks the solution as being eligible for tenant-scoped deployment. Note that I still left the feature definition present in this file. This enables the solution to still be installed on individual sites via Site Contents > Add an app should the tenant administrator decline to perform a tenant-scoped installation.
Adding the user custom action for the extension in a tenant-scoped deployment
If you check the box labeled Make this solution available to all sites in the organization before pressing Deploy, you will need to manually add the user custom action associated with the extension on any site where you would like the custom header and footer to be rendered on modern pages. If you deploy the extension at tenant scope, it is immediately available to all sites and you do not need to explicitly add the app from the Site Contents screen. However, because tenant-scoped extensions cannot leverage the feature framework, you will need to associate the user custom action with the ClientSideComponentId of the extension manually. This can be accomplished a number of different ways. Some example code using the .NET Managed Client Object Model in a console application is shown below:
using (ClientContext ctx = new ClientContext("https://[YOUR TENANT].sharepoint.com"))
{
    SecureString password = new SecureString();
    foreach (char c in "[YOUR PASSWORD]".ToCharArray()) password.AppendChar(c);
    ctx.Credentials = new SharePointOnlineCredentials("[USER]@[YOUR TENANT].onmicrosoft.com", password);

    Web web = ctx.Web;
    UserCustomActionCollection ucaCollection = web.UserCustomActions;
    UserCustomAction uca = ucaCollection.Add();
    uca.Title = "SPFxHeaderFooterApplicationCustomizer";
    // This is the user custom action location for application customizer extensions
    uca.Location = "ClientSideExtension.ApplicationCustomizer";
    // Use the ID from HeaderFooterApplicationCustomizer.manifest.json below
    uca.ClientSideComponentId = new Guid("bbe5f3fa-7326-455d-8573-9f0b2b015ff9");
    uca.Update();

    ctx.Load(web, w => w.UserCustomActions);
    ctx.ExecuteQuery();

    Console.WriteLine("User custom action added to site successfully!");
}
If you decline to check the box to allow tenant-scoped installation when you upload the .sppkg file to the app catalog, the extension will still be available to manually add to any site via Site Contents > Add an app. If you manually add the extension to a site in this way, the user custom action registration will be handled automatically via the feature framework (as it has in the past). No additional code is necessary to register the user custom action in that case.
Version 1.1.4.0 now available!
All of my updated code (RC0 updates and support for tenant-scoped deployment) can be found within my Github repository at:

Custom modern page header and footer using SharePoint Framework, part 2
This post is part 2 of what is currently a 3 part series of updates to my SharePoint Framework application customizer as the capability has evolved since entering developer preview in June. Please see the links to parts 1 and 3 below.
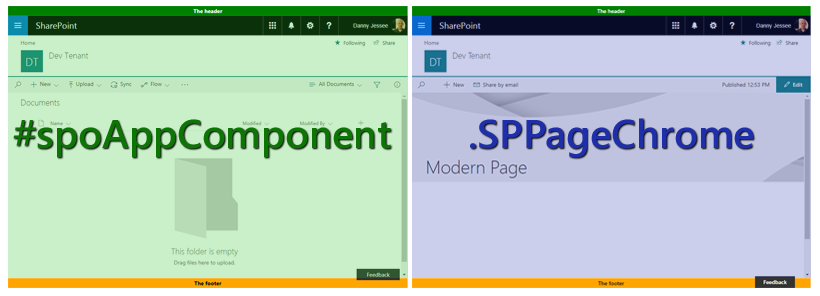
When I first released my custom modern page header and footer using SharePoint Framework in June, there was one significant shortcoming with the built-in page placeholders on modern page experiences that made them impractical to use for a site-wide header and footer solution: modern site pages did not contain a PageFooter placeholder.
When application customizers were initially rolled out, modern site pages did not contain a PageFooter placeholder. Image from June 2017.
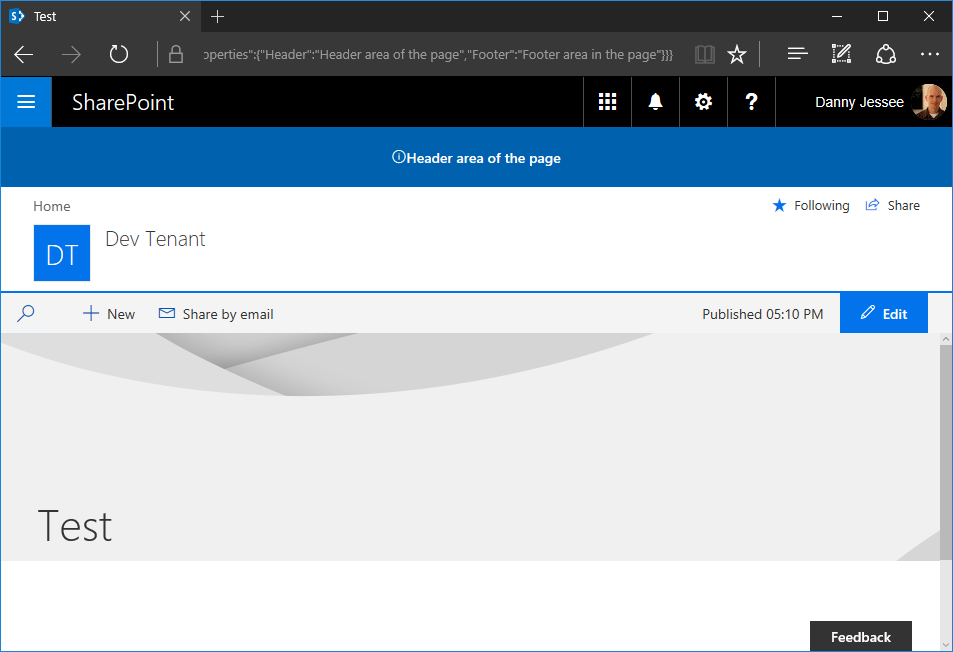
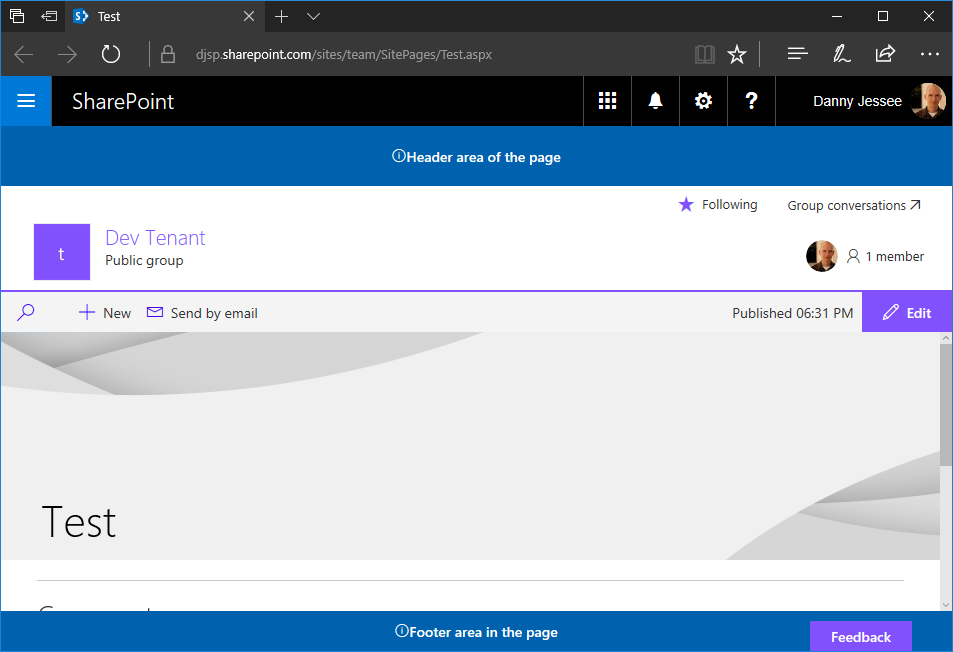
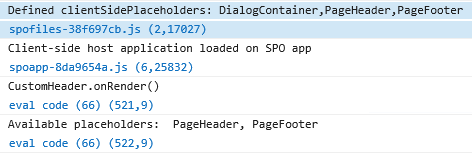
However, on or around August 11th, I noticed that the PageFooter placeholder started appearing on modern site pages. With this change, all modern page experiences now had PageHeader and PageFooter placeholders.
Modern site pages now contain a PageFooter placeholder! Image from August 2017.
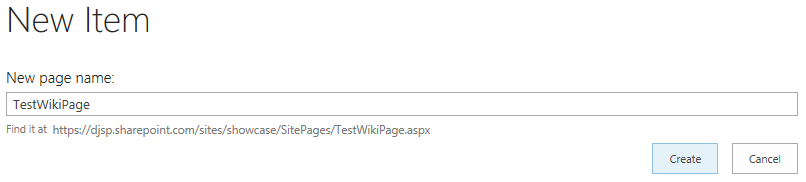
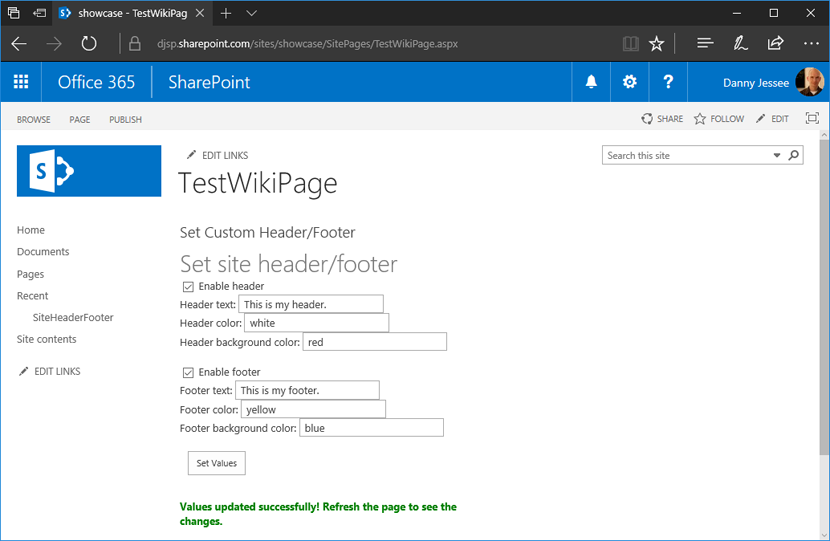
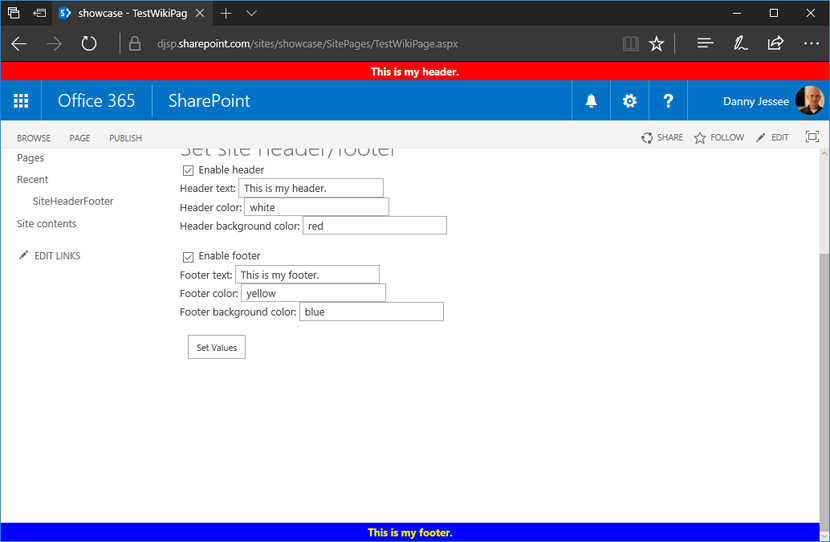
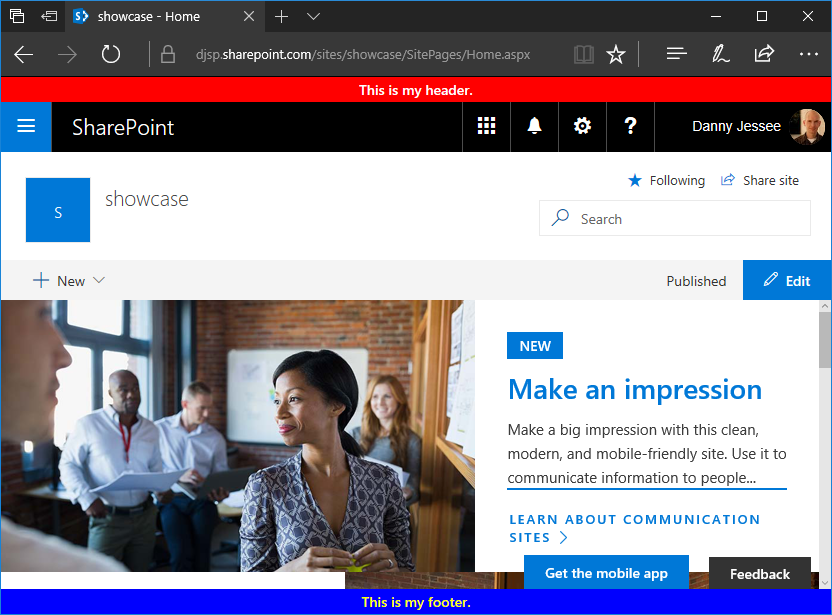
Update to the SharePoint Framework application customizer
My original SPFx application customizer could not make use of the built-in page placeholders because at the time, modern site pages did not contain a PageFooter placeholder. Also, the PageHeader placeholder was located beneath the Office 365 suite bar instead of above it, which is where I had chosen to inject my custom header for classic pages using a SharePoint-hosted add-in. Because of this, I relied on fragile and unsupported DOM manipulation techniques that would break if Microsoft ever changed the class names or IDs of the main page content areas (modern site pages currently use a I decided that having the page header beneath the suite bar was a worthwhile tradeoff to be able to leverage the built-in page placeholders and eliminate all of the ugly DOM manipulation I was previously doing. The updated code can be found in the HeaderFooterApplicationCustomizer.ts file contained within my Github repository at: https://github.com/dannyjessee/SPFxHeaderFooter Update to the SharePoint-hosted add-in Since I decided to leverage the built-in PageHeader placeholder on modern pages beneath the suite bar, for the sake of consistency I also updated my SharePoint-hosted add-in to provide the option to inject the custom header in the same location on classic pages: My SharePoint-hosted add-in now offers the ability to select whether to render the header above or below the suite bar. Code for the updated SharePoint-hosted add-in may be found on Github at the following location: https://github.com/dannyjessee/SiteHeaderFooter Note that you must disable NoScript (if it is enabled) in order to install and utilize this add-in. For more information about NoScript and how to disable it, check out my post on NoScript and modern sites. Putting it all together With the SharePoint-hosted add-in and SharePoint Framework application customizer both installed on the same site, you can render a custom header and footer consistently across all classic and modern page experiences within that site. Custom header and footer rendered on a classic page experience within a communication site using a SharePoint-hosted add-in. Custom header and footer rendered on a modern page experience within a communication site using a SharePoint Framework application customizer and page placeholders. In just a few short weeks (August 8-11), I will be joining SharePoint experts from around the world at SharePoint Fest Seattle 2017! I am very excited to be debuting a new session that will take a lighthearted, but detailed look at how to attempt to achieve consistency when branding the mix of classic and modern page experiences within SharePoint Online sites, modern team sites, and recently unveiled communication sites using the SharePoint Framework along with techniques from the SharePoint add-in model: DEV 206 – Apply Consistent UI Customizations Across Classic and Modern Pages in SharePoint Online SharePoint Online sites are currently made up of a hodgepodge of classic and modern page experiences. A site’s home page is a classic page while the site contents page is a modern page. Page experiences may vary between pages, lists, and libraries as users navigate a site. Although the SharePoint Framework allows you to build client-side web parts to customize both classic and modern pages, a combination of the add-in model and SharePoint Framework application customizers must be used to embed JavaScript-based UI customizations across both page types. In this demo-intensive session, you will learn how to brand a SharePoint Online site with a customizable page header and footer that looks identical across classic and modern pages. If you register now and use code JesseeSeattle100 at checkout, you can save $100! My session is Friday, August 11th at 3:30 in Breakout 8. This will be my fourth SharePoint Fest and my second SharePoint Fest Seattle. I look forward to seeing you there! Although the title of this post indicates the particular objective I achieved, this post walks through the steps that are necessary for any scenario that requires you to have access to the classic page experience on a communication site or modern team site in SharePoint Online. In my case, the reason for this is to leverage a “legacy” app part on a classic wiki page that allows users to configure settings for a custom page header and footer. Unlike “classic” SharePoint Online sites, communication sites and modern team sites do not give you the ability to create a new wiki page in the Site Pages library that allows you to add “legacy” web parts. SharePoint Framework client-side web parts are the only custom web parts supported on modern page experiences. Microsoft didn’t necessarily make it “easy” to do all of this, but it is possible and the process is simple if you follow the steps below. Step 1 (modern team sites only): Disable NoScript This step is required because my app part uses custom script to access and manipulate values stored in the site property bag. In this post, I explain the differences between modern team sites and communication sites when it comes to the default NoScript setting and show how you can query a site’s NoScript status and change it if necessary. Because communication sites are not NoScript sites (apologies for the double negative), you do not need to perform this step on them. Step 2: Install the SharePoint-hosted add-in My SharePoint-hosted add-in surfaces an app part that reads configuration settings for the custom header and footer from the site property bag and allows users to update them. I built the .app package for the add-in and deployed it to my tenant’s app catalog site. This made it available to install in my communication site and modern team site: After installing my SharePoint-hosted add-in’s SiteHeaderFooter.app file and my SharePoint Framework Application Customizer Extension’s sp-fx-header-footer.sppkg file to my tenant’s app catalog site, both are available to install on my new communication site. We will install the SharePoint Framework Application Customizer Extension in step 4 below. Notice how the addanapp.aspx page retains the “classic” page experience. This was my first clue that it would still be possible to unlock other classic page experiences–such as a classic wiki page–within these modern sites. Step 3: Create the classic wiki page and add the “legacy” app part If you navigate to the Site Pages library in a “classic” site, you will see the option to create a new Wiki Page within that library: The Site Pages library within “classic” sites still allows you to create Wiki Pages with the classic page experience. However, if you navigate to the Site Pages library in a communication site or modern team site, this option does not exist: The Site Pages libraries within communication sites and modern team sites do not expose the option to create new Wiki Pages. How can we add a new wiki page to the Site Pages library if the option isn’t there? By clicking the “Return to classic SharePoint” link that appears in the lower left corner of the screen: There is much to be said about what happens when you click that link, but for our purposes it does exactly what we need (at least for the duration of our session). When viewing the same Site Pages library returned to the classic page experience, clicking the New link now prompts you for a new page name: Specifying the page name and pressing Create gives us a new “classic” wiki page to which we can add the app part from the SharePoint-hosted add-in. Once that is done, I can configure the custom header and footer parameters and press Set Values: Refreshing the page will display the header and footer, since this is a classic page experience that supports the user custom actions used by the add-in to embed the JavaScript responsible for rendering the header and footer: Installing and configuring the SharePoint-hosted add-in handles the rendering of the header and footer on all classic page experiences within a site. However, the site home page will still not display the header and footer because modern page experiences do not support user custom actions. That’s where the SharePoint Framework Application Customizer Extension comes into play. Step 4: Install the SharePoint Framework Application Customizer Extension Return to the addanapp.aspx page we visited earlier when installing the SharePoint-hosted add-in to our site. This time, choose to add the sp-fx-header-footer-client-side-solution. You can read all about this SharePoint Framework Application Customizer Extension and how it works in this blog post. This will activate the associated site-scoped feature that renders the header and footer on modern page experiences. You can confirm this by going to Site Settings and ensuring the SPFx HeaderFooter Application Extension – Deployment of custom action feature is Active: When this feature is Active, the JavaScript associated with our SharePoint Framework Application Customizer Extension will execute on all modern page experiences. Step 5: Enjoy the results Below you can see my custom header and footer applied on both a new communication site and a modern team site: Custom header and footer rendered on a communication site. Custom header and footer rendered on a modern team site where I followed the same steps performed on the communication site in the steps above. Key takeaways – By returning to classic SharePoint, it is still possible to add new wiki pages to the Site Pages library in communication sites and modern team sites in SharePoint Online (where the option to create them is not shown by default). The original post from July 1, 2017 appears below. Earlier this month, Microsoft launched the developer preview of SharePoint Framework Extensions. I examined the available page placeholders on modern list and library pages, the modern Site Contents page, and modern site pages in this blog post. With the rollout of SharePoint communication sites now underway, I thought I would take this opportunity to confirm the available page placeholders on each of the three new communication site designs: – Topic Communication sites are based on the SITEPAGEPUBLISHING#0 template and feature a new responsive modern site page for the site home page. Based on my previous research, it came as no surprise that all three modern communication site page designs contain the PageHeader placeholder but not the PageFooter placeholder. Below are screenshots of all three communication site designs in Edge and the SharePoint mobile app, reflecting the custom content rendered in the PageHeader placeholder after deploying the SharePoint Framework Hello World Application Customizer Extension. Topic Showcase Blank (8/13/2017) NOTE: All three communication site designs–as well as all modern site pages in general–now also contain the PageFooter placeholder. What if I also need a custom footer on these modern communication site pages? I recently implemented a custom header and footer SharePoint Framework Application Customizer Extension that was based on a custom header and footer SharePoint-hosted add-in I developed back in 2015. This particular extension works great on the modern page experiences within my “classic” SharePoint Online site because I am able to leverage the SharePoint-hosted add-in part (on a classic wiki page) that maintains the custom header and footer configuration parameters in the site property bag. In my next post, I will show you how to create a classic wiki page in a modern communication site (unlike in classic sites, you can’t just go to New > Wiki Page in the Site Pages library) to leverage the SharePoint-hosted add-in part to configure the custom header and footer configuration parameters in the site property bag. My SharePoint Framework Application Customizer Extension will then read these values from the property bag and render the custom header and footer. As an added bonus, I will also show you the extra step necessary to accomplish this on a modern team site, a so-called “NoScript site” that does not allow custom script to access the site property bag by default. This post is part 1 of what is currently a 3 part series of updates to my SharePoint Framework application customizer as the capability has evolved since entering developer preview in June. Please see the links to parts 2 and 3 below. Back in 2015, I published a post on this blog detailing the steps for implementing a custom site header and footer using a SharePoint-hosted add-in. The add-in contained: 1. An add-in part that provides an interface to configure the text and colors associated with the custom header and footer, storing the necessary values in the property bag of the site. 2. Custom JavaScript that is embedded on every (classic) page through the use of user custom actions that reads the values set by the add-in part from the property bag and renders the header and footer on each page. An add-in part is used to display and update the site header and footer configuration information, which is stored in the site property bag. User custom actions are then used to embed the JavaScript that reads this information and renders the header and footer on all (classic) pages within a site. Issues with current add-in solution While the add-in solution from that blog post worked great in SharePoint Online in 2015 (and still works great for SharePoint Online classic pages and SharePoint 2013/2016 on-premises today), SharePoint Online has evolved somewhat over the past two years. Since late 2016, Microsoft has been rolling out new modern page experiences across SharePoint Online. These include new modern team site pages as well as list and library view pages. The technique I used for embedding custom JavaScript on every page–namely, user custom actions–are not supported on modern pages. Therefore, even with the add-in deployed and configured you will not see a header or footer on any modern page. So how are we supposed to customize them? Enter SharePoint Framework The SharePoint Framework gives us a new way to deploy JavaScript-based customizations to SharePoint. These include web parts (for both classic and modern pages) and now Extensions such as Application Customizers that allow you to embed JavaScript on modern pages. To extend the functionality of my SharePoint-hosted add-in to modern pages using the SharePoint Framework, I created a new SharePoint client-side solution containing an application customizer extension to handle the rendering of the header and footer on all modern pages, reading the same configuration values from the site property bag that are set by the add-in part from my original SharePoint-hosted add-in. Modern pages contain useful placeholders When creating the original add-in, I had to do some manipulation of the DOM to insert the To that end, SharePoint Framework Extensions now give us access to page placeholders representing well-known locations on the page where we can more reliably inject our customizations. These include PageHeader and PageFooter. Awesome, right? Unfortunately, in my initial experiments with page placeholders, I identified some shortcomings that would prevent me from building a complete modern page header/footer solution that leverages them. Most notably, modern site pages do not contain the PageFooter placeholder at all. Also, since my current solution renders the header at the very top of the page, I wasn’t a fan of the PageHeader placeholder location beneath the #suiteBarTop SharePoint Framework page placeholders render the PageHeader below the suiteBarTop Approach NOTE: This approach still relies on DOM manipulation and is a fragile and unsupported way to make user interface customizations to modern pages because of dependencies on page elements with specific IDs and CSS classes. In your solutions, please make every effort to leverage the supported page placeholders if possible. With these limitations in mind and for the sake of a consistent look and feel across all pages (both classic and modern), I decided to stick with my jQuery-based approach of using .insertBefore() and .insertAfter() to inject my custom header and footer at the top and bottom of the page. While investigating the DOM on modern pages to determine where I would need to inject my header and footer, I realized that not all modern pages are created alike. Perhaps this is part of the reason why modern site pages do not contain a PageFooter placeholder… The Page content areas on a modern list/library view page (left) and a modern site page (right) with the custom header and footer injected around them. In my code, you will see that I test for the existence of #spoAppComponent on the page. If it exists, I know I’m on a modern list or library view page and I inject the custom header and footer around that Building the Application Customizer I followed the step-by-step instructions from the four-part Office Dev Center article series Build your first extension to generate, build, and deploy my application customizer. The following notes may be useful to you: – If you have already installed a previous version of Microsoft’s Yeoman SharePoint Client-side Solution Generator, you will need to update it by running npm update -g @microsoft/generator-sharepoint. The current version of the generator (as of the publishing of this post) is now 1.1.1. – If you haven’t updated your SharePoint Framework development environment in awhile, you may want to run npm update -g to ensure the rest of your global packages are up-to-date as well. – I added jQuery (npm install –save jquery) and sp-pnp-js (npm install –save sp-pnp-js) to my project and used the PnP JavaScript Core library to simplify the API query for the header and footer configuration values from the site property bag. – Since I didn’t make use of any ClientSideComponentProperties, I removed that attribute from my ./sharepoint/assets/elements.xml file. – If you download this code, you will need to update the CDN URL in the ./config/write-manifests.json file to match the location where you deploy the assets from the ./temp/deploy folder in your environment. More information about working with the Office 365 CDN may be found here. – Remember that you must upload the .sppkg file from the ./sharepoint/solution folder to your tenant’s app catalog site, then add the associated app on your site. This will provision and activate the feature that deploys the application customizer to your site. The code My code is posted to GitHub at the following location: https://github.com/dannyjessee/SPFxHeaderFooter I encourage you to download it, try it out in your environment, and let me know if you run into any issues with it. Please keep the following things in mind: – You must also install the SharePoint-hosted add-in located here in order to configure the header and footer property bag values and render them on classic pages. – Although the above dependency on my SharePoint-hosted add-in currently exists, it should be possible to move all of these capabilities into a SharePoint Framework solution (i.e., by building a client-side web part to read and write the property bag configuration values and apply the user custom actions to classic pages within the site using the REST API, JSOM, or the PnP JavaScript Core library). Stay tuned! This is a very exciting time to be doing modern SharePoint development. SharePoint Framework extensions reached GA in September 2017 and even more new capabilities and options for modern SharePoint customizations are still in the pipeline. Keep an eye on the SharePoint Framework wiki for more announcements and updates! The original post from June 9, 2017 appears below. We finally received some much anticipated news this week: SharePoint Framework Extensions are now available in developer preview! For a full overview of the new capabilities that are now available in your Office 365 developer tenant, I encourage you to read through the official documentation and labs here. As someone who developed a SharePoint-hosted add-in a couple years ago that renders a custom site header and footer on every page, I was especially excited to begin playing with the new page placeholders that were available to use within Application Customizer Extensions. According to the definition of an Application Customizer Extension, they “allow developers to add script to the page, as well as access well-known HTML element placeholders and extend them with custom renderings.” The sample walkthrough shows how to render a custom header and footer using placeholders on a modern list view page. Once you have updated your SharePoint Framework packages (in particular the Yeoman generator for SharePoint, which is now version 1.1.1 as of June 8) and scaffolded your first Application Customizer Extension, you can follow the steps in the walkthrough and see how to inject custom HTML into these page placeholders without too much effort. I was curious to see which placeholders are available–namely if there were any others besides PageHeader and PageFooter, the two used in the sample walkthrough–and how they would look. I tested the walkthrough code on each of the modern page experiences: For experiences 1-3, I saw the same results in my console: The “defined” clientSidePlaceholders were: After the onRender() method was called, the “available” placeholders were: Consequently, the header and footer rendered properly on each of these page types as shown in the walkthrough (modern library view shown below, the others looked exactly the same): However, for a modern page in the SitePages library, my console showed something a little different: For whatever reason, modern site pages do not appear to contain a PageFooter placeholder. As you can see, only the PageHeader rendered on this page: (8/13/2017) NOTE: All modern site pages now also contain the PageFooter placeholder. This may be intentional and by design or it may be subject to change in the future. There will no doubt be many updates, fixes, and enhancements to page placeholders, Application Customizer Extensions, and the SharePoint Framework in general over the weeks and months ahead. Going back to my blog post from 2015, the advent of modern page experiences in SharePoint Online has produced some new challenges to overcome if your objective is to apply a custom header and footer across all pages in a SharePoint Online site as things stand today: The story here will no doubt evolve and improve as time goes on and I will continue to post updates as these changes take place. In the meantime, I encourage you to follow this frequently updated guidance on how to customize the modern experiences in SharePoint Online and keep a close eye on the official SharePoint Framework documentation. Over a year ago, Microsoft first announced the SharePoint Framework (SPFx) at the Future of SharePoint event. Accompanying the introduction was this blog post describing the SharePoint Framework as “an open and connected platform” that represents the next step in a natural evolution toward client-side development and customization on top of SharePoint. The SharePoint Framework allows developers to use modern web paradigms and JavaScript frameworks and moves away from the more Microsoft-specific legacy server-side customizations of the past. The SharePoint Framework finally reached GA in February 2017 and is currently available in SharePoint Online. SharePoint Framework support will be available to SharePoint 2016 on-premises users with the release of Feature Pack 2 later this year. Getting started with the new developer toolchain Perhaps the largest barrier to entry when it comes to getting started with development using the SharePoint Framework is the new developer toolchain, which bears very little resemblance to any SharePoint development tools you may have used in the past. Gone are the days of just cracking open Visual Studio to build a SharePoint solution (although Eric Shupps has just announced the SharePoint Framework Extension for Visual Studio, so definitely check that out if you want to continue leveraging Visual Studio as part of your development workflow). In exchange for the added complexity introduced by this new toolchain we get a set of modern, open-source, cross-platform tools and technologies that finally levels the playing field between SharePoint development and modern web development (try leveraging React or Angular in a Script Editor Web Part!) and opens the door for developers on Linux and Mac OS to build SharePoint customizations. It also eliminates the need for a local SharePoint farm on the developer workstation for on-premises development. Moving forward, the SharePoint Framework is your only option for building custom web parts that can be added to the new modern page experiences. Even if you decide to leverage the SharePoint Framework Extension for Visual Studio, you will still need to install–and have a basic understanding of–all of the prerequisite tools and technologies that comprise this developer toolchain, which include: Feeling overwhelmed? I recently published a Pluralsight course that contains short, easy-to-digest modules and demos, each introducing a different item in the toolchain: Tooling up for SharePoint Framework. The course is geared toward “newbies” with little to no prior experience using any of these new tools and technologies. If you follow along with the course, within about an hour you will be able to stand up a new, fully-configured SharePoint Framework development workstation and create, build, and test your first client-side web part. The clip below is a demo from the course showing how to use the Workbench that is included with the SharePoint Framework to test customizations locally without having to deploy anything to SharePoint (another advantage over “legacy” SharePoint development). What the future holds Client-side web parts are the first of what will ultimately be many types of JavaScript customizations supported by the SharePoint Framework. According to this blog post from the Office Team, we can expect to see support for the following customizations coming to the SharePoint Framework soon: Finally: SPFx vs. the Add-in Model As the SharePoint Framework continues to evolve and mature, you may encounter scenarios where you cannot use it to achieve a particular objective. In these cases (and many other cases, such as those where server-side code is still necessary), the Add-in model is still viable and fully supported. Microsoft intends for the SharePoint Framework to be complementary to the Add-in model, not a replacement for it. If you’re interested in learning more about updating your legacy SharePoint customizations to take advantage of the Add-in model, please check out my blog post and Pluralsight course.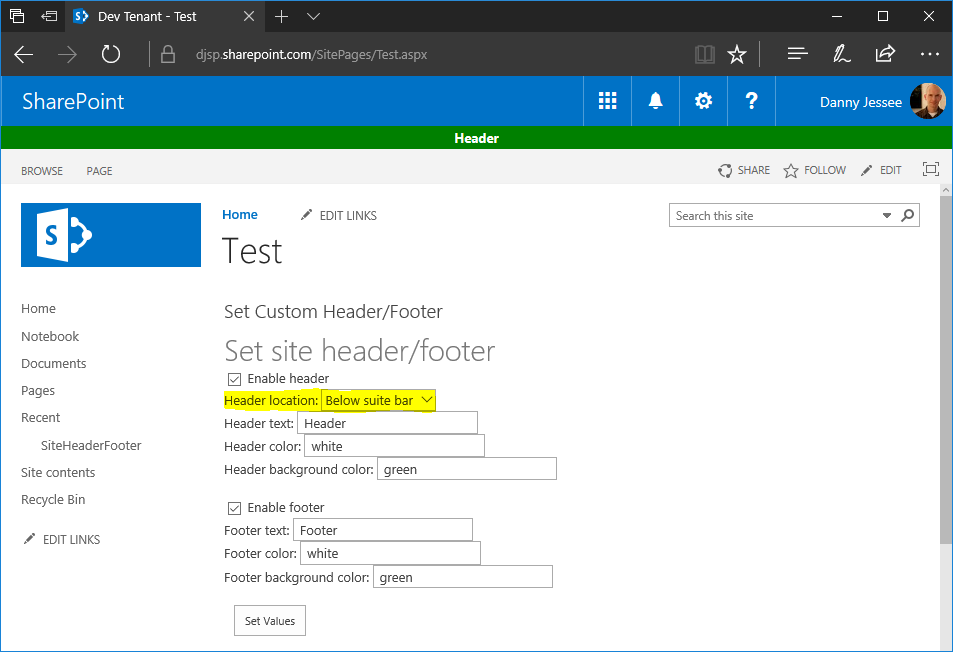

Speaking at SharePoint Fest Seattle 2017!

Applying a custom header and footer on communication sites and modern team sites
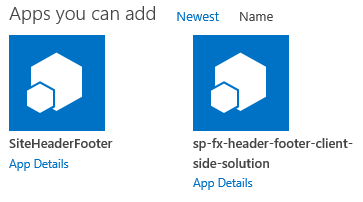
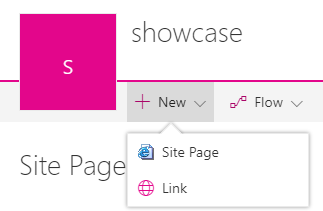


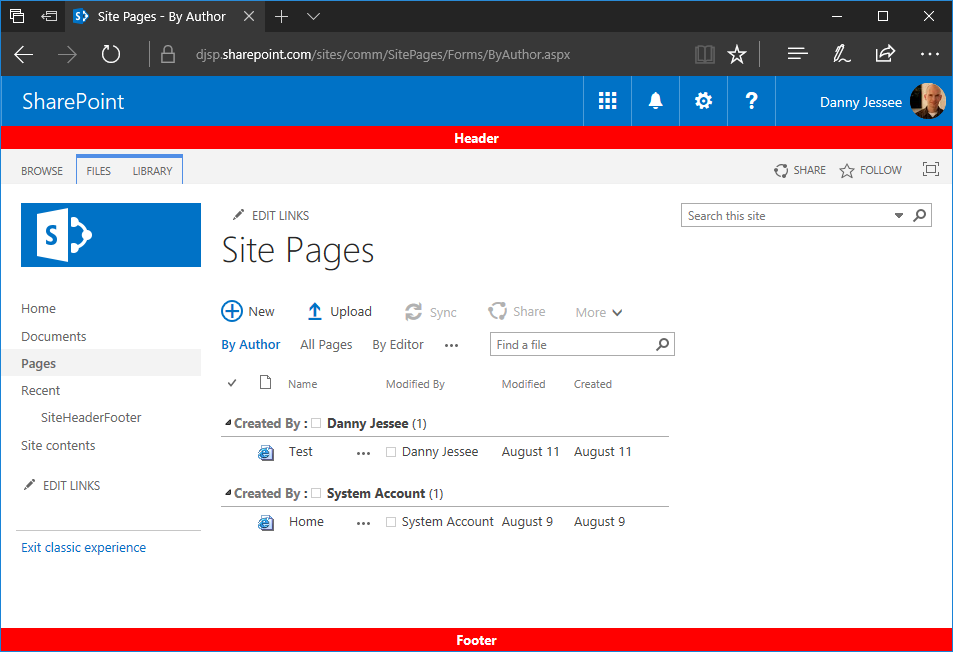
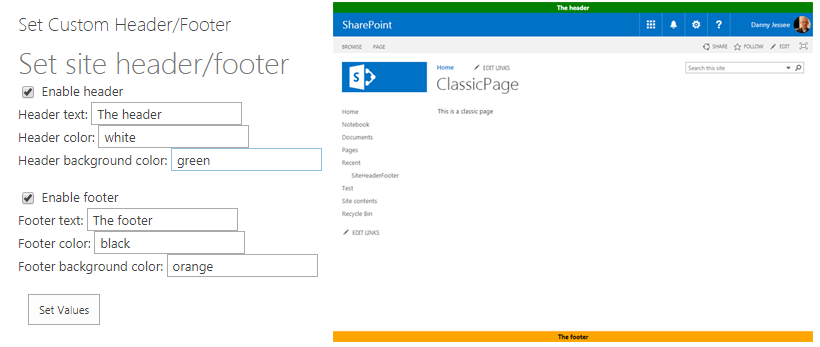
– Restoring this classic page experience to modern sites allows you to leverage “legacy” app parts that were built using the add-in model without having to rebuild the functionality using a SharePoint Framework client-side web part (NOTE: this is probably something you will still want to do in most cases).
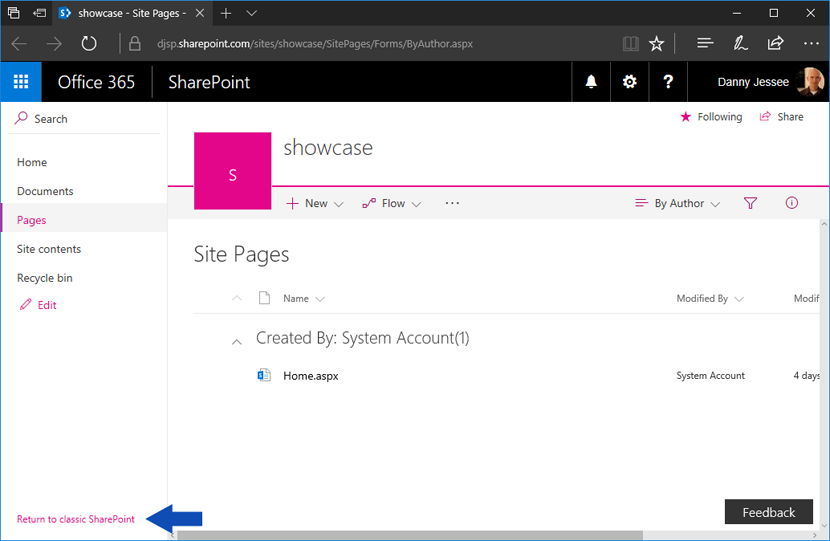
– Even when your “Return to classic SharePoint” session cookie expires, your classic wiki page will remain in the Site Pages library and is still completely accessible.
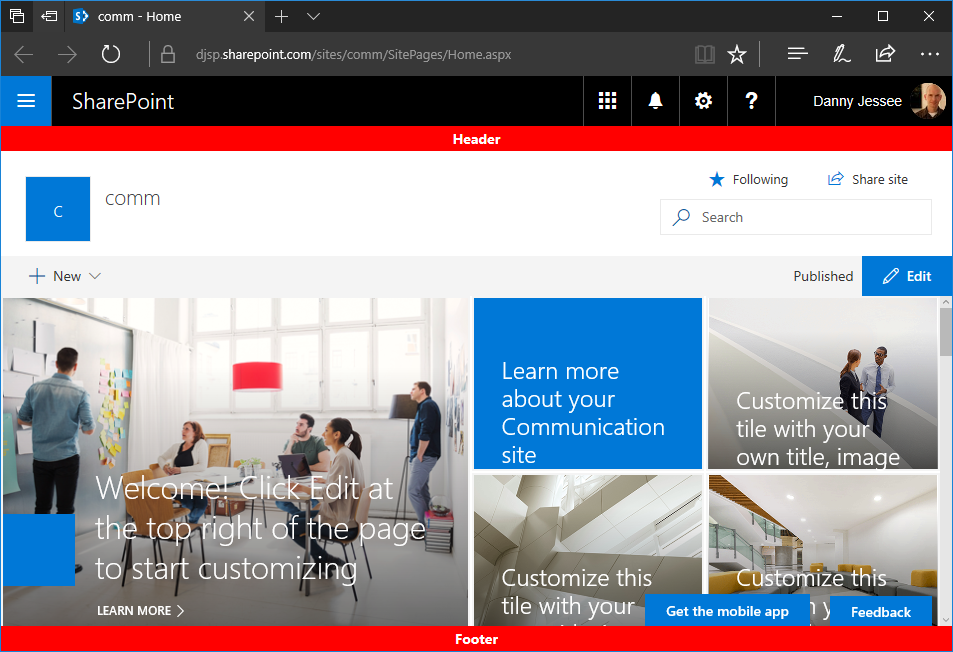
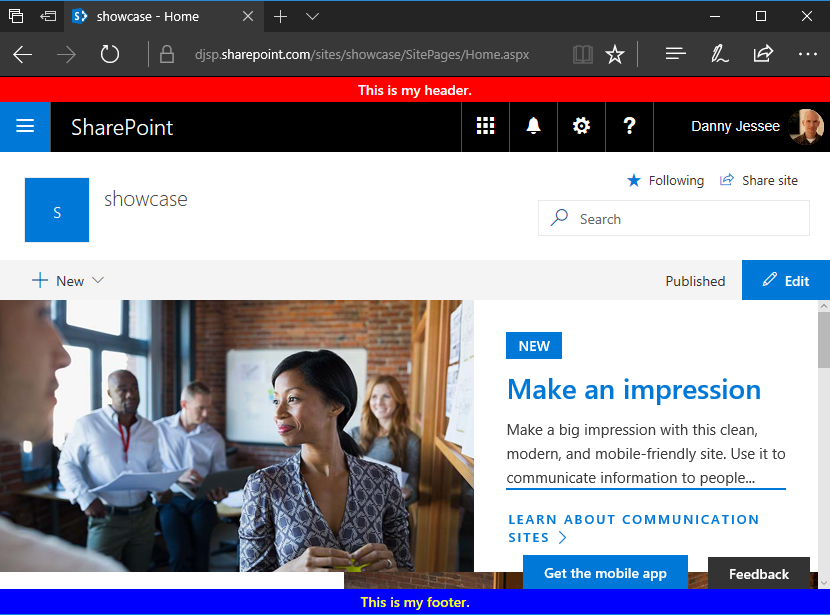
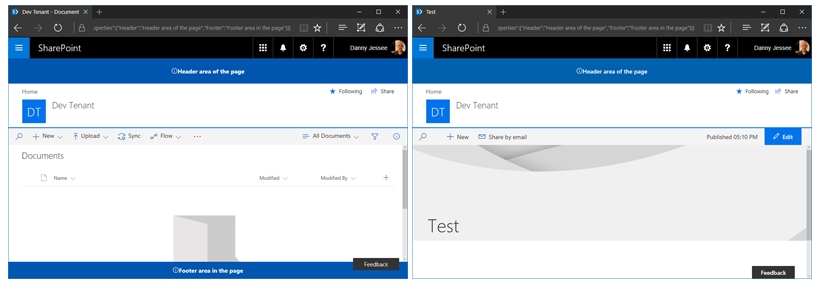
– Applying branding such as a custom header and footer to modern sites–especially those that contain a combination of classic and modern page experiences–will require a multifaceted approach that may include capabilities from the SharePoint add-in model as well as SharePoint Framework.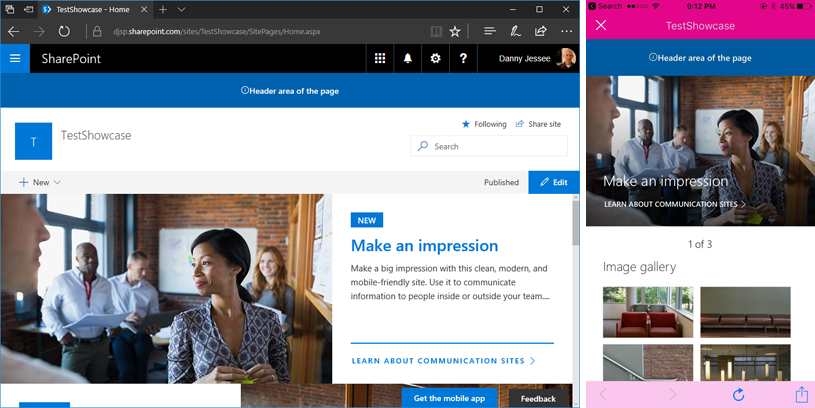
SharePoint Framework page placeholders on new communication sites
UPDATE 8/13/2017: As of August 11, 2017, all modern site pages also contain the PageFooter placeholder.
– Showcase
– Blank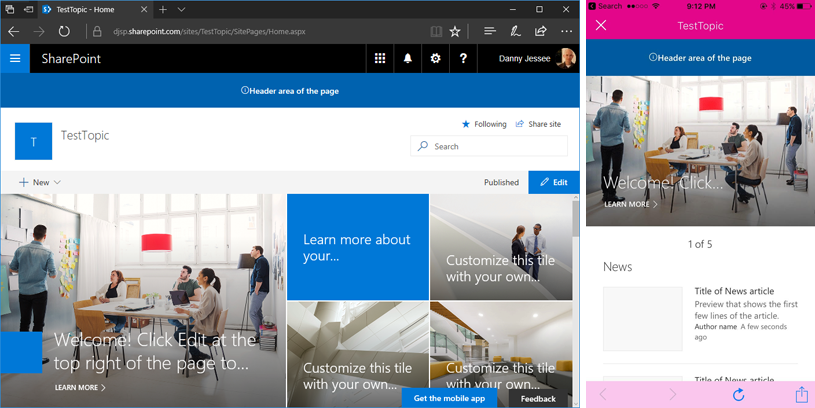

![]()

Custom modern page header and footer using SharePoint Framework

An early look at the new SharePoint Framework page placeholders
UPDATE 8/13/2017: As of August 11, 2017, all modern site pages also contain the PageFooter placeholder.

Tooling up for SharePoint Framework
Tool
Purpose
Node.js (LTS version)
JavaScript runtime; most of the other tools in the toolchain are built on Node.js
npm
Package and dependency management
Yeoman
Scaffolding engine for new projects
TypeScript
Typed superset of JavaScript; transpiles to plain JavaScript
Gulp
Extensible build task runner
My Pluralsight course