Tagged: Add-in model

Speaking at SharePoint Fest Seattle 2017!
In just a few short weeks (August 8-11), I will be joining SharePoint experts from around the world at SharePoint Fest Seattle 2017! I am very excited to be debuting a new session that will take a lighthearted, but detailed look at how to attempt to achieve consistency when branding the mix of classic and modern page experiences within SharePoint Online sites, modern team sites, and recently unveiled communication sites using the SharePoint Framework along with techniques from the SharePoint add-in model:
DEV 206 – Apply Consistent UI Customizations Across Classic and Modern Pages in SharePoint Online
SharePoint Online sites are currently made up of a hodgepodge of classic and modern page experiences. A site’s home page is a classic page while the site contents page is a modern page. Page experiences may vary between pages, lists, and libraries as users navigate a site.
Although the SharePoint Framework allows you to build client-side web parts to customize both classic and modern pages, a combination of the add-in model and SharePoint Framework application customizers must be used to embed JavaScript-based UI customizations across both page types.
In this demo-intensive session, you will learn how to brand a SharePoint Online site with a customizable page header and footer that looks identical across classic and modern pages.
If you register now and use code JesseeSeattle100 at checkout, you can save $100!

My session is Friday, August 11th at 3:30 in Breakout 8. This will be my fourth SharePoint Fest and my second SharePoint Fest Seattle. I look forward to seeing you there!
Updating Legacy SharePoint Customizations to the Add-in Model
If you follow this blog, you have probably read many of my posts through the years dedicated to the Add-in (formerly app) model for SharePoint 2013, 2016, and SharePoint Online. Microsoft introduced the Add-in model in SharePoint 2013 to address the various shortcomings associated with running custom code on the SharePoint server — most notably, of course, that custom code cannot be deployed to SharePoint Online in Office 365. SharePoint-hosted Add-ins are great for simple functionality that can be achieved with 100% client-side solutions (HTML, CSS, and JavaScript), while provider-hosted Add-ins allow you to run custom server-side code in Azure or anywhere other than the SharePoint server.
Using the Add-in model is a no-brainer for most new development efforts, especially if you are developing for SharePoint Online and still need to write server-side code. (At the time of this writing, the new SharePoint Framework is still in Developer Preview but is definitely worth adding to your repertoire for client-side SharePoint development in the years to come!)
But what about your existing solutions? Many organizations using SharePoint maintain large portfolios of custom code solutions that leverage different legacy development approaches advocated by Microsoft through the years, and most of the custom code developed for earlier versions of SharePoint cannot be directly migrated to the cloud. If your organization decided to move to the cloud tomorrow, where would you begin?
Taking inventory of your customizations
I have found that most legacy SharePoint customizations can be placed into the following categories:
- User interface enhancements (master page, branding, themes, custom web parts)
- Declarative items (XML for custom site columns, list instances, and content types)
- Timer jobs (and other administrative extensions to the platform) running in SharePoint Central Administration on-premises
These customizations may take the form of farm or sandboxed solutions that depend on SharePoint’s legacy feature framework. In the case of some user interface customizations, custom HTML markup, CSS, or even JavaScript might be embedded directly within a site’s master page file. For the most part, these are situations we should try to avoid as much as possible when migrating our customizations to the cloud for the following reasons:
- Farm solutions cannot be deployed to SharePoint Online.
- Sandboxed solutions that contain managed code can no longer be deployed to SharePoint Online (note that sandboxed solutions contain a managed code assembly by default, even if the solution does not contain any managed code).
- Custom master pages, while still supported in SharePoint Online, should be avoided unless absolutely necessary. (Microsoft has a history of making significant changes to the default master page in SharePoint Online, such as the addition of the app launcher/waffle/Hollywood Squares in the upper left corner. Sites with heavily customized master pages may not always have access to these changes as they are introduced in the future.)
The role of the Add-in model
When migrating these customizations, keep in mind that you will not necessarily be building and deploying a SharePoint Add-in to replace each customization. In fact, in many cases, you will simply be leveraging techniques from the Add-in model. These include paradigms that were introduced and/or popularized with the introduction of the Add-in model:
- Using client-side script wherever possible
- Remote provisioning of assets (everything from CSS/JavaScript files to site columns, content types, etc.) using the .NET Managed client object model (CSOM) or PowerShell
- Running server-side code outside the SharePoint server that communicates with SharePoint via its APIs
In some cases, all you may need to do is build and deploy a “throwaway” provider-hosted Add-in within a local development environment that performs some one-time remote provisioning tasks, but is not intended to be accessed by end users and can be removed after its work is done.
Add-in model techniques enable us to make our SharePoint customizations with a “lighter touch.” By lighter touch, I am referring to a lighter footprint and/or impact on the SharePoint server. As we decrease the burden on the SharePoint server, we enable SharePoint to run more reliably and efficiently while also making it easier to administer and upgrade (at least on-premises…yes, these techniques all work on-prem as well!) To better explain this concept, I put together the table below contrasting legacy SharePoint development approaches with their modern lighter touch equivalents:
| Legacy Approach | Lighter Touch |
|---|---|
| Farm solutions with custom code running in the SharePoint IIS worker process | Provider-hosted Add-in with custom code running outside of SharePoint |
| Farm or sandboxed solutions that deploy declarative artifacts such as site columns, content types, and list instances | Remote provisioning these artifacts from a provider-hosted Add-in using CSOM |
| Custom master pages with embedded markup, styles, and script | Remote provisioning of branding assets, embedding of JavaScript UI customizations using ScriptLink custom actions |
| Custom timer jobs running in Central Administration using the SharePoint server object model | Remote timer jobs running as Windows scheduled tasks or Azure WebJobs using CSOM |
SharePoint Developer PnP: here to help!
Because the Add-in model represents such a strong departure from the way things were done in the past with full-trust code in SharePoint, Microsoft started the SharePoint Developer Patterns and Practices (or PnP) initiative to assist developers with transforming their existing solutions to be cloud-ready as they migrate to SharePoint Online in Office 365.
The PnP team maintains several Github repositories that include reusable, production-ready components, templates, and solution starters that demonstrate the preferred modern approach to SharePoint development — making customizations with a lighter touch wherever possible.
Eric Overfield just published a great blog post detailing the PnP initiative and how you can get involved.
My Pluralsight course
If you are interested in learning more, I recently published a Pluralsight course with lots of demos: Updating Legacy SharePoint Customizations to the Add-in Model. The course covers the process of migrating a heavily customized on-premises SharePoint site to SharePoint Online from start to finish. The clip below is a demo from the course showing how a legacy timer job customization can be made cloud-ready with the help of the PnP Timer Job Framework and Azure WebJobs.
In this course, you will see me leverage the PnP Core Component to drastically simplify writing .NET Managed CSOM code. I also use several great samples and solution starters from the PnP team, all with the objective of easing the pain associated with migrating legacy SharePoint customizations to the Add-in model.
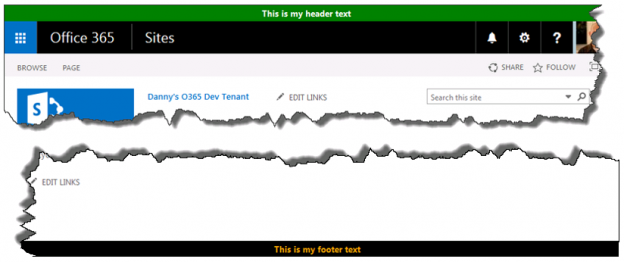
Custom site header and footer using a SharePoint-hosted add-in
In this post, I will show you how to create a custom site header and footer for SharePoint Online/Office 365 that will render on all pages using a SharePoint-hosted add-in. This could be used to post critical alerts or to specify the level of business impact of the content stored within a particular site (e.g., high, medium, or low).
This add-in will accomplish the following, all without a single line of server-side code:
- Upon installation, deploy 3 JavaScript files to the Style Library of the host web
- Register 3 user custom actions in the host web to ensure these JavaScript files are loaded on every page
- Via an add-in part, provide a mechanism for users to enable/disable and set properties of the custom header and footer (e.g., message text, background/text color)
- Store and retrieve configuration parameters for the site header and footer in the host web’s property bag
Rendering a custom header and footer
We might be tempted to edit the master page directly to add a header and a footer, but this is not considered a best practice (especially in SharePoint Online, where master page changes can be rolled out quite frequently). Instead, our add-in will make use of JavaScript techniques to insert
- In SharePoint Online/Office 365, our header (with ID customHeader) will be inserted above thewith ID suiteBarTop (for SharePoint 2013 on-premises, you’ll need to update the script to reference ID suiteBar instead).
- Our footer
(with ID customFooter) will be inserted below thewith ID s4-bodyContainer.- NOTE: The
IDs in SharePoint Online are never set in stone and could change at any time. If they do, you will need to update HeaderFooter.js to reference the newIDs.jQuery makes it easy to create our custom header and footer
elements and insert them in the appropriate location within the DOM with its .insertBefore() and .insertAfter() functions following this approach:$("HEADER TEXT").insertBefore("#suiteBarTop"); $("").insertAfter("#s4-bodyContainer");Making the footer “sticky”
Huge shout-out to Randy Drisgill for his SharePoint 2013 Sticky Footer implementation. The “sticky” footer anchors the footer
to the bottom of the page (or the bottom of the browser window if the available screen real estate exceeds the amount of content on a given page). I only needed to make one change to Randy’s StickyFooter.js implementation, and that was to account for the height offset imposed by the addition of our customHeader:var difference = windowheight - (bodyheight + ribbonheight + footerheight + $("#customHeader").outerHeight());Provisioning files to the host web via JavaScript
For anyone following the OfficeDev PnP, the concept of remote provisioning to allow add-ins to deploy files to the host web should be a familiar one. However, the PnP examples make use of the .NET Managed CSOM to do this, which is a perfectly valid technique but would require us to develop a provider-hosted add-in (allowing that code to run in Azure or some other web server). Since I wanted to create a SharePoint-hosted add-in, I had to find a way to accomplish this using only JavaScript. Thankfully, I found Chris O’Brien’s post with code showing how to provision files to the host web using JavaScript. You will see that my code is based heavily on the example he provides and provisions the following files from the add-in web to the host web:
- jQuery-1.9.1.min.js – jQuery
- HeaderFooter.js – our logic to read the header/footer configuration data from the host web property bag and render the header and footerelements
- StickyFooter.js – Randy Drisgill’s Sticky Footer implementation for SharePoint 2013 (with the one tweak described above)
Add-in part for setting configuration values
The add-in also includes an add-in part (deployed to and rendered from the add-in web) that allows users to enable/disable the header/footer and set the text and colors:
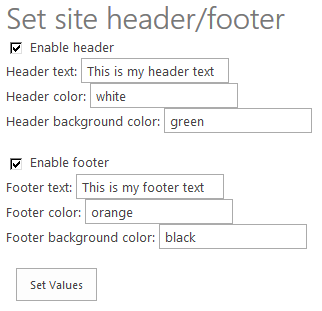 When the add-in part loads, it uses JavaScript to query the property bag of the host web to see if these settings already exist and if so, prepopulates the values in the form. Once the user has made the necessary changes, clicking Set Values will save the changes back to the property bag (again, using JavaScript).
NOTE: The need for our add-in to read and write data to and from the host web property bag requires us to request the FullControl permission at the Web scope in our add-in manifest (AppManifest.xml):
What about MDS?
SharePoint 2013 introduced the Minimal Download Strategy (MDS), which reduces page load time by sending only the differences when users navigate to a new page. While this is a wonderful benefit, it wreaks havoc with solutions that need to manipulate the DOM every time a new page is loaded. In other words, our header and footer may render perfectly on the home page when we first load it, but thanks to MDS when we navigate to the “Documents” library, only part of the page will actually be re-rendered. Our header and footer will not display properly (if at all) when only part of the page is re-rendered to support a new page request.
For much deeper reading on this subject, I encourage you to go through Wictor Wilen’s blog posts introducing the MDS and explaining the correct way to execute JavaScript functions on MDS-enabled sites. My code is based on Wictor’s solution and works properly in scenarios where MDS is enabled and where it is not (e.g., on Publishing sites or any site where the MDS feature has been deactivated).
We handle MDS by calling RegisterModuleInit() with the function we need to execute on every page load in HeaderFooter.js:
if (typeof _spPageContextInfo != "undefined" && _spPageContextInfo != null) {
    // MDS enabled
    RegisterModuleInit(_spPageContextInfo.siteServerRelativeUrl + 'Style Library/Headerfooter.js', DJ.HeaderFooter.Render.initializeHeaderFooter);
}
// Run now on this page (and non-MDS scenarios)
DJ.HeaderFooter.Render.initializeHeaderFooter();
The code
I have posted the code for this add-in to GitHub at the following location:
https://github.com/dannyjessee/SiteHeaderFooter
I encourage you to download it, try it out in your environment, and let me know if you run into any issues with it. My sincere thanks go out to Chris O’Brien, Randy Drisgill, and Wictor Wilen for giving me the building blocks needed to put this add-in together.
- Our footer