Category: SharePoint
JavaScript to Conditionally Enable a SharePoint Custom Ribbon Button
During my session on getting started with apps for SharePoint 2013, I demonstrate how to use the “extension” app shape to define a UI custom action that displays a button in the ribbon. When clicked, this button allows the user to view a Bing traffic map centered at the location specified in the selected list item. This is done using a CustomAction in the same declarative manner as it was done in SharePoint 2010, using the following XML:
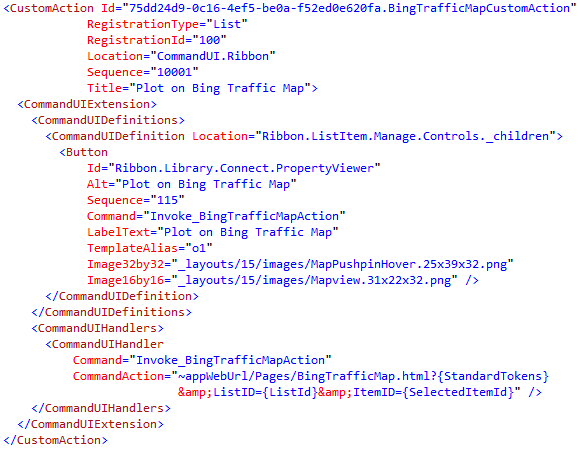
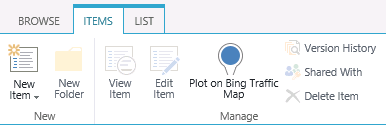
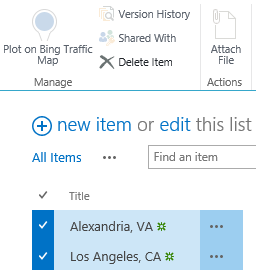
Installing the app adds a button labeled “Plot on Bing Traffic Map” to the “Items” tab on all custom lists in the host web where the app is installed:
In my CommandAction of the CommandUIHandler for the CommandUIExtension I define to create the button, I specify that clicking the button will take the user to the following URL:
~appWebUrl/Pages/BingTrafficMap.html?{StandardTokens}&ListID={ListId}&ItemID={SelectedItemId}
Note the use of the SelectedItemId token in the URL above. This means my BingTrafficMap.html page can rightly expect to have an ItemID parameter in its query string, which can then be parsed to get the list item and read its properties using JavaScript.
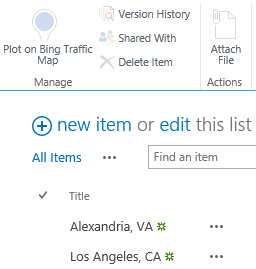
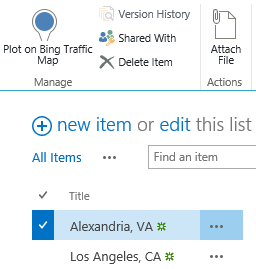
But what if the user hasn’t selected any items? Or multiple items? Since I can only center a map on one single location, I need to have more control over when this button is enabled. In this case, I only want the button to be enabled when exactly one item in the list is selected. (By default, any ribbon buttons you create through custom actions will always be enabled, regardless of whether or not any items are selected.)
As it turns out, there is an EnabledScript attribute of the CommandUIHandler that will enable or disable the button depending on whether the function returns true or false. I was able to adapt this code from Tomasz Rabiński to add the following logic to my CommandUIHandler:

Note that the function EnableDisable–which I can define and then call within the EnabledScript attribute–returns true only if the number of selected items equals 1.
Now my button behaves exactly as I would expect.
No items selected (disabled):
One item selected (enabled):
More than one item selected (disabled):
I have updated my demo code to include this change. You can download this code here.
Presenting Apps for SharePoint 2013 at @CapAreaSP!
Thanks to everyone who braved the elements (e.g., the winter storm that never materialized) to see me present “Get Started with Apps for SharePoint 2013!” at the Capital Area .NET SharePoint Special Interest Group at Knowlogy in Tysons Corner tonight! I was very impressed with the level of audience participation and interaction during the session. Feel free to reach out to me anytime (either in the comments here or on Twitter) if you have any questions or just want to chat about Apps for SharePoint 2013!
Slides and code from my session
Code for the sample app I demonstrated can be downloaded here.
To learn more about when and when not to use the new app model for SharePoint 2013 development, attend next month’s @CapAreaSP session featuring Alex Randall from Microsoft!

Kicking off @RestonSPUG with Apps for SharePoint 2013!
Thanks to everyone who joined me, Scott Hoag, and Dan Usher as we kicked off the new Reston SharePoint User Group today! The group will meet around lunchtime at the Microsoft office in Reston on the first Monday of each month. The group’s meeting time and location should be ideal for the many SharePoint professionals in the Reston area who can’t make it to the various regional SPUGs that traditionally meet in the evenings.
I had the privilege of being the group’s inaugural speaker today, presenting my session “Get Started with Apps for SharePoint 2013!” Much like the session I led last weekend at SPS Virginia Beach, there was great audience participation and interaction. There were a couple of great questions in particular that I wanted to address further here:
If an app requests the Write right at the List scope, is there any way I can install or configure multiple instances of the app to grant it write permissions against two or more lists on a site?
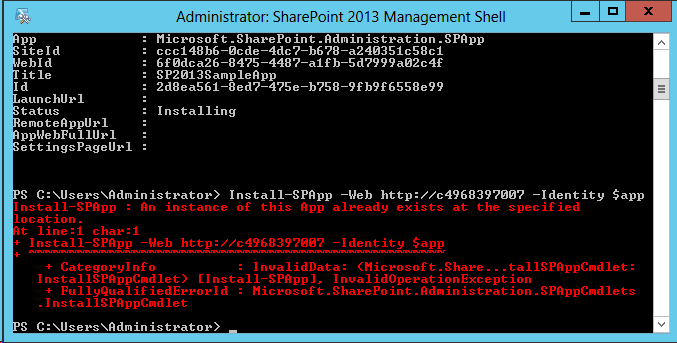
This was an interesting question because the guidance I gave last weekend was that in order to grant the Write right against multiple lists, your app must request permissions at the next highest scope (in the case of this example, that would be the Web scope). However, it is not possible to install multiple instances of an app for SharePoint to the same site. The UI will not show the app in the “Apps you can add” section for that site once an instance of that app is already installed. I even tried forcing my around that by using PowerShell, but was forbidden:
What is the relationship between OAuth and tokens with apps for SharePoint? Is there a token for the user as well as one for the app that factors into authorization decisions?
The OAuth protocol is used to authenticate and authorize apps for SharePoint. Authentication and authorization of users and apps in SharePoint 2013 is a very advanced subject with many potentially complicated scenarios and unique considerations. To learn more about these topics, I strongly encourage you to read the following articles on MSDN:
- Authorization and authentication for apps in SharePoint 2013
- App authorization policy types in SharePoint 2013
- Authentication, authorization, and security in SharePoint 2013
Slides and code from my session
Code for the sample app I demonstrated can be downloaded here.
Thanks again to everyone who was part of today’s Reston SPUG event. I look forward to working with the group much more in the future!
Using Azure ACS to Sign In to SharePoint 2013 with Facebook
For those of you who have seen me speak (or read my blog posts) about Claims-based identity, SharePoint 2010, Facebook, and the cloud, you already know that Windows Azure Access Control Service (ACS) can be used to set up identity providers such as Windows Live ID, Google, Yahoo!, and Facebook in SharePoint 2010 through the magic of Claims.
In this blog post, I am pleased to report that all the steps to follow to enable this integration with SharePoint 2010 also work with SharePoint 2013!
For those who are unfamiliar with this integration, I will cover the steps at a high-level below with screenshots from SharePoint 2013. Keep in mind the process to follow is the same for SharePoint 2010.
Prerequisites
- A Facebook account integrated with the Facebook Developers application
- A Windows Azure account with an ACS namespace created (these can be created using the Service Bus, Access Control & Caching section of the portal)
- SharePoint 2013 (might I recommend CloudShare‘s preconfigured SharePoint 2013 RTM Small Farm environment?)
- An X.509 certificate to be used by Azure ACS to digitally sign tokens (and explicitly trusted by SharePoint)
Procedures
Setting up this integration requires configuration steps to be performed in three different places:
- Within Facebook, an application must be created that supports “Website with Facebook Login.”
-
Within the Azure ACS management portal, a new Identity Provider (IP), Relying Party (RP) application, and Rule Group must be created to inform Azure ACS about:
a. The Facebook application created above.
b. The SharePoint environment to be configured with Azure ACS integration below. - Within SharePoint, we must create a new web application with Claims (in SharePoint 2013, Claims is the default authentication mechanism) and configure it to point to our Azure ACS setup as a Trusted Identity Provider.
We must also inform both Azure ACS and SharePoint about the SSL certificate that will be used to sign the SAML tokens containing a user’s claims. This is done by uploading the X.509 certificate into the Azure ACS management portal and telling SharePoint to trust this certificate (via the New-SPTrustedRootAuthority and New-SPTrustedIdentityTokenIssuer cmdlets which we will execute later on). In a demonstration environment, I use a self-signed certificate made via the makecert command. In production, you would obviously want to use a legitimate SSL certificate.
Facebook Application Setup
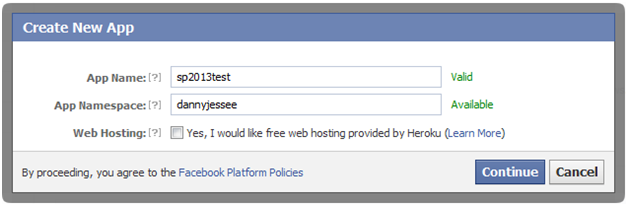
Within the Facebook Developers application, click Create New App.

Give the app a Name and a Namespace. Click Continue.
After passing the Captcha check, select Website with Facebook Login in the next screen and enter the URL to your Azure ACS Service Namespace (e.g., https://{your namespace}.accesscontrol.windows.net). Click Save Changes.
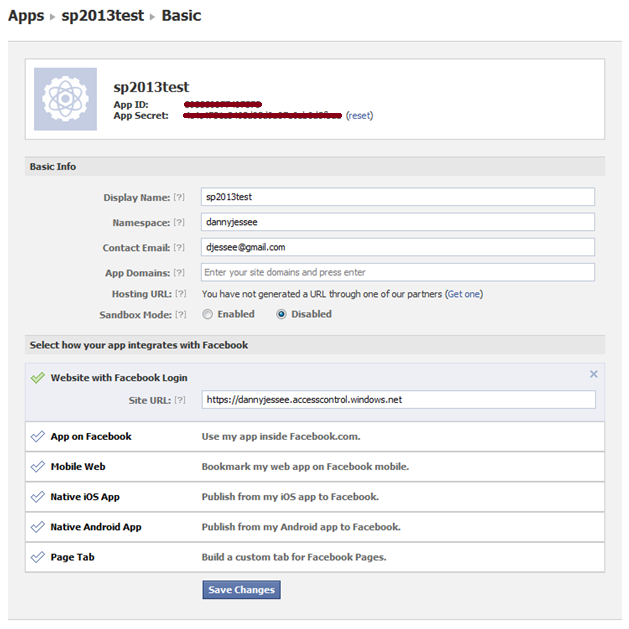
Take note of the App ID and App Secret values that appear at the top of this screen. You will need to use these to configure Azure ACS to leverage this application. That’s all we need to do within Facebook!
Azure ACS Setup
Within Azure ACS, we must configure the following four things:
- Facebook as an Identity Provider.
- SharePoint as a Relying Party Application.
- Claims Rule Groups to determine how Claims are passed from the identity provider to the relying party application.
- The Token Signing Certificate that Azure ACS will use to prove that it is indeed the issuer of the SAML token that SharePoint receives.
Identity Provider
From within your Azure ACS management portal (e.g., https://{your namespace}.accesscontrol.windows.net) and select Identity providers from the Trust relationships section in the left navigation. In the next screen, click Add.

In the next screen, choose Facebook application and click Next.
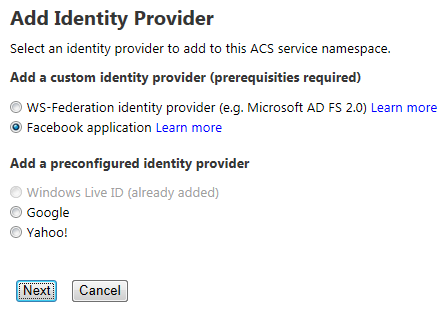
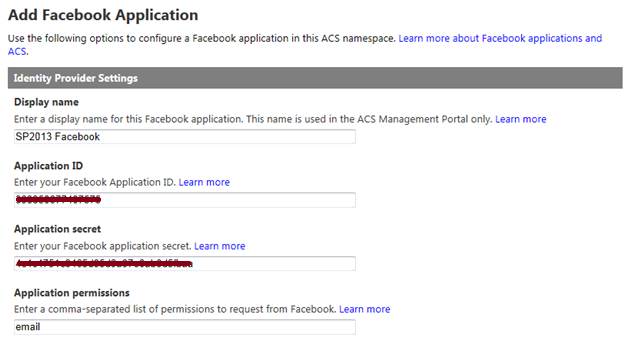
In the next screen, enter the Application ID and Application secret values from the Facebook application you created above. You should also provide a Display name (for use within the ACS management portal) and a comma-separated list of Application permissions (note that email is the only required permission to enable Facebook users to sign in to SharePoint). You can, however, request additional permissions to do lots of fun and exciting things. Those permission strings are defined here.
You do not need to specify values for Login link text or Image URL unless you plan to configure more than one Azure ACS identity provider to use with SharePoint. If you have already configured your Relying party applications within Azure ACS, you may select them at the bottom of this screen. Otherwise, we will configure SharePoint as an RP in the next step.
Press Save to save changes.
Relying Party Application
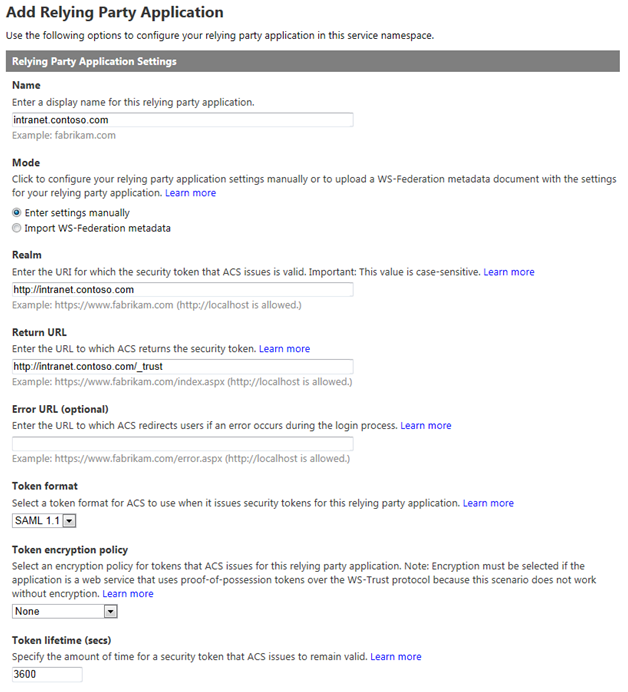
From within your Azure ACS management portal (e.g., https://{your namespace}.accesscontrol.windows.net) and select Relying party applications from the Trust relationships section in the left navigation. In the next screen, click Add.

In the next screen, provide a name for the relying party application (I often just use the fully-qualified domain name of my SharePoint web application) and choose to Enter settings manually. In the boxes below, enter the following values:
- Realm – URL of your SharePoint web application (note that a URN can also be entered here and, in many cases, is the preferred approach)
- Return URL – URL of your SharePoint web application + /_trust – this is the endpoint for SharePoint’s STS, which is where Azure ACS will send the SAML token it creates
- Token format – SAML 1.1
- Token lifetime – enter a value greater than the default 600 seconds (Wictor Wilen gives a great explanation why here)
In the Authentication Settings section, select the Identity provider you configured above and choose to Create a new rule group. Under Token Signing Settings, choose whether to Use service namespace certificate (if you have already configured a certificate within Azure ACS) or Use a dedicated certificate if you would like to use a different X.509 certificate exclusively for this relying party application.
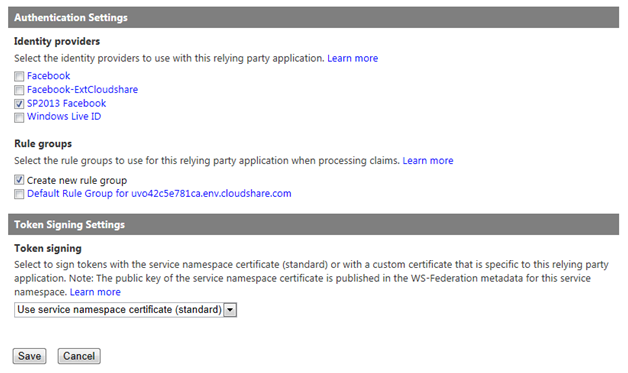
Click Save to save changes.
Rule Group
From within your Azure ACS management portal (e.g., https://{your namespace}.accesscontrol.windows.net) and select Rule groups from the Trust relationships section in the left navigation. In the next screen, click Default Rule Group for {your web application}.
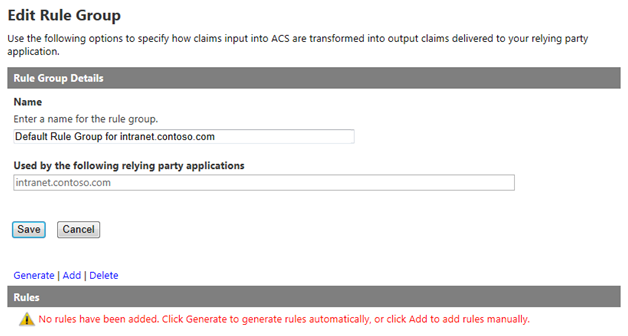
Note that no rules are added by default. Click Generate and select the identity provider you created above.
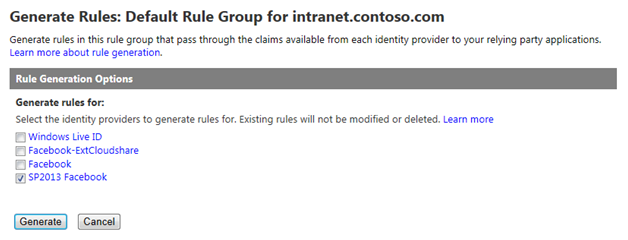
Click Generate to generate Claims rules for the 5 values Azure ACS can obtain from a logged in Facebook user:
- AccessToken – the Facebook Graph API access token
- emailaddress – the email address associated with the user’s Facebook profile
- expiration – the expiration date/time of the AccessToken granted above
- name – the Facebook user’s display name
- nameidentifier – the Facebook user’s unique profile ID (integer)
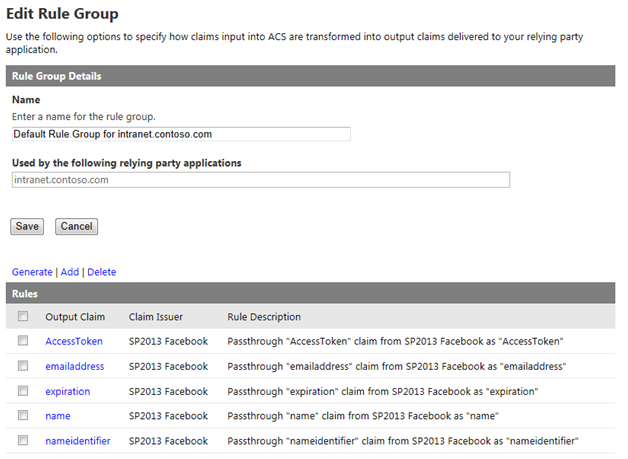
Press Save to save the rules.
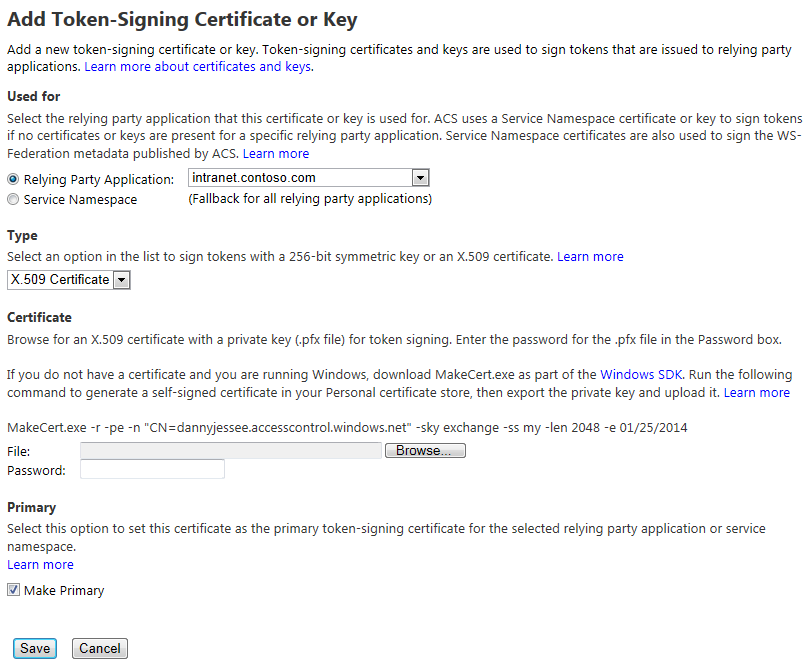
Upload Token Signing Certificate
If you haven’t already, you will need to configure Azure ACS to utilize an X.509 certificate to digitally sign the tokens it generates. Optionally, you can also specify certificates to use for token encryption and decryption. For the purposes of this demonstration, I generated a self-signed certificate using the makecert utility. DO NOT DO THIS IN PRODUCTION! I then uploaded this certificate by going to the Certificates and Keys link under Service settings in the ACS management portal.
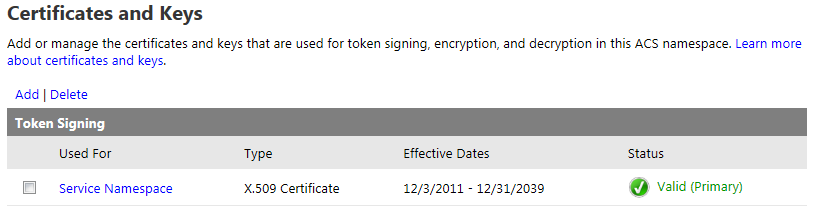
Click Add to upload your certificate. This page allows you to specify where the certificate should be used, what type of certificate it is, and how to make it the primary token-signing certificate. It even includes the specific makecert command you need to run to generate a self-signed certificate (again, I cannot overemphasize how important it is that you NOT use a self-signed certificate in production!)
That’s all we need to do within Azure ACS!
SharePoint 2013 Setup
Within SharePoint, we must do the following:
- Create a new web application using Claims-based authentication (the default mechanism in SharePoint 2013).
- Configure Azure ACS as a new Trusted Identity Provider for that web application and tell SharePoint to trust the certificate Azure ACS uses to sign its SAML tokens.
- Set a User Policy within the web application to allow users who log in via the Trusted Identity Provider to have access to the site.
New Web Application
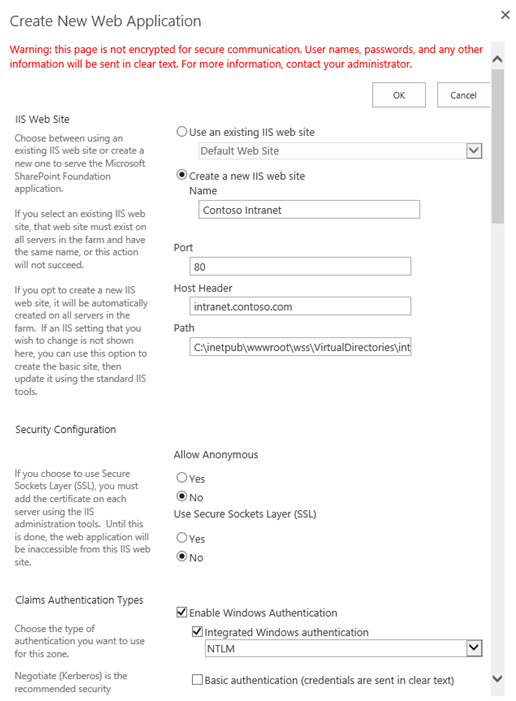
From SharePoint 2013 Central Administration, create a new web application. Unlike SharePoint 2010, SharePoint 2013 does not prompt you to choose between Classic and Claims-based authentication. Claims is the default (hooray)!
Make sure the host header matches the host header for the Return URL specified in the Azure ACS relying party application setup. Enable Integrated
Windows Authentication with NTLM at this step. You’ll notice no Trusted Identity providers exist at this point.
Enjoy the friendly new progress messages in SharePoint 2013:

Create a new site collection at the root of the web application and choose a Windows identity for the primary Site Collection Administrator.
Configure Azure ACS as a new Trusted Identity Provider
In order to enable us to select Azure ACS as a trusted identity provider for the web application, we need to run some PowerShell. The script to run appears below.
$realm = "http://intranet.contoso.com"
$signinurl = "https://dannyjessee.accesscontrol.windows.net:443/v2/wsfederation?wa=wsignin1.0&wtrealm=http%3a%2f%2fintranet.contoso.com%2f"
$certloc = "C:\dannyjessee.cer"
$rootcert = Get-PfxCertificate $certloc
New-SPTrustedRootAuthority "Danny Jessee Azure ACS" -Certificate $rootcert
$cert = New-Object System.Security.Cryptography.X509Certificates.X509Certificate2($certloc)
$map1 = New-SPClaimTypeMapping -IncomingClaimType "http://schemas.xmlsoap.org/ws/2005/05/identity/claims/emailaddress" -IncomingClaimTypeDisplayName "Email" -SameAsIncoming
$map2 = New-SPClaimTypeMapping -IncomingClaimType "http://schemas.xmlsoap.org/ws/2005/05/identity/claims/name" -IncomingClaimTypeDisplayName "Display Name" –LocalClaimType "http://schemas.xmlsoap.org/ws/2005/05/identity/claims/givenname"
$map3 = New-SPClaimTypeMapping -IncomingClaimType "http://www.facebook.com/claims/AccessToken" -IncomingClaimTypeDisplayName "Access Token" -SameAsIncoming
$map4 = New-SPClaimTypeMapping -IncomingClaimType "http://schemas.xmlsoap.org/ws/2005/05/identity/claims/nameidentifier" -IncomingClaimTypeDisplayName "Name Identifier" –LocalClaimType "http://schemas.xmlsoap.org/ws/2005/05/identity/claims/upn"
$map5 = New-SPClaimTypeMapping -IncomingClaimType "http://schemas.microsoft.com/ws/2008/06/identity/claims/expiration" -IncomingClaimTypeDisplayName "Expiration" -SameAsIncoming
New-SPTrustedIdentityTokenIssuer -Name "Facebook" -Description "Facebook" -Realm $realm -ImportTrustCertificate $cert -ClaimsMappings $map1,$map2,$map3,$map4,$map5 -SignInUrl $signinurl -IdentifierClaim $map1.InputClaimType
This script performs the following actions:
- Establishes a trust relationship between SharePoint and the Azure ACS token signing certificate (this is the equivalent of going to Security > Manage trust and uploading this certificate in Central Administration).
- Sets up the claim rules to pass the claims returned from Azure ACS to the SharePoint STS at the _trust endpoint (in some cases, these claims need to be mapped to different claim type URIs to avoid collisions with claims provided by the SharePoint STS).
- Creates a new trusted identity provider associated with the appropriate realm, certificate, claims mappings, and sign in URL (this value can be obtained by going to Application integration under Development in the Azure ACS management portal, then selecting Login pages).
Some things to keep in mind as you modify this script to run in your environment:
- Ensure the value for $realm matches the realm value used when creating the relying party application within Azure ACS.
- Ensure the X.509 certificate used here is the same as the token signing certificate used when creating the Relying Party application within Azure ACS.
- Ensure the value for $signinurl is set properly for your SharePoint web application.
Run this PowerShell script from the SharePoint 2013 Management Shell (as an Administrator). If you don’t see red text, you’re doing alright!
Return to the list of web applications in SharePoint 2013 Central Administration. Select the web application and press Authentication Providers.
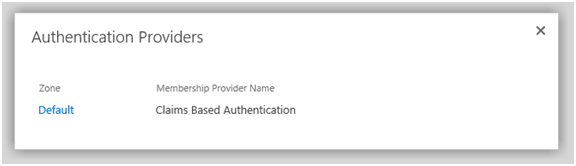
Choose the appropriate zone and scroll down. Facebook should now appear in the list of trusted identity providers:
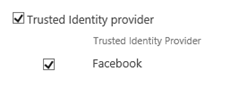
Select Facebook and press Save. You have now configured Azure ACS as a new trusted identity provider, and SharePoint knows it can trust SAML tokens signed with your Azure ACS token-signing certificate.
Set User Access Policy
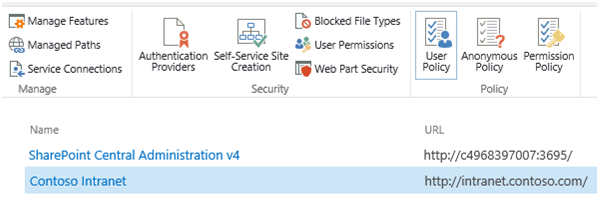
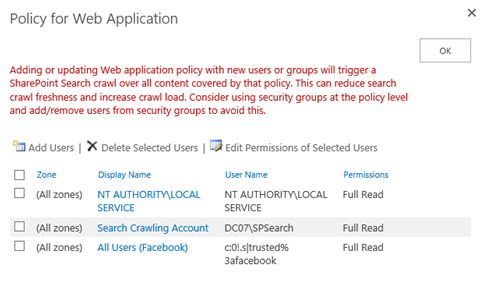
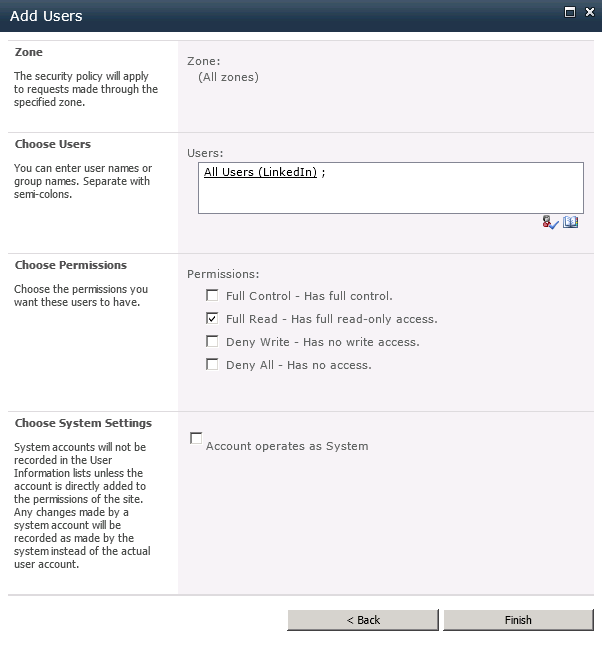
In order for users to access your SharePoint 2013 site once they have authenticated via Facebook, we must grant them the appropriate level of authorization. To do this, I recommend setting a “Full Read” policy for all users who authenticate to SharePoint via our “Facebook” trusted identity provider. Start by selecting the web application in Central Administration and go to User Policy.
Choose Add Users, then select the appropriate zone (All zones) and press Next.
Select the address book icon beneath the Users text box to bring up the Select People and Groups dialog.
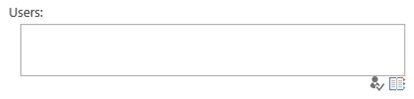
Select All Users, then choose All Users (Facebook). Press Add to select the group.

Check the box for Full Read in the permissions section and press Finish.

The new policy is now displayed at the bottom of the list.
With that, our SharePoint configuration is complete! We are now ready to have our users sign in to SharePoint 2013 with Facebook.
Signing in to SharePoint 2013 with Facebook
Navigate to the home page of the web application. The default sign in page will appear.
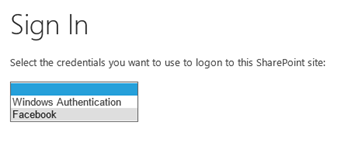
Choose Facebook from the drop down list. The user will be redirected (through the Azure ACS portal) to a Facebook-hosted login page.
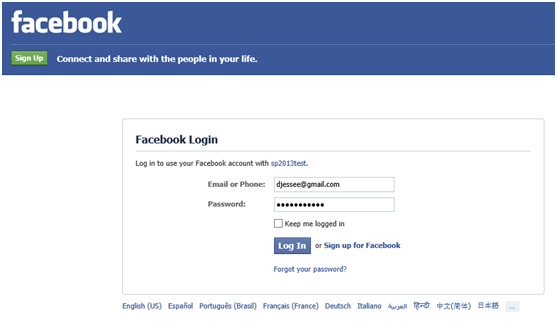
Enter your Facebook credentials and press Log In. The first time a user attempts to log in to your SharePoint site with Facebook, he or she will be prompted to grant the Facebook application access to the user’s basic information and email address (this is based on the permissions we set up when we initially defined the Facebook identity provider in the Azure ACS management portal).
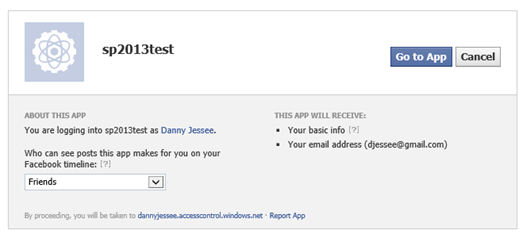
Press Go to App. The user should be redirected back to Azure ACS, which then redirects the user back to SharePoint…logged in with Facebook credentials!

Note the user’s display name is the email address associated with the user’s Facebook account. This is because we set EmailAddress as the IdentifierClaim in the PowerShell script we ran to configure Azure ACS as a trusted identity provider.
I know this is a TON of information to put in a single blog post, so feel free to post any questions in the comments!
Slides and Code for my #SPSCincinnati Session
A huge thank you to all the organizers, volunteers, speakers, sponsors, and attendees who made SharePoint Saturday Cincinnati 2012 (also known as “ScarePoint Saturday Spookinnati”) such a huge success! I had a great time making new friends and catching up with old ones.
I especially wanted to thank everyone who came out early on a rainy, cold Saturday morning to attend my session “SharePoint 2010, Claims-based Identity, Facebook, and the Cloud.” The audience was very engaged and we had some of the best discussions and questions of any time I have ever given this session.
One question I received that I wanted to address specifically here was about how to integrate a Facebook application with a Facebook Page. Unfortunately, you can’t create a Facebook application using the identity of your Facebook Page. You MUST use your “authentic personal Facebook account” to create the application that is required to set up Facebook as an identity provider in the Azure ACS management portal (note that this is not a limitation of Azure ACS; it would apply whether you were writing a custom STS to support Facebook login, or even if you were using Facebook to log in to a web site that had nothing to do with SharePoint or IIS). That said, this restriction is something organizations need to keep in mind as they plan the management and governance of the Facebook application required to support logging in to their web site—SharePoint or otherwise.
Note that it IS possible to post things like status updates from SharePoint to a Facebook Page’s wall, as long as you request the manage_pages permission from users who log in using your application. Note that you would have to write additional code to retrieve a separate access_token for the Page (which would require the logged in user to be an administrator of that Page). If anyone out there tries this approach, please let me know how it works for you!
Here are the slides from my presentation:
Source code and/or a WSP for the web parts I demonstrated can be downloaded from CodePlex.
To learn more about Azure ACS, check out this page and sign up for your free Windows Azure trial.
Thanks again to everyone for such a great event!
Programmatically Updating SharePoint User Profiles with Facebook Data
While giving my demo at SharePoint Saturday Boston last weekend, I showed how to populate a Contacts list in SharePoint with data from the currently logged in user’s Facebook profile. An audience member posed a question about user profiles in SharePoint and how data from Facebook could also be used to populate them. Though I had never considered the potential applications of doing this (one might not think to leverage SharePoint user profiles in a public-facing scenario), it is technically straightforward to do.
Prerequisites
In order to surface Facebook profile information in a SharePoint user profile, you should have the following in place:
- A My Site Host site collection deployed on the same web application where Facebook is configured as an identity provider.
- User Profile properties configured to allow the user to edit values for the properties you wish to set/update programmatically.
Objective
In our scenario, we will take the following information from a user’s Facebook profile and use it to populate his/her SharePoint user profile:
- Given name
- Job title
- Location
- “About me” bio
- Birthday
- Profile picture
Our Starting Point
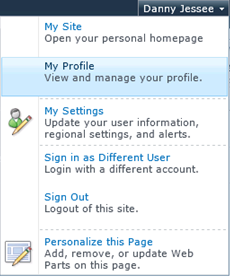
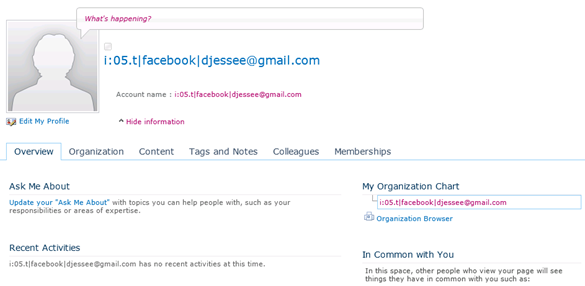
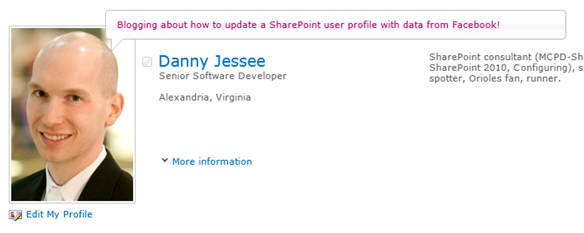
Upon initially configuring Facebook as an identity provider for SharePoint, a very bare bones user profile will appear when selecting “My Profile” from the welcome menu.
The profile page (person.aspx) shows the claims-encoded name for the user, and that’s about it:
The Code
The algorithm required to update a user profile for a user logged in via Facebook is the same as it is for any other SPUser; however, we will utilize the Facebook C# SDK to encapsulate calls to the Facebook Graph API to get the information we need. For demonstration purposes, I have this code wired up to a button click event handler in a SharePoint web part.
This code leverages JSON.NET to parse the JSON-formatted values returned by calls to the Facebook Graph API.
// Iterate through the Claims we are presented until we find the Facebook AccessToken
// and given name
IClaimsPrincipal claimsPrincipal = Page.User as IClaimsPrincipal;
claimsIdentity = (IClaimsIdentity)claimsPrincipal.Identity;
foreach (Claim c in claimsIdentity.Claims)
{
    if (c.ClaimType.Equals("http://www.facebook.com/claims/AccessToken"))
    {
        // We will use this Claim to make all calls to the Facebook Graph API
        token = c.Value;
    }
    else if (c.ClaimType.Equals("http://schemas.xmlsoap.org/ws/2005/05/identity/claims/givenname"))
    {
        // We will use this Claim to set the proper display name for the user
        givenName = c.Value;
    }
}

// Assuming we have the AccessToken, use it to access the user's Facebook profile
if (!string.IsNullOrEmpty(token))
{
    var client = new Facebook.FacebookClient(token);
    var me = (IDictionary)client.Get("me");

    Guid siteId = SPContext.Current.Site.ID;
    Guid webId = SPContext.Current.Web.ID;

    // Assume the identity of the application pool - this account is configured as an
    // Administrator of my User Profile Service Application in Central Administration
    SPSecurity.RunWithElevatedPrivileges(delegate()
    {
        using (SPSite site = new SPSite(siteId))
        {
            try
            {
                // Obtain a reference to the UserProfileManager for this SPSite
                SPServiceContext sc = SPServiceContext.GetContext(site);
                UserProfileManager userProfileMangager = new UserProfileManager(sc);

                SPUser currentUser = SPContext.Current.Web.CurrentUser;
                if (currentUser != null)
                {
                    // Get the current user's SharePoint profile
                    UserProfile profile = userProfileMangager.GetUserProfile(true);

                    // Update the display name and preferred name to match given name
                    profile.DisplayName = givenName;
                    profile[PropertyConstants.PreferredName].Value = givenName;
                    profile[PropertyConstants.Birthday].Value = (string)me["birthday"];
                    profile[PropertyConstants.AboutMe].Value = (string)me["bio"];

                    // Get the current job title
                    JsonArray work = me["work"] as JsonArray;
                    // Most recent/current employer stored in work[0]
                    JsonObject company = work[0] as JsonObject;
                    if (company.ContainsKey("position"))
                    {
                        JsonObject position = company["position"] as JsonObject;
                        profile[PropertyConstants.JobTitle].Value = (string)position["name"];
                        profile[PropertyConstants.Title].Value = (string)position["name"];
                    }

                    // Get the current location
                    JsonObject location = me["location"] as JsonObject;
                    string cityState = (string)location["name"];
                    profile[PropertyConstants.Location].Value = cityState;

                    // Get the user's current Facebook profile picture
                    // https://graph.facebook.com/[Facebook Profile ID]/picture?type=large
                    profile[PropertyConstants.PictureUrl].Value = "https://graph.facebook.com/" + (string)me["id"] + "/picture?type=large";

                    // Commit all changes to the user's profile
                    profile.Commit();
                }

                lblOutput.Text = "User profile successfully updated.";
            }
            catch (Exception ex)
            {
                lblOutput.Text = "" + ex.Message + "
" + ex.StackTrace + "";
            }
        }
    });
}
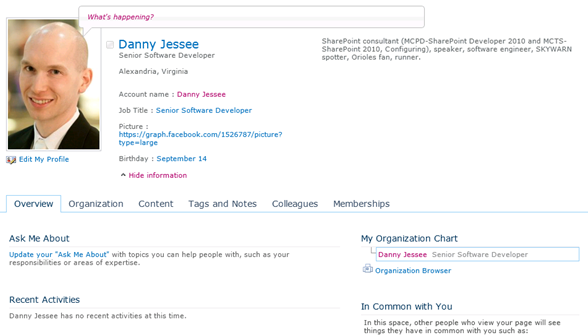
The Outcome
After executing this code, the user’s SharePoint profile looks a lot more complete!
One Final Thing
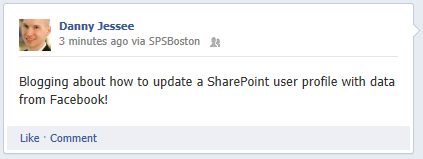
My demos include a basic “status update” web part that allows a user to type a status message in a SharePoint web part. With a few additional lines of code, we can update the “What’s happening?” text bubble to include the text of this status update as well:
SPServiceContext sc = SPServiceContext.GetContext(site);
UserProfileManager userProfileMangager = new UserProfileManager(sc);
UserProfile profile = userProfileMangager.GetUserProfile(true);
profile[PropertyConstants.StatusNotes].Value = txtStatus.Text;
profile.Commit();
Now whenever I post a status update, it will update both my Facebook profile and my SharePoint profile!
Slides, Code, and More for my SPSBOS Session
Thanks to everyone who came out to SharePoint Saturday Boston yesterday! Once again, the organizers put together an outstanding event with well over 300 developers, administrators, and end users in attendance. Thanks, also, to all the sponsors who help to make such great events possible.
I had the great privilege of being able to speak at this event. I would like to extend a special thank you to everyone who attended my session on Claims-Based Identity, Facebook, and the Cloud yesterday morning. There were lots of great questions and discussions! Thanks to all of you for your participation. I hope you enjoyed the session and found the information presented to be valuable.
Below are links to my presentation, code, PowerShell script, and CloudShare environment. Additional background information can be found in my blog post Beyond Authentication: Deeper Facebook Integration with SharePoint.
Download presentation as .pptx
Web parts, source code, site template, and required certificates
PowerShell script to configure Azure ACS trusted identity provider
If you would like a copy of the CloudShare virtual machine I used for my demos, follow this link to obtain a 14-day free trial of CloudShare (if you don’t already have an account) and access a copy of the environment. I used the VM called SharePoint 2010 Enterprise SP1 for my demos. If you would like to know more about CloudShare (I love CloudShare!), please contact me.
Also, to take full advantage of the functionality shown in this demo, I strongly encourage you to sign up for a 90-day free trial of Windows Azure. This will give you access to the AppFabric Access Control Service (ACS) capabilities I demonstrated. If you already have a Windows Azure account, or if you choose to convert your trial to a full-blown account, the ACS features are free through December 1, 2012 (after this date, the charge will be $1.99 for every 100,000 transactions).
If you have any questions or issues deploying or running the code and/or scripts above, feel free to leave a comment below. Thanks again to everyone for such a fantastic event!
Using jQuery to Build a More Intuitive Advanced Search Experience in SharePoint 2010 – Part 2: Advanced.aspx
Update 3/28/12: If you have already downloaded the code for this solution, please download it again! Several bugs were fixed in this latest release.
This entry is part 2 of a multi-part blog series on enhancing the advanced search experience for SharePoint 2010 end users using jQuery. Part 1 may be found here. I will link to subsequent entries in this series from here once they have been written.
In part 1 of this series, I wrote about what I believe are some serious flaws with the way advanced searches are handled out of the box in SharePoint 2010. If you so much as follow one navigational link from the search results page after performing an advanced search, then decide you wish to change your advanced search parameters in any way, you are forced to re-enter all your search parameters on an empty advanced search page, even though the page URL contains a query string parameter that includes everything you searched for!
Enter jQuery
I know I can use JavaScript to parse parameters from a query string. This post details one of the most elegant ways I have seen to do this. Since the advanced.aspx URL already includes all of my advanced search criteria (in the k query string parameter), I will use this method to parse that value. Once I have that value, through a combination of jQuery and JavaScript RegExp (regular expression) parsing, I can take all of my search criteria and repopulate the appropriate text boxes, check boxes, and dropdowns so that the end user doesn’t have to needlessly re-enter this information.
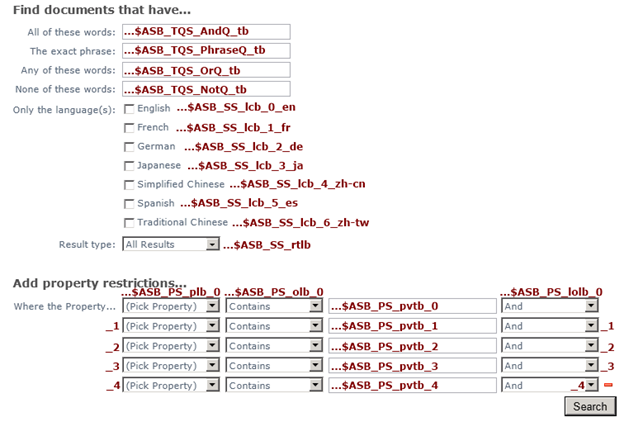
The key to being able to populate the appropriate controls is knowing the IDs of each of the controls on the advanced search page. I can then use jQuery to set the values of the respective text boxes and dropdowns using the .val() method for text boxes and the .prop() method for check boxes and dropdowns (although .val() can also be used for setting the selected value in a dropdown, I encountered a problem with the dynamically populated dropdowns in the property restrictions area that required me to set the selectedIndex property of those dropdowns instead). Using my trusty F12 developer tools, I was able to determine how the controls on the advanced search page are named. The image below displays the last part of the “name” value associated with each of these controls. I can then use attribute selectors to choose each specific element (based on the name of that element ending with the given string) and set its value accordingly.
Deploying jQuery and this Script
A thorough discussion of how best to deploy jQuery in a given site collection is beyond the scope of this blog post. Suffice it to say, my preferred approach for deploying jQuery is as a sandboxed solution that includes a jQuery module. Jan Tielens outlines this solution in greater detail here. Keep in mind that you can use any method you would like to deploy jQuery on your Search Center site as long as you properly reference the location of your jQuery script on the advanced.aspx page. The functionality I have created for this blog post requires jQuery 1.6 or above.
Keep in mind that the advanced.aspx page in a SharePoint Search Center is a fully customizable web part page. With that in mind, once you have deployed jQuery in your site collection and referenced it from this page, you can deploy this script in a Content Editor Web Part and be good to go. The general algorithm followed by this script is:
- Store the k query string parameter in a variable, k.
- Look for regular expression matches in k for the various keyword searches (ALL(), ANY(), “”, and NONE()). Populate the appropriate text boxes with the words found.
- Look for regular expression matches in k for the various language filters (DetectedLanguage).
- Look for regular expression matches in k for the result type (IsDocument=True or FileExtension=).
- Parse out any property restrictions (property, type of match, the text itself, and the and/or operand associated with it). This script should handle the out of the box properties without any issue. It also properly handled the custom mapped properties I had previously configured in my environment (but please feel free to let me know if you run into any specific issues with this script in your environment).
The Solution in Action
Download the script here (it is available as both a standalone text file or an exported Content Editor Web Part) and try it out for yourself. Again, the steps to deploy it are as follows:
- Download jQuery 1.6 or greater and deploy it in your environment.
- Ensure jQuery is referenced from your advanced search page, advanced.aspx.
- Add a Content Editor Web Part to advanced.aspx and reference this script. Alternately, you could import and add the .dwp file that can also be downloaded from the link above.
Let’s try it out!
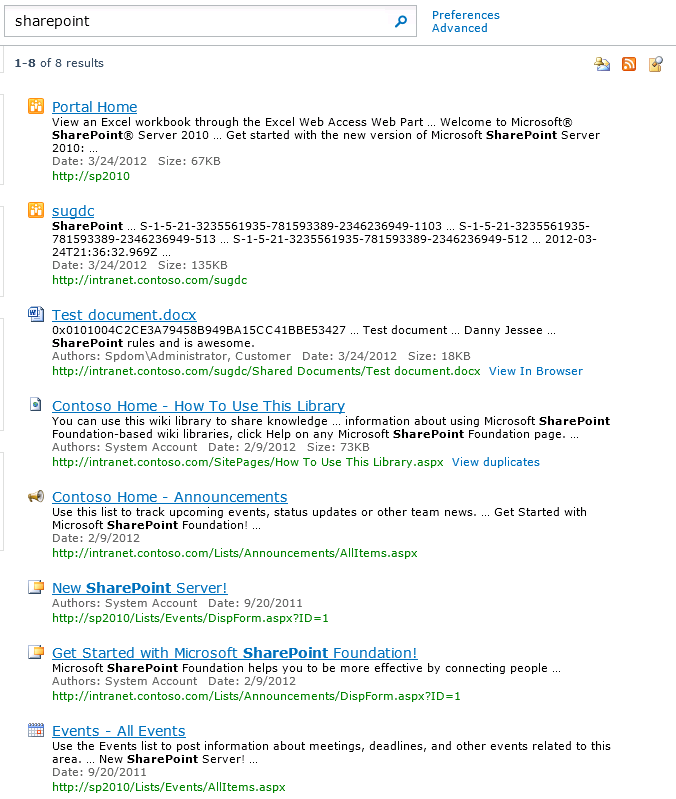
I’ll start by doing a basic search on my favorite subject, SharePoint!

Here are my results:
Now let’s say I want to filter these results by date. I’ll click the Advanced link.
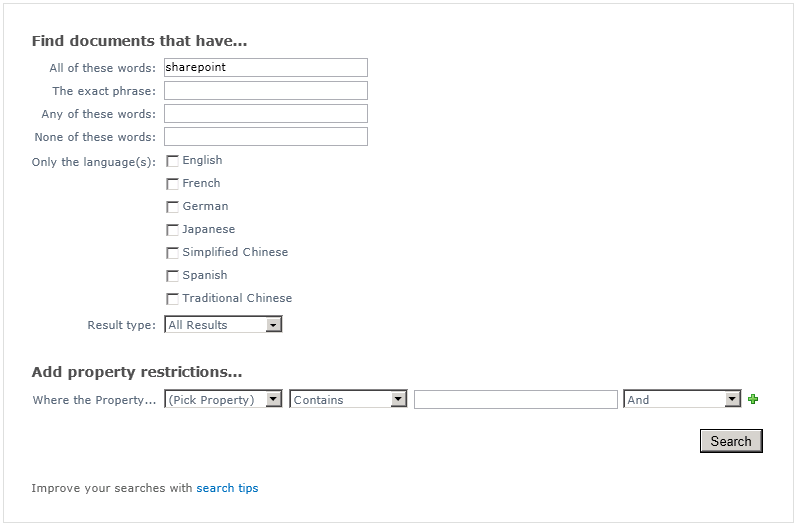
Nothing special here (yet). The advanced search page knows how to put a simple keyword query’s terms in the “All of these words” text box. Now let’s enhance our search by adding some keyword, language, type, author, and date range restrictions:
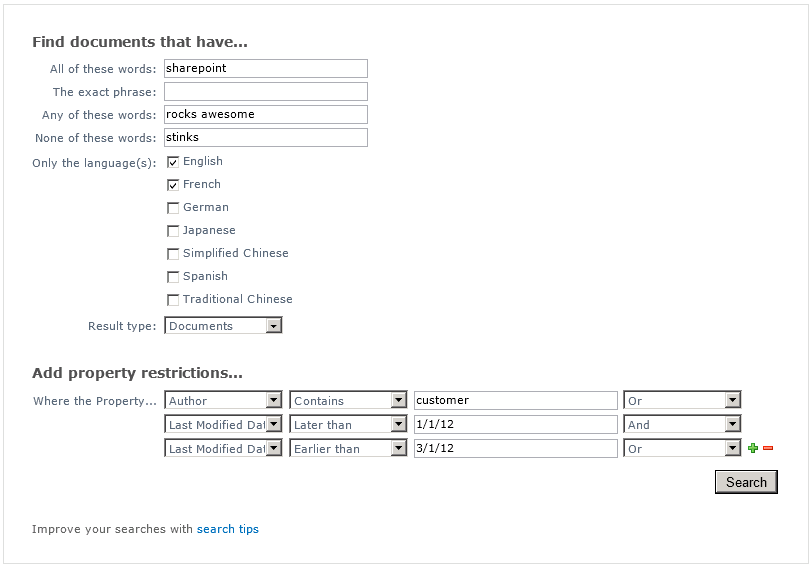
Pressing Search yields a new set of search results:
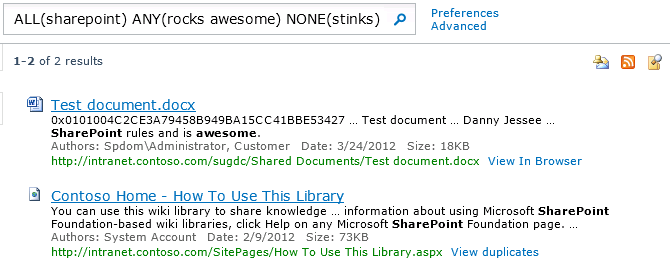
The entire string in the search text box reads:
ALL(sharepoint) ANY(rocks awesome) NONE(stinks) (DetectedLanguage=”en” OR DetectedLanguage=”fr”) (IsDocument=”True”) (Author:customer OR Write>=1/1/12 AND Write<=3/1/12)
At this point, the Advanced link points to javascript:history.back(), so clicking it would bring up the advanced search page just as it was when I submitted my query.
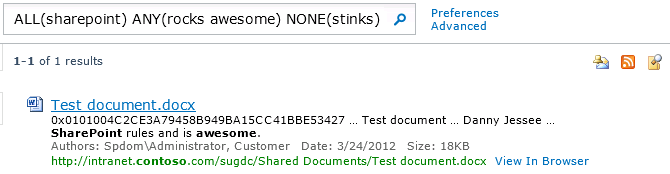
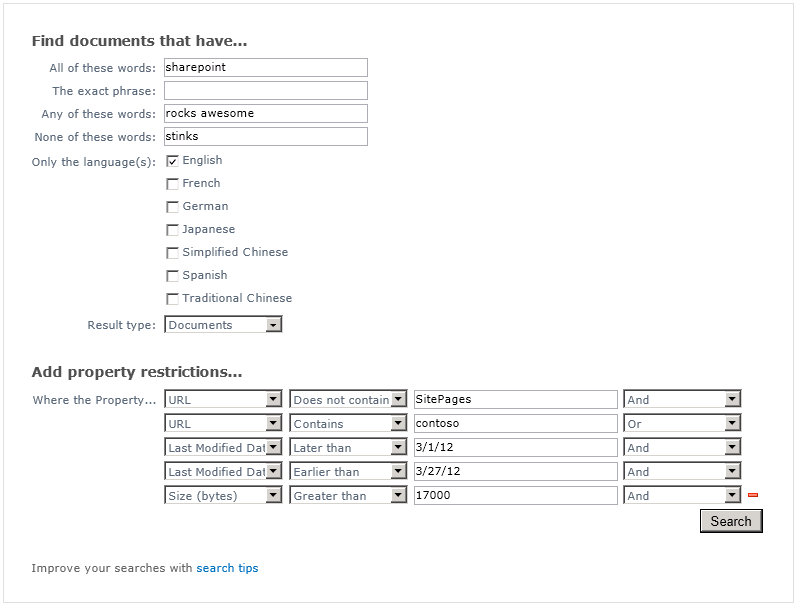
Let’s say I want to change the date range being searched, remove one of the selected languages, and put size and URL restrictions in place. I can manually change the search string to read:
ALL(sharepoint) ANY(rocks awesome) NONE(stinks) (DetectedLanguage=”en”) (IsDocument=”True”) (-Path:SitePages AND Path:contoso OR Write>=3/1/12 AND Write<=3/27/12 AND Size>17000)
Pressing the search button yields the following results:
At this point, the Advanced link now points to advanced.aspx with a messy query string parameter called k. Without this script in place, clicking that link would yield a woefully empty advanced search page:
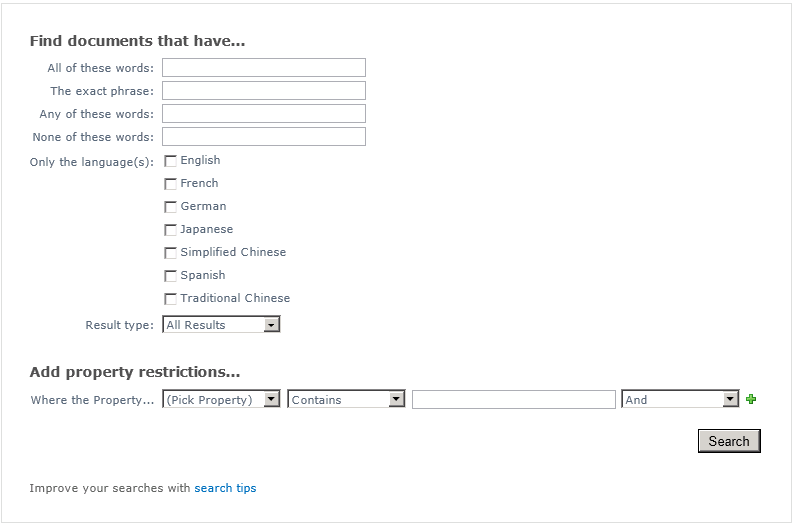
(As an aside, I find it strange that SharePoint has somehow forgotten how to even parse the “All of these words” keywords!)
But with this script installed, the page “magically” reflects all the parameters of my updated query automatically!
Pretty cool, huh? Try it out (you can download the code in a standalone text file or as an exported Content Editor Web Part) and let me know what you think. Feel free to leave any comments, concerns, or ideas for improvement in the comments. Stay tuned for part 3, where I will use jQuery to enhance the advanced search interface directly on the search results page!
Using jQuery to Build a More Intuitive Advanced Search Experience in SharePoint 2010 – Part 1: Introduction
This entry is part 1 of a multi-part blog series on enhancing the advanced search experience for SharePoint 2010 end users using jQuery. Part 2, using jQuery to enhance the advanced search page advanced.aspx can be found here. I will link to subsequent entries in this series from here once they have been written.
The default advanced search experience in a SharePoint 2010 Search Center (basic or enterprise) has always disappointed me. The interface is clean enough, but the execution and navigation leave a lot to be desired, particularly when end users wish to make changes to the search string from the search results page. Out of the box, performing the different types of keyword searches (ALL of these words, ANY of these words, the exact phrase, etc.) displays the combined SharePoint search syntax for that query in the search box. For instance, if I wanted to find documents that contained ALL of the words SharePoint and awesome, the exact phrase Danny Jessee, ANY of the words rocks or rules, and NONE of the words sad or sorry, I would enter the following in the advanced search page:
And the results (if any) appear on the results page, results.aspx:
As you can see, my advanced query was converted to a single search string where the words I entered in the All of these words: were surrounded with ALL(), the words I entered in The exact phrase: were surrounded with quotation marks, and so on with ANY() and NONE(). The entire string that appears in the search box looks like this:
ALL(SharePoint awesome) “Danny Jessee” ANY(rocks rules) NONE(sad sorry)
This (URL-encoded) string also appears as the k query string parameter in the search results page URL:
results.aspx?k=ALL(SharePoint%20awesome)%20%22Danny%20Jessee%22%20ANY(rocks%20rules)%20NONE(sad%20sorry)
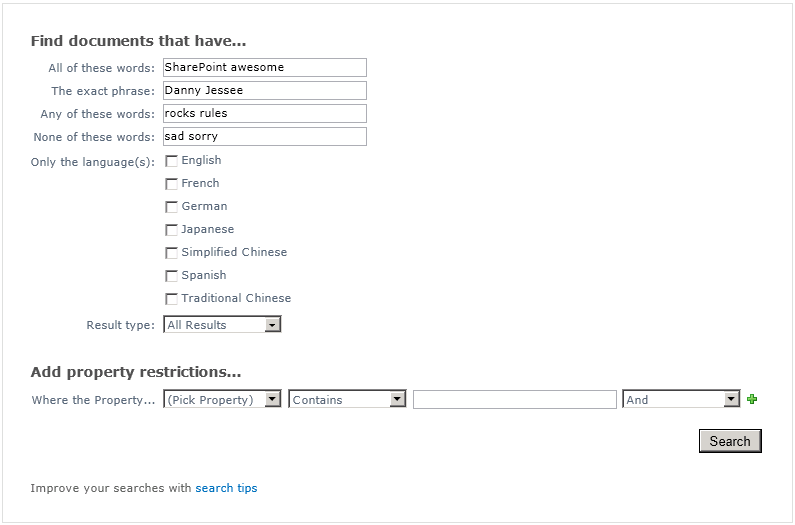
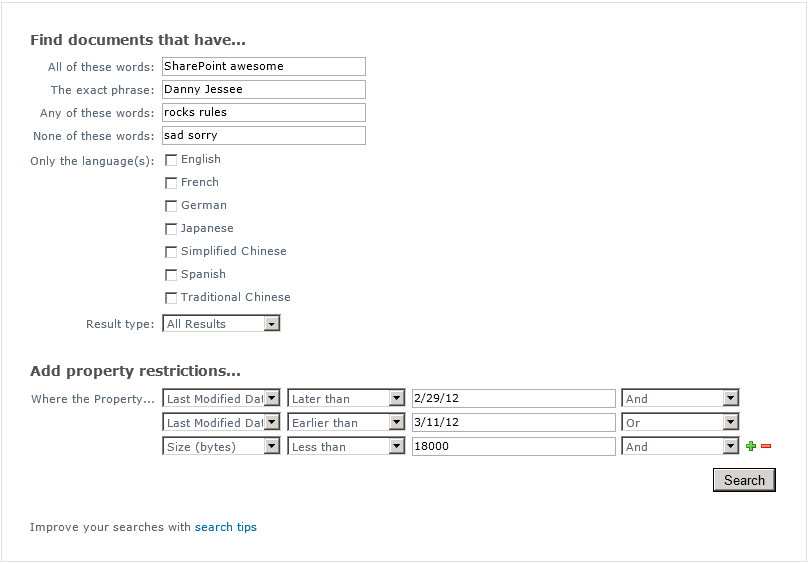
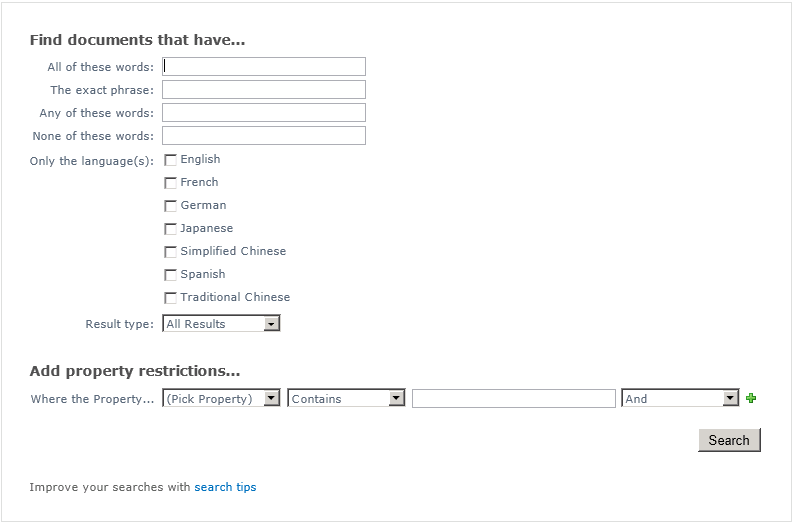
This is intuitive enough for most users to follow, and in fact gives users the opportunity to understand some basic SharePoint search syntax. There’s certainly nothing wrong with that. Things start to get more complex, however, when you start to add property restrictions into the mix. What if, in addition to my search query above, I only wanted to return results that were either modified between March 1 and March 10, or were less than 18000 bytes in size? My advanced search page would now look like this:
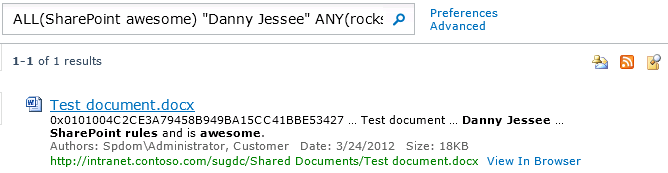
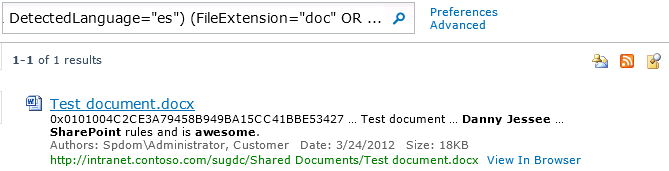
And the entire string that appears in the search box on the search results page now looks like this:
ALL(SharePoint awesome) “Danny Jessee” ANY(rocks rules) NONE(sad sorry) (Write>=2/29/12 AND Write<=3/11/12 OR Size<18000)
The URL to my results page now looks like this:
results.aspx?k=ALL(SharePoint%20awesome)%20%22Danny%20Jessee%22%20ANY(rocks%20rules)%20NONE(sad%20sorry)%20(Write%3E%3D2%2F29%2F12%20AND%20Write%3C%3D3%2F11%2F12%20OR%20Size%3C18000)
Although this syntax is still fairly intuitive, I have found that some end users begin to feel intimidated (or at least uncomfortable) as the size of this search string grows (especially when you start nesting clauses in parentheses or have to enclose property values that include spaces in quotation marks).
It gets better!
Did you know that if you include enough advanced search parameters in your query, the string that SharePoint puts in the search box for you is truncated so that it ends in “…” instead?
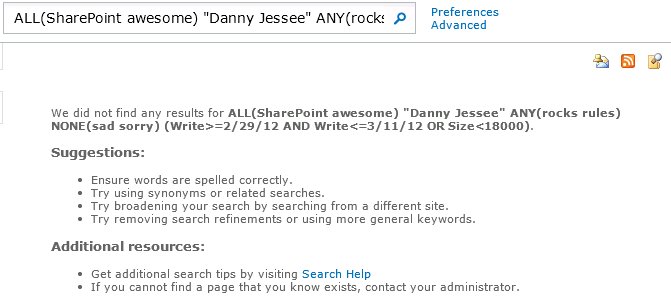
That’s all well and good, but what if the user makes (what he or she believes to be) a simple change to the search query, such as changing the spelling of a word at the beginning of the search string? Pressing the search button yields the following unpleasant result:

Your query is malformed. Please rephrase your query. Wow.
But back to the problem at hand…
What if I had meant for that query to include any document less than 20,000 bytes in size? I could click the Advanced link to adjust my query. Note that on the first results page displayed after submitting a query from the advanced search page, this link actually invokes the JavaScript method history.back(). On any subsequent results pages (or if you follow a link that returns you to the first result page), the link instead goes to advanced.aspx, repeating the k query string parameter that also exists in the URL to the results.aspx page.
Why does this matter?
When you follow a link that goes to javascript:history.back(), your browser reloads the previous page from its history list. This means that the state of controls on this page is preserved from when the form on that page was submitted and you can easily tweak the search parameters you specified before pressing the Search button. In the case of the example above, clicking the Advanced link on the “no results found” page reloads the advanced search form just as I had left it. But what happens if I change my search parameters in the search box instead?
If I update my search string to be ALL(SharePoint awesome) “Danny Jessee” ANY(rocks rules) NONE(sad sorry) (Write>=2/29/12 AND Write<=3/11/12 OR Size<20000) and press the search button (magnifying glass), the search results page appears (reflecting my updated query). However, since I was not directed to results.aspx from advanced.aspx, the Advanced link will now point to:
advanced.aspx?k=ALL%28SharePoint%20awesome%29%20%22Danny%20Jessee%22%20ANY%28rocks%20rules%29%20NONE%28sad%20sorry%29%20%28Write%3E%3D2%2F29%2F12%20AND%20Write%3C%3D3%2F11%2F12%20OR%20Size%3C20000%29
If I want to change my search parameters again (perhaps by adding another property restriction), clicking this link should enable me to do that with relative ease, right?
WHAT?! I have to enter ALL of my advanced search parameters again? No way!
Sadly, it’s true. Even though the advanced search page URL includes all of my search parameters encoded in the k query string parameter, the out of the box advanced search page has no idea what to do with it! While that definitely explains why SharePoint weakly attempts to hack around this limitation with the history.back() link, it does not satisfy a user base who is accustomed to using search engines that provide a more intelligent advanced search interface. Something needs to be done to address this limitation.
jQuery to the rescue…
In part 2 of this series, I will demonstrate how to use jQuery and JavaScript to parse the k query string parameter on the advanced.aspx page and populate the appropriate controls on that page with the parameters of the active search query. This way, users can feel empowered to change the parameters of their advanced searches without having to re-enter everything on the advanced search page.
In part 3, I will update the results.aspx page itself to display a more intuitive mechanism for inputting and updating search parameters directly on the results page without having to modify a complex search string…all using jQuery and JavaScript!
If you have any ideas about how the default advanced search experience should be improved in SharePoint 2010, or if you have any gripes or frustrations of your own to share, I would love to hear about them in the comments!
Using LinkedIn as an Identity Provider for SharePoint 2010
Updated 5/29/2013: LinkedIn has changed the format of the profile URLs it sends back. Consequently, I had to change the GetProfileId function in my STS code. The code in this post has been updated. Thanks to Dee for commenting and bringing the issue to my attention!
Updated 1/27/2013: I am pleased to report that the steps below also work for setting up LinkedIn as an identity provider for SharePoint 2013! The SharePoint screens will look a little different, but the steps to set up the integration are the same. If you run into any issues with this setup in SharePoint 2013, please leave a comment at the bottom of this post.
Updated 1/22/2013: After almost a year, I thought I would go back and revisit this post (as it continues to be one of the most popular posts on my blog). As it turns out, some updates to the code were required and many of the LinkedIn user interfaces required to complete this integration had changed. I can verify that the steps below work properly and that all screenshots are current as of January 22, 2013. Please leave a comment on this post if you run into any issues.
Those of you who have seen me speak at a user group or SharePoint Saturday event recently know how much I love Windows Azure AppFabric’s Access Control Services and how easy ACS makes it to configure SharePoint 2010 to allow users to log in with OpenID identity providers such as Facebook, Google, Yahoo!, and Windows Live. But what about LinkedIn? While LinkedIn isn’t an OpenID provider per se, numerous sites on the web allow users to sign in using their LinkedIn account credentials via OAuth. When the subject of external identity providers for a future version of the SharePoint User Group of Washington, DC site came up during my recent presentation there, the audience overwhelmingly agreed that LinkedIn was the most “professional” identity provider to integrate (and certainly one that most SharePoint professionals would feel more comfortable using than Facebook). There was only one problem…Azure AppFabric ACS does not natively support LinkedIn as an identity provider. What was I to do?
As one astute observer pointed out during my presentation, ACS is not required to configure SharePoint 2010 to interact with any external identity provider. While ACS greatly simplifies the management and configuration required to set up an external identity provider and its associated claim rules, it is possible to write code that leverages a custom STS (Security Token Service) to manage all of this without involving Azure at all.
Getting Started
Luckily for me, the vast majority of the technical “heavy lifting” required to accomplish this integration had already been done by Travis Nielsen. In this blog post, Travis details the steps (and development prerequisites, including the Windows Identity Foundation SDK 4.0) required to integrate SharePoint 2010 with Facebook as an identity provider using a custom STS (and without using Azure ACS). The steps for integrating LinkedIn are basically the same as they are for Facebook. Below I will detail how configuring the two identity providers differs.
C# OAuth Class for LinkedIn
I was preparing to have to adapt the Facebook OAuth class Travis had found to work with LinkedIn. Fortunately, I stumbled upon a C# OAuth class for LinkedIn that had already been developed by Fatih YASAR. All credit for this aspect of the solution belongs to him.
Creating the Application
Much like configuring Facebook as an identity provider requires the creation of an “application” within Facebook, LinkedIn requires the creation of an application as well.
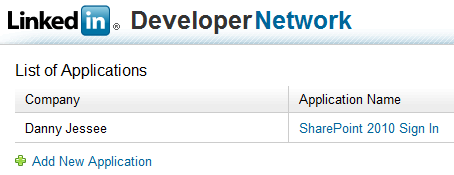
Anyone with a LinkedIn account can create an application through the LinkedIn Developer Network.
1. Go to https://www.linkedin.com/secure/developer.
2. Click Add New Application. Fill out the form to register your new application. Any values you enter here can be changed later on.
3. Press Add Application. The following screen will confirm creation of your LinkedIn application.
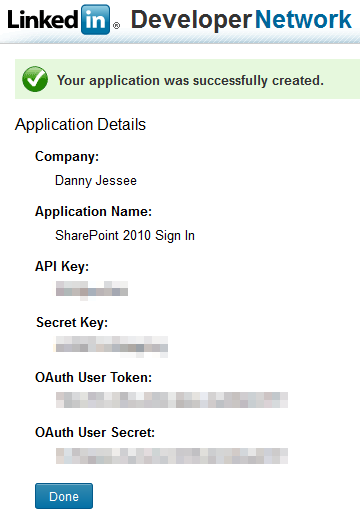
4. As with Facebook, it is important that you take note of the API Key and Secret Key values that are displayed. We will need to use these values in our code (note that you are also provided with OAuth User Token and OAuth User Secret values; these are not required for this setup). Press Done. We will return to our application setup when we have identified the SharePoint 2010 web application with which we want to integrate LinkedIn.
Customizing the STS
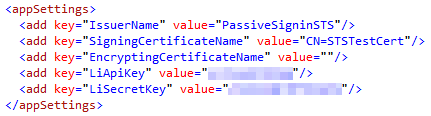
First, add the oAuthBase2 and oAuthLinkedIn classes from Fatih YASAR to the App_Code folder of your STS project. You shouldn’t need to make any changes to the two .cs files, but you will notice that the oAuthLinkedIn class expects to find your API Key and Secret Key values in the
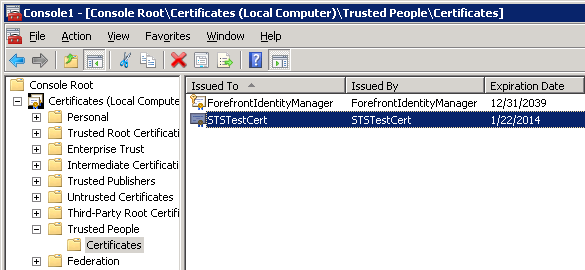
While we are here, it’s worth noting that the STS is configured by default to use the certificate with CN=STSTestCert to sign the SAML tokens it generates containing the claims we configure it to send. This certificate is installed as part of the Windows Identity Framework SDK. We will need to export this certificate so that we can configure SharePoint 2010 to use our custom STS as a Trusted Identity Provider and add this certificate to its trusted certificate store. I was able to find and export this certificate by loading the Certificates (Local Computer) snap-in and navigating to Trusted People > Certificates:
It goes without saying that you would not want to use this certificate in a production environment. Remember to update the SigningCertificateName in your STS’s Web.config to match the name of your production certificate.
Back to the STS code…I tied everything together in Login.aspx.cs. When the login page first loads (with no oauth_token value present in the query string), the user is redirected to the appropriate authorization link (hosted by LinkedIn). Once the user has an access token from LinkedIn, we are able to populate a series of claims for that user. Much like Travis did with Facebook, I make a call to the LinkedIn API to get profile information associated with the current user and define a series of output claims based on this information. The claims I have defined are:
- Name – concatenated first and last name
- Webpage – the LinkedIn user’s profile URL
- NameIdentifier – the LinkedIn user’s profile ID (parsed from the profile URL)
- GivenName and Surname (just because I could)
Below is the code that I used. In a production environment, you will want to include better error handling and more robust XML parsing!
public partial class Login : System.Web.UI.Page
{
    private oAuthLinkedIn liAuth = new oAuthLinkedIn();
    private string profileId = string.Empty;

    protected void Page_Load(object sender, EventArgs e)
    {
        if (Request.QueryString["oauth_token"] == null)
        {
            // If "oauth_token" does not appear in the query string, the user has not been authenticated
            // This call sets the Token and TokenSecret values
            string authLink = liAuth.AuthorizationLinkGet();
            Application["requestToken"] = liAuth.Token;
            Application["requestTokenSecret"] = liAuth.TokenSecret;
            Response.Redirect(authLink);
        }
        else
        {
            // User has been authenticated
            // Use the request token to get the access token
            liAuth.Token = (string)Application["requestToken"];
            liAuth.TokenSecret = (string)Application["requestTokenSecret"];
            liAuth.Verifier = Request.QueryString["oauth_verifier"];
            liAuth.AccessTokenGet(Request.QueryString["oauth_token"]);

            if (liAuth.Token.Length > 0)
            {
                // Make a LinkedIn API call to get claim information
                Dictionary claims = GetClaims();
                HttpContext.Current.Session.Add("LinkedInClaims", claims);
                // Set FedAuth cookie (without this line, SharePoint will not consider the user logged in)
                FormsAuthentication.SetAuthCookie(profileId, false);
                // Pass along the query string - STS default.aspx will redirect to SharePoint
                Response.Redirect("default.aspx?" + Request.QueryString.ToString());
            }
        }
    }

    private Dictionary GetClaims()
    {
        Dictionary claims = new Dictionary();
        string response = liAuth.APIWebRequest("GET", "https://api.linkedin.com/v1/people/~", null);

        if (!string.IsNullOrEmpty(response))
        {
            string firstName = string.Empty;
            string lastName = string.Empty;
            string headline = string.Empty;
            string url = string.Empty;

            // Parse values from response XML
            using (XmlReader reader = XmlReader.Create(new StringReader(response)))
            {
                reader.ReadToFollowing("first-name");
                firstName = reader.ReadElementContentAsString();
                reader.ReadToFollowing("last-name");
                lastName = reader.ReadElementContentAsString();
                reader.ReadToFollowing("headline");
                headline = reader.ReadElementContentAsString();
                reader.ReadToFollowing("url");
                url = reader.ReadElementContentAsString();
                profileId = GetProfileId(url);
            }

            claims.Add(System.IdentityModel.Claims.ClaimTypes.Name, string.Format("{0} {1}", firstName, lastName));
            claims.Add(System.IdentityModel.Claims.ClaimTypes.Webpage, url);
            claims.Add(System.IdentityModel.Claims.ClaimTypes.NameIdentifier, profileId);
            claims.Add(System.IdentityModel.Claims.ClaimTypes.GivenName, firstName);
            claims.Add(System.IdentityModel.Claims.ClaimTypes.Surname, lastName);
        }

        return claims;
    }

    private string GetProfileId(string url)
    {
        // Parse the profile ID from the profile URL
        string id = url.Substring(url.IndexOf("id=") + 3);
        return id.Substring(0, id.IndexOf('&'));
    }
}
Also, don’t forget to update the GetOutputClaimsIdentity() function in the CustomSecurityTokenService.cs class to make use of the output claims that are stored in a Session variable:
protected override IClaimsIdentity GetOutputClaimsIdentity( IClaimsPrincipal principal, RequestSecurityToken request, Scope scope )
{
    if ( null == principal )
    {
        throw new ArgumentNullException( "principal" );
    }

    ClaimsIdentity outputIdentity = new ClaimsIdentity();

    var oAuth20Claims = HttpContext.Current.Session["LinkedInClaims"] as Dictionary;
    if (oAuth20Claims != null)
    {
        foreach (var claim in oAuth20Claims)
        {
            outputIdentity.Claims.Add(new Claim(claim.Key, claim.Value));
        }
    }

    return outputIdentity;
}
Deploying the Custom STS and Updating the OAuth Redirect URL for the LinkedIn Application
Following the steps outlined in Travis’ blog post will give you an ASP.NET 4.0 web site that serves as your Security Token Service. You must deploy or publish this web site so that your SharePoint users will have access to it. For the purposes of this blog post, I have set up an IIS web site at http://sts.contoso.com that points to my custom STS. (Remember to set the .NET Framework version of your STS application pool to v4.0!)
Once I have deployed my STS, I need to return to my LinkedIn application setup and provide the URL to this STS as the OAuth Redirection URL, with a couple of important query string parameters appended:
1. Return to https://www.linkedin.com/secure/developer and click the name of your application.
2. In the OAuth User Agreement section near the bottom of the form, enter the URL to the Default.aspx page at the root of your STS site with the following query string:
?wa=wsignin1.0&wtrealm=http%3a%2f%2fintranet.contoso.com%2f_trust%2f
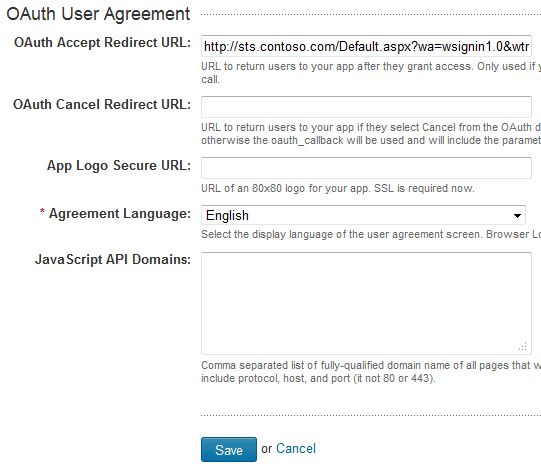
These parameters are defined in greater detail here. The wtrealm parameter should be the URL-encoded value of your SharePoint web application with /_trust/ (%2f_trust%2f) appended. As you can see, you also have the option of specifying a different URL if the user selects “Cancel” from the authorization dialog. Finally, you may also optionally specify a URL to an 80×80 logo image for your app (that must use SSL).
3. Press Save to update your application.
Configuring the Trusted Identity Provider for SharePoint 2010
We will configure our LinkedIn Trusted Identity Provider for SharePoint 2010 to map the following claim types that are included in the SAML tokens we receive from our custom STS:
- http://schemas.xmlsoap.org/ws/2005/05/identity/claims/nameidentifier (LinkedIn profile ID)
- http://schemas.xmlsoap.org/ws/2005/05/identity/claims/name (First and last name)
- http://schemas.xmlsoap.org/ws/2005/05/identity/claims/webpage (LinkedIn profile URL)
This is done by running the following PowerShell script:
$cert = New-Object System.Security.Cryptography.X509Certificates.X509Certificate2("c:\STSTestCert.cer")
$map1 = New-SPClaimTypeMapping -IncomingClaimType "http://schemas.xmlsoap.org/ws/2005/05/identity/claims/nameidentifier" -IncomingClaimTypeDisplayName "LinkedIn ID" -LocalClaimType "http://schemas.xmlsoap.org/ws/2005/05/identity/claims/upn"
$map2 = New-SPClaimTypeMapping -IncomingClaimType "http://schemas.xmlsoap.org/ws/2005/05/identity/claims/name" -IncomingClaimTypeDisplayName "Display Name" -LocalClaimType "http://schemas.xmlsoap.org/ws/2005/05/identity/claims/givenname"
$map3 = New-SPClaimTypeMapping -IncomingClaimType "http://schemas.xmlsoap.org/ws/2005/05/identity/claims/webpage" -IncomingClaimTypeDisplayName "LinkedIn URL" -SameAsIncoming
$realm = "http://intranet.contoso.com/_trust"
$signinurl = "http://sts.contoso.com/"
New-SPTrustedIdentityTokenIssuer -Name "LinkedIn" -Description "LinkedIn custom STS" -Realm $realm -ImportTrustCertificate $cert -ClaimsMappings $map1,$map2,$map3 -SignInUrl $signinurl -IdentifierClaim $map1.InputClaimType
New-SPTrustedRootAuthority -Name "LinkedIn" -Certificate $cert
The script is fairly straightforward. A couple items to note:
- The $cert defined in line 1 is created based on the exported STS signing certificate mentioned previously. In this case, I exported the certificate to my C:\ drive and reference it there.
- Because certain claim type mappings are already used by SharePoint (such as name and nameidentifier), I had to define different LocalClaimType values for 2 of my 3 claim mappings.
- I use the LinkedIn profile ID (and not the first and last name of the user) as the IdentifierClaim because only the profile ID is guaranteed to be unique (e.g., two different users could have the same first and last names). I will write some custom code to update the display name property of the SPUser objects associated with LinkedIn users so that they see their first and last name (instead of that 7-digit ID) at the top of the screen when they sign in to SharePoint.
Running this script will add a Trusted Identity Provider called LinkedIn to the list of Trusted Identity Providers that can be added to any web application through Central Administration:
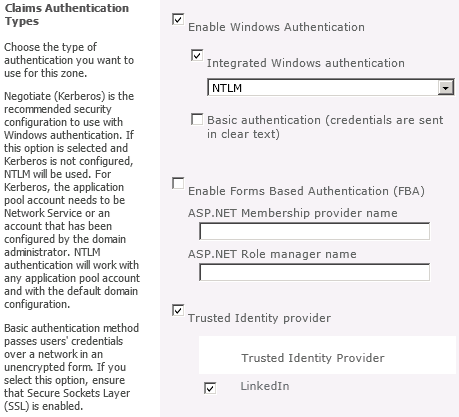
After adding the new Trusted Identity Provider, it helps to define a User Permission policy for the web application that allows any users who authenticate using this Trusted Identity Provider to be authorized to have read access to the web application:
The Moment of Truth
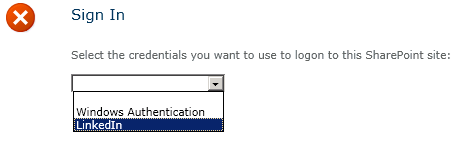
Users should now be able to sign in to SharePoint with their LinkedIn accounts. Let’s give it a shot! Depending on the different authentication providers configured for a given web application, you may or may not see a sign-in page allowing you to choose which credentials to use to log in to SharePoint. We will choose LinkedIn:
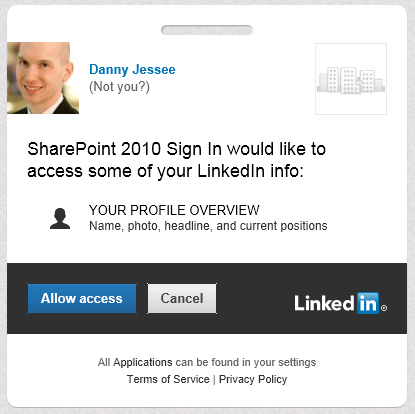
A series of HTTP redirects will take place. If the user has previously logged in to LinkedIn and has a cookie, that user will not need to enter his/her credentials again. In this screen, the user is agreeing to allow the LinkedIn application to have access to his or her account information (which consists of name, profile headline, and profile URL):
If the user has not previously logged in to LinkedIn and/or does not have a cookie, the following screen will appear:
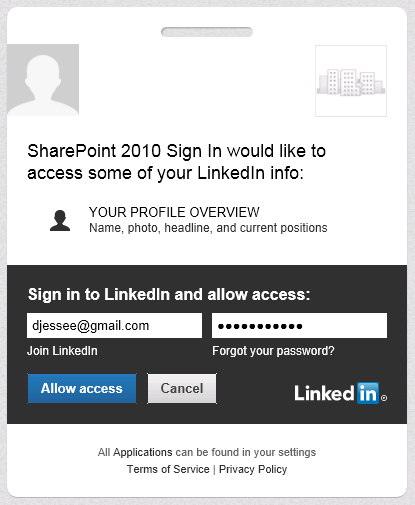
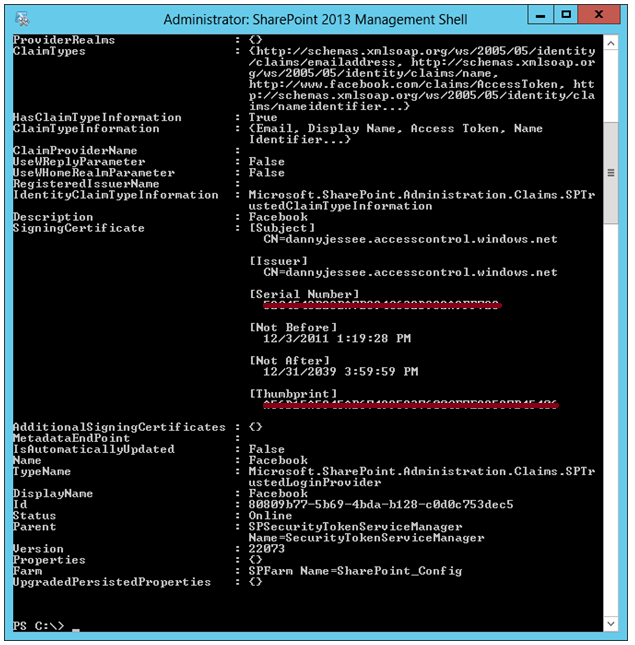
Users always retain the ability to revoke your application’s permission at any time. Press Allow access and some more HTTP redirects will take place that should eventually land the user back in SharePoint. I have used Travis Nielsen’s Claims Web Part on the team site where users log in with LinkedIn. Here you can see the claims mappings we configured earlier and how those claims are presented to SharePoint from our custom STS:
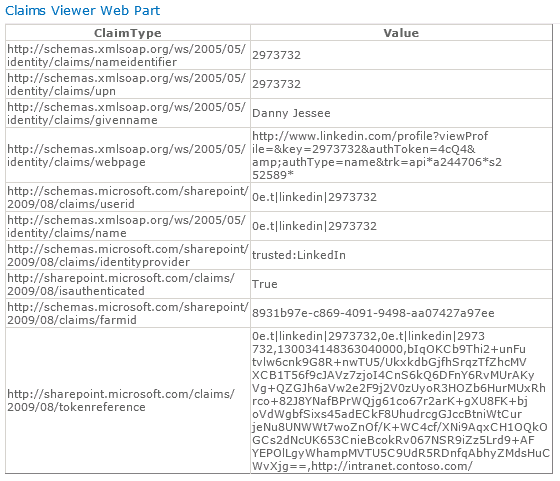
Because we are using the user’s LinkedIn profile ID as the nameidentifier claim, that value initially appears at the top right of the page when the user first signs in:

To improve the personalization experience for the end user, we can write the following code (in a web part, for instance) to update the DisplayName property of the SPUser to read the value from the givenname claim instead:
public class LinkedInNameChanger : WebPart
{
    string givenName = string.Empty;
    IClaimsIdentity claimsIdentity;
    Label lblOutput = new Label();
    Button btnFixUserName = new Button();

    protected override void OnLoad(EventArgs e)
    {
        // Read the incoming claims and assign values
        IClaimsPrincipal claimsPrincipal = Page.User as IClaimsPrincipal;
        claimsIdentity = (IClaimsIdentity)claimsPrincipal.Identity;

        foreach (Claim c in claimsIdentity.Claims)
        {
            if (c.ClaimType.EndsWith("givenname"))
            {
                givenName = c.Value;
                break;
            }
        }
    }

    protected override void CreateChildControls()
    {
        btnFixUserName.Text = "Fix Display Name";
        btnFixUserName.Click += new EventHandler(btnFixUserName_Click);
        this.Controls.Add(btnFixUserName);
        this.Controls.Add(lblOutput);
    }

    void btnFixUserName_Click(object sender, EventArgs e)
    {
        try
        {
            Guid siteId = SPContext.Current.Site.ID;
            Guid webId = SPContext.Current.Web.ID;
            SPUser currentUser = SPContext.Current.Web.CurrentUser;
            SPSecurity.RunWithElevatedPrivileges(delegate()
            {
                using (SPSite site = new SPSite(siteId))
                {
                    using (SPWeb web = site.OpenWeb(webId))
                    {
                        web.AllowUnsafeUpdates = true;
                        SPUser user = web.AllUsers[currentUser.LoginName];
                        user.Name = givenName;
                        user.Update();
                        lblOutput.Text = "
Display name successfully updated.
";
                    }
                }
            });
        }
        catch (Exception ex)
        {
            lblOutput.Text = "
Exception: " + ex.Message + "
";
        }
    }
}
There now, that’s better!