Tagged: ACS
Using Azure ACS to Sign In to SharePoint 2013 with Facebook
For those of you who have seen me speak (or read my blog posts) about Claims-based identity, SharePoint 2010, Facebook, and the cloud, you already know that Windows Azure Access Control Service (ACS) can be used to set up identity providers such as Windows Live ID, Google, Yahoo!, and Facebook in SharePoint 2010 through the magic of Claims.
In this blog post, I am pleased to report that all the steps to follow to enable this integration with SharePoint 2010 also work with SharePoint 2013!
For those who are unfamiliar with this integration, I will cover the steps at a high-level below with screenshots from SharePoint 2013. Keep in mind the process to follow is the same for SharePoint 2010.
Prerequisites
- A Facebook account integrated with the Facebook Developers application
- A Windows Azure account with an ACS namespace created (these can be created using the Service Bus, Access Control & Caching section of the portal)
- SharePoint 2013 (might I recommend CloudShare‘s preconfigured SharePoint 2013 RTM Small Farm environment?)
- An X.509 certificate to be used by Azure ACS to digitally sign tokens (and explicitly trusted by SharePoint)
Procedures
Setting up this integration requires configuration steps to be performed in three different places:
- Within Facebook, an application must be created that supports “Website with Facebook Login.”
-
Within the Azure ACS management portal, a new Identity Provider (IP), Relying Party (RP) application, and Rule Group must be created to inform Azure ACS about:
a. The Facebook application created above.
b. The SharePoint environment to be configured with Azure ACS integration below. - Within SharePoint, we must create a new web application with Claims (in SharePoint 2013, Claims is the default authentication mechanism) and configure it to point to our Azure ACS setup as a Trusted Identity Provider.
We must also inform both Azure ACS and SharePoint about the SSL certificate that will be used to sign the SAML tokens containing a user’s claims. This is done by uploading the X.509 certificate into the Azure ACS management portal and telling SharePoint to trust this certificate (via the New-SPTrustedRootAuthority and New-SPTrustedIdentityTokenIssuer cmdlets which we will execute later on). In a demonstration environment, I use a self-signed certificate made via the makecert command. In production, you would obviously want to use a legitimate SSL certificate.
Facebook Application Setup
Within the Facebook Developers application, click Create New App.
Give the app a Name and a Namespace. Click Continue.
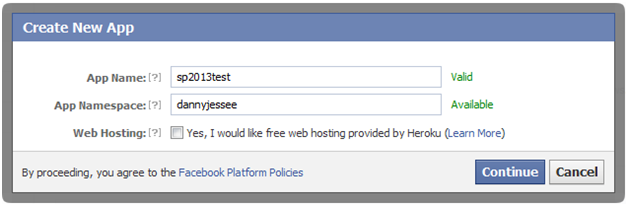
After passing the Captcha check, select Website with Facebook Login in the next screen and enter the URL to your Azure ACS Service Namespace (e.g., https://{your namespace}.accesscontrol.windows.net). Click Save Changes.
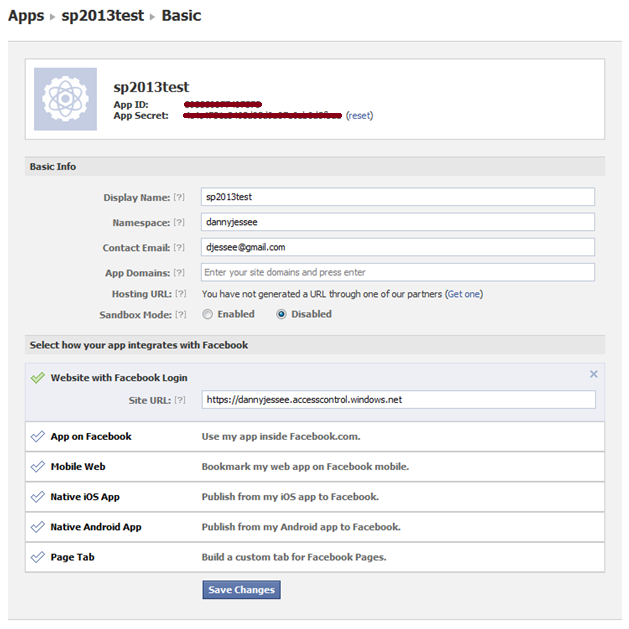
Take note of the App ID and App Secret values that appear at the top of this screen. You will need to use these to configure Azure ACS to leverage this application. That’s all we need to do within Facebook!
Azure ACS Setup
Within Azure ACS, we must configure the following four things:
- Facebook as an Identity Provider.
- SharePoint as a Relying Party Application.
- Claims Rule Groups to determine how Claims are passed from the identity provider to the relying party application.
- The Token Signing Certificate that Azure ACS will use to prove that it is indeed the issuer of the SAML token that SharePoint receives.
Identity Provider
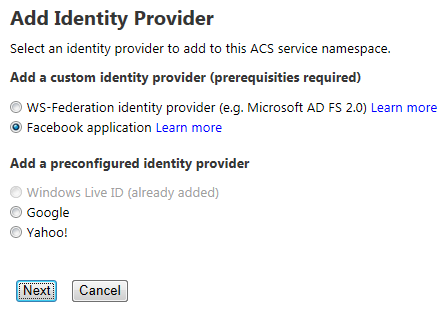
From within your Azure ACS management portal (e.g., https://{your namespace}.accesscontrol.windows.net) and select Identity providers from the Trust relationships section in the left navigation. In the next screen, click Add.

In the next screen, choose Facebook application and click Next.
In the next screen, enter the Application ID and Application secret values from the Facebook application you created above. You should also provide a Display name (for use within the ACS management portal) and a comma-separated list of Application permissions (note that email is the only required permission to enable Facebook users to sign in to SharePoint). You can, however, request additional permissions to do lots of fun and exciting things. Those permission strings are defined here.
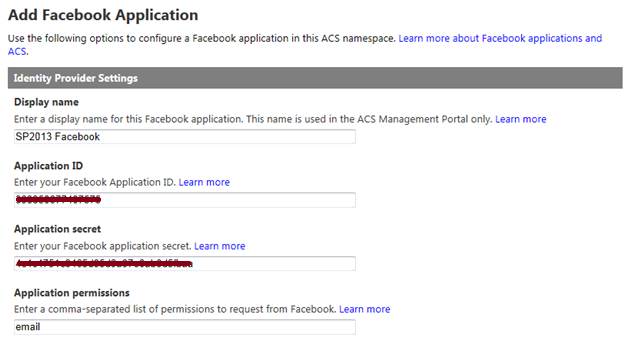
You do not need to specify values for Login link text or Image URL unless you plan to configure more than one Azure ACS identity provider to use with SharePoint. If you have already configured your Relying party applications within Azure ACS, you may select them at the bottom of this screen. Otherwise, we will configure SharePoint as an RP in the next step.
Press Save to save changes.
Relying Party Application
From within your Azure ACS management portal (e.g., https://{your namespace}.accesscontrol.windows.net) and select Relying party applications from the Trust relationships section in the left navigation. In the next screen, click Add.

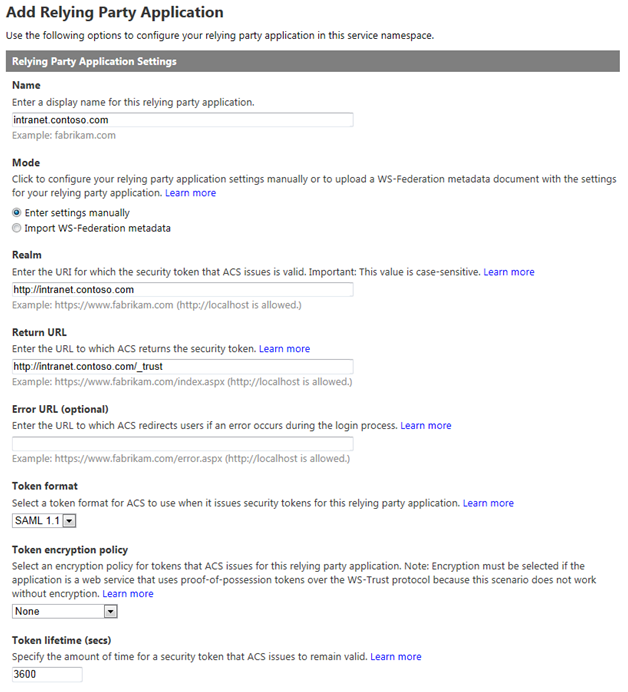
In the next screen, provide a name for the relying party application (I often just use the fully-qualified domain name of my SharePoint web application) and choose to Enter settings manually. In the boxes below, enter the following values:
- Realm – URL of your SharePoint web application (note that a URN can also be entered here and, in many cases, is the preferred approach)
- Return URL – URL of your SharePoint web application + /_trust – this is the endpoint for SharePoint’s STS, which is where Azure ACS will send the SAML token it creates
- Token format – SAML 1.1
- Token lifetime – enter a value greater than the default 600 seconds (Wictor Wilen gives a great explanation why here)
In the Authentication Settings section, select the Identity provider you configured above and choose to Create a new rule group. Under Token Signing Settings, choose whether to Use service namespace certificate (if you have already configured a certificate within Azure ACS) or Use a dedicated certificate if you would like to use a different X.509 certificate exclusively for this relying party application.
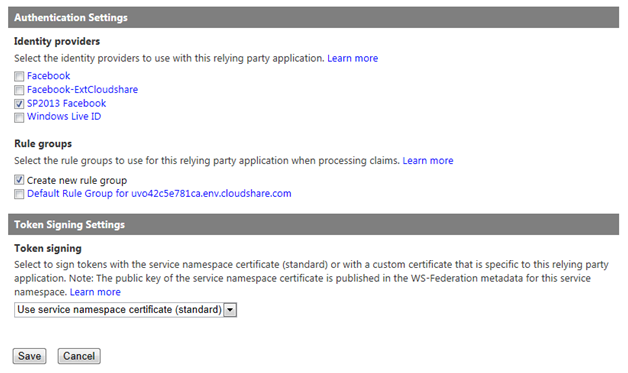
Click Save to save changes.
Rule Group
From within your Azure ACS management portal (e.g., https://{your namespace}.accesscontrol.windows.net) and select Rule groups from the Trust relationships section in the left navigation. In the next screen, click Default Rule Group for {your web application}.
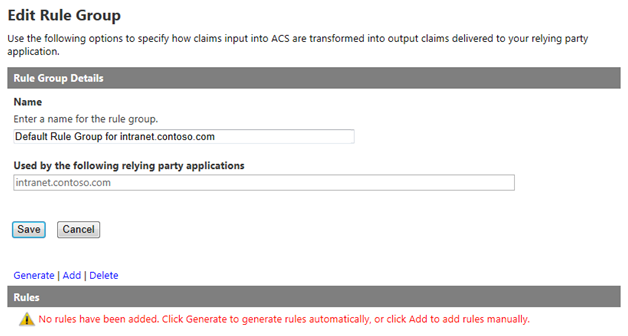
Note that no rules are added by default. Click Generate and select the identity provider you created above.
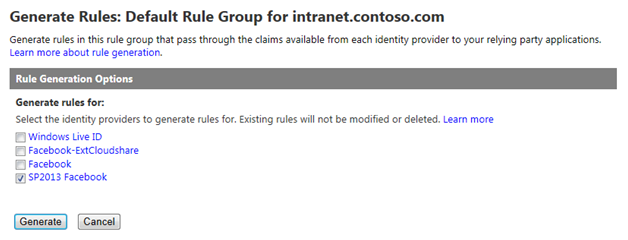
Click Generate to generate Claims rules for the 5 values Azure ACS can obtain from a logged in Facebook user:
- AccessToken – the Facebook Graph API access token
- emailaddress – the email address associated with the user’s Facebook profile
- expiration – the expiration date/time of the AccessToken granted above
- name – the Facebook user’s display name
- nameidentifier – the Facebook user’s unique profile ID (integer)
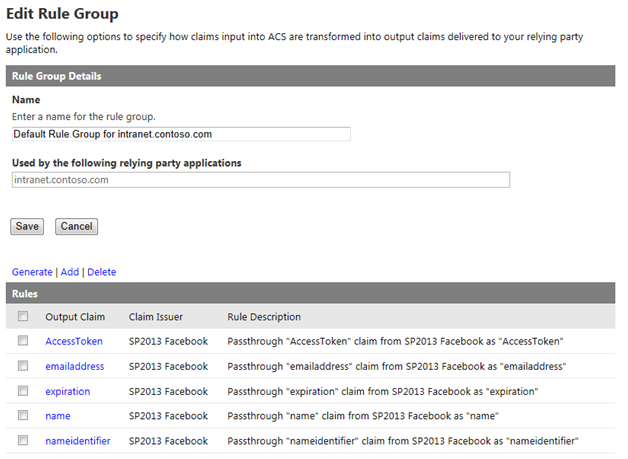
Press Save to save the rules.
Upload Token Signing Certificate
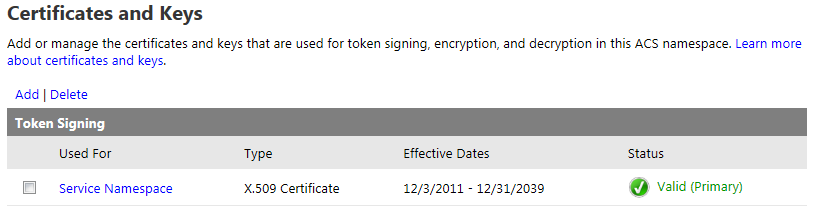
If you haven’t already, you will need to configure Azure ACS to utilize an X.509 certificate to digitally sign the tokens it generates. Optionally, you can also specify certificates to use for token encryption and decryption. For the purposes of this demonstration, I generated a self-signed certificate using the makecert utility. DO NOT DO THIS IN PRODUCTION! I then uploaded this certificate by going to the Certificates and Keys link under Service settings in the ACS management portal.
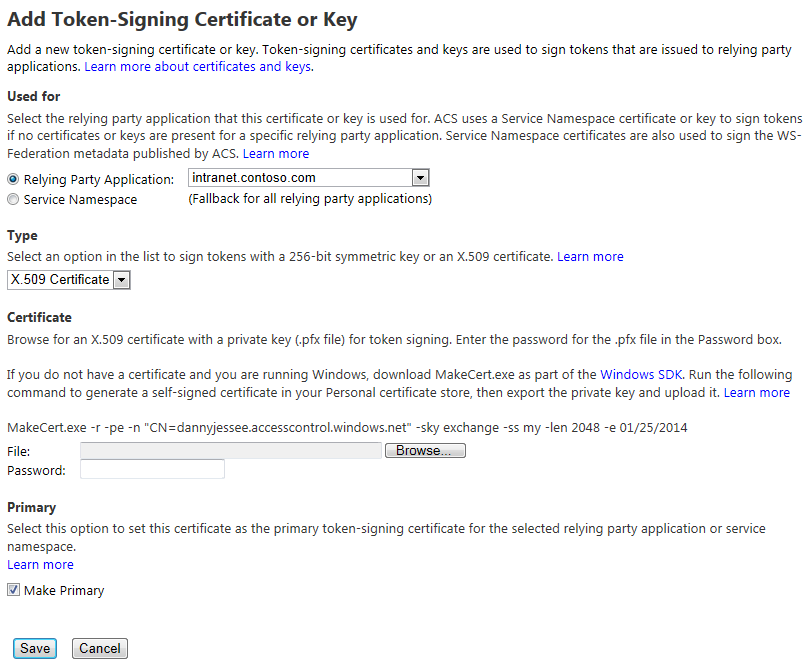
Click Add to upload your certificate. This page allows you to specify where the certificate should be used, what type of certificate it is, and how to make it the primary token-signing certificate. It even includes the specific makecert command you need to run to generate a self-signed certificate (again, I cannot overemphasize how important it is that you NOT use a self-signed certificate in production!)
That’s all we need to do within Azure ACS!
SharePoint 2013 Setup
Within SharePoint, we must do the following:
- Create a new web application using Claims-based authentication (the default mechanism in SharePoint 2013).
- Configure Azure ACS as a new Trusted Identity Provider for that web application and tell SharePoint to trust the certificate Azure ACS uses to sign its SAML tokens.
- Set a User Policy within the web application to allow users who log in via the Trusted Identity Provider to have access to the site.
New Web Application
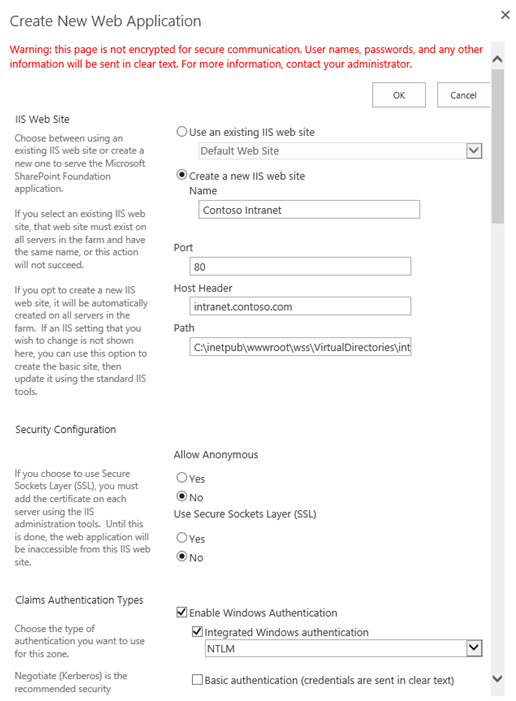
From SharePoint 2013 Central Administration, create a new web application. Unlike SharePoint 2010, SharePoint 2013 does not prompt you to choose between Classic and Claims-based authentication. Claims is the default (hooray)!
Make sure the host header matches the host header for the Return URL specified in the Azure ACS relying party application setup. Enable Integrated
Windows Authentication with NTLM at this step. You’ll notice no Trusted Identity providers exist at this point.
Enjoy the friendly new progress messages in SharePoint 2013:

Create a new site collection at the root of the web application and choose a Windows identity for the primary Site Collection Administrator.
Configure Azure ACS as a new Trusted Identity Provider
In order to enable us to select Azure ACS as a trusted identity provider for the web application, we need to run some PowerShell. The script to run appears below.
$realm = "http://intranet.contoso.com"
$signinurl = "https://dannyjessee.accesscontrol.windows.net:443/v2/wsfederation?wa=wsignin1.0&wtrealm=http%3a%2f%2fintranet.contoso.com%2f"
$certloc = "C:\dannyjessee.cer"
$rootcert = Get-PfxCertificate $certloc
New-SPTrustedRootAuthority "Danny Jessee Azure ACS" -Certificate $rootcert
$cert = New-Object System.Security.Cryptography.X509Certificates.X509Certificate2($certloc)
$map1 = New-SPClaimTypeMapping -IncomingClaimType "http://schemas.xmlsoap.org/ws/2005/05/identity/claims/emailaddress" -IncomingClaimTypeDisplayName "Email" -SameAsIncoming
$map2 = New-SPClaimTypeMapping -IncomingClaimType "http://schemas.xmlsoap.org/ws/2005/05/identity/claims/name" -IncomingClaimTypeDisplayName "Display Name" –LocalClaimType "http://schemas.xmlsoap.org/ws/2005/05/identity/claims/givenname"
$map3 = New-SPClaimTypeMapping -IncomingClaimType "http://www.facebook.com/claims/AccessToken" -IncomingClaimTypeDisplayName "Access Token" -SameAsIncoming
$map4 = New-SPClaimTypeMapping -IncomingClaimType "http://schemas.xmlsoap.org/ws/2005/05/identity/claims/nameidentifier" -IncomingClaimTypeDisplayName "Name Identifier" –LocalClaimType "http://schemas.xmlsoap.org/ws/2005/05/identity/claims/upn"
$map5 = New-SPClaimTypeMapping -IncomingClaimType "http://schemas.microsoft.com/ws/2008/06/identity/claims/expiration" -IncomingClaimTypeDisplayName "Expiration" -SameAsIncoming
New-SPTrustedIdentityTokenIssuer -Name "Facebook" -Description "Facebook" -Realm $realm -ImportTrustCertificate $cert -ClaimsMappings $map1,$map2,$map3,$map4,$map5 -SignInUrl $signinurl -IdentifierClaim $map1.InputClaimType
This script performs the following actions:
- Establishes a trust relationship between SharePoint and the Azure ACS token signing certificate (this is the equivalent of going to Security > Manage trust and uploading this certificate in Central Administration).
- Sets up the claim rules to pass the claims returned from Azure ACS to the SharePoint STS at the _trust endpoint (in some cases, these claims need to be mapped to different claim type URIs to avoid collisions with claims provided by the SharePoint STS).
- Creates a new trusted identity provider associated with the appropriate realm, certificate, claims mappings, and sign in URL (this value can be obtained by going to Application integration under Development in the Azure ACS management portal, then selecting Login pages).
Some things to keep in mind as you modify this script to run in your environment:
- Ensure the value for $realm matches the realm value used when creating the relying party application within Azure ACS.
- Ensure the X.509 certificate used here is the same as the token signing certificate used when creating the Relying Party application within Azure ACS.
- Ensure the value for $signinurl is set properly for your SharePoint web application.
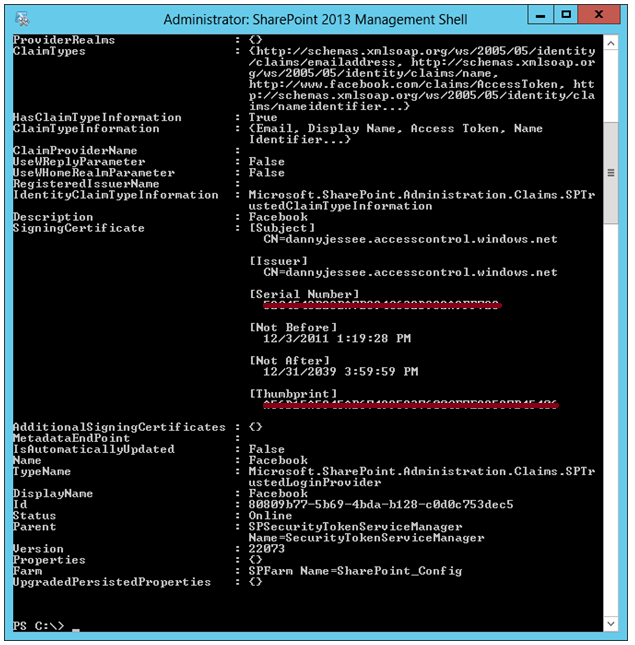
Run this PowerShell script from the SharePoint 2013 Management Shell (as an Administrator). If you don’t see red text, you’re doing alright!
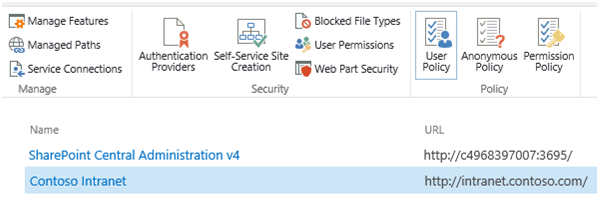
Return to the list of web applications in SharePoint 2013 Central Administration. Select the web application and press Authentication Providers.
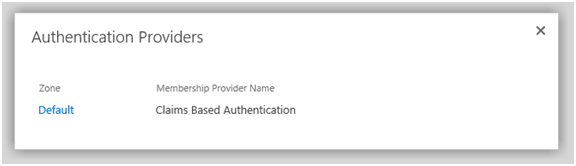
Choose the appropriate zone and scroll down. Facebook should now appear in the list of trusted identity providers:
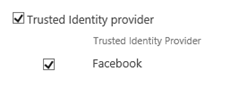
Select Facebook and press Save. You have now configured Azure ACS as a new trusted identity provider, and SharePoint knows it can trust SAML tokens signed with your Azure ACS token-signing certificate.
Set User Access Policy
In order for users to access your SharePoint 2013 site once they have authenticated via Facebook, we must grant them the appropriate level of authorization. To do this, I recommend setting a “Full Read” policy for all users who authenticate to SharePoint via our “Facebook” trusted identity provider. Start by selecting the web application in Central Administration and go to User Policy.
Choose Add Users, then select the appropriate zone (All zones) and press Next.
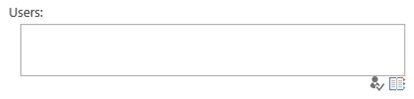
Select the address book icon beneath the Users text box to bring up the Select People and Groups dialog.
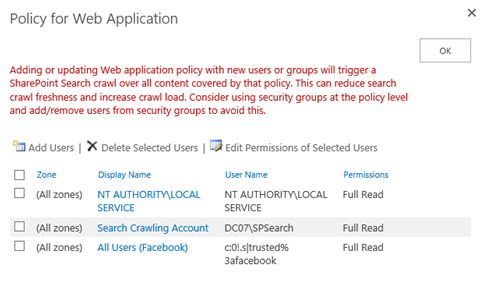
Select All Users, then choose All Users (Facebook). Press Add to select the group.

Check the box for Full Read in the permissions section and press Finish.

The new policy is now displayed at the bottom of the list.
With that, our SharePoint configuration is complete! We are now ready to have our users sign in to SharePoint 2013 with Facebook.
Signing in to SharePoint 2013 with Facebook
Navigate to the home page of the web application. The default sign in page will appear.
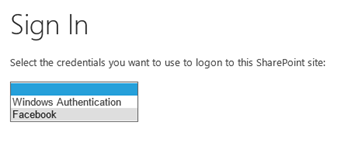
Choose Facebook from the drop down list. The user will be redirected (through the Azure ACS portal) to a Facebook-hosted login page.
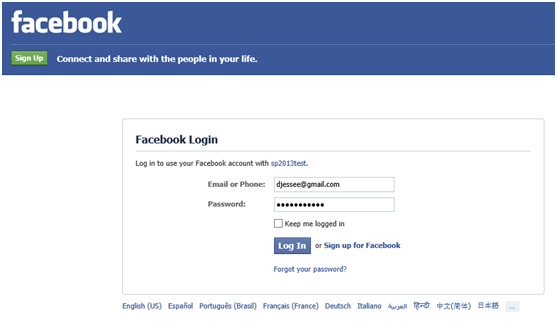
Enter your Facebook credentials and press Log In. The first time a user attempts to log in to your SharePoint site with Facebook, he or she will be prompted to grant the Facebook application access to the user’s basic information and email address (this is based on the permissions we set up when we initially defined the Facebook identity provider in the Azure ACS management portal).
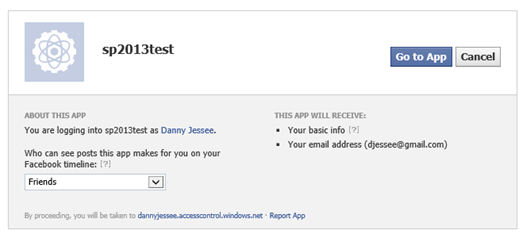
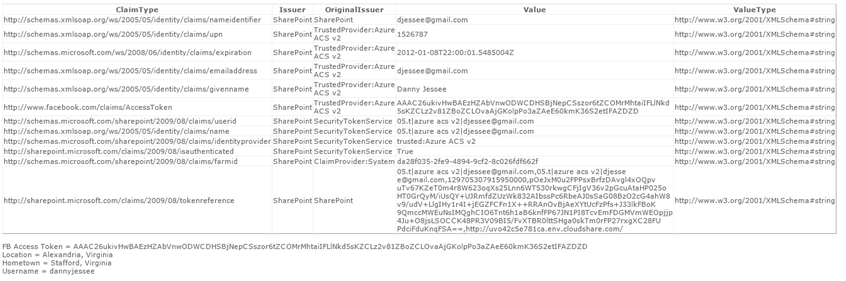
Press Go to App. The user should be redirected back to Azure ACS, which then redirects the user back to SharePoint…logged in with Facebook credentials!

Note the user’s display name is the email address associated with the user’s Facebook account. This is because we set EmailAddress as the IdentifierClaim in the PowerShell script we ran to configure Azure ACS as a trusted identity provider.
I know this is a TON of information to put in a single blog post, so feel free to post any questions in the comments!
Slides and Code for my #SPSCincinnati Session
A huge thank you to all the organizers, volunteers, speakers, sponsors, and attendees who made SharePoint Saturday Cincinnati 2012 (also known as “ScarePoint Saturday Spookinnati”) such a huge success! I had a great time making new friends and catching up with old ones.
I especially wanted to thank everyone who came out early on a rainy, cold Saturday morning to attend my session “SharePoint 2010, Claims-based Identity, Facebook, and the Cloud.” The audience was very engaged and we had some of the best discussions and questions of any time I have ever given this session.
One question I received that I wanted to address specifically here was about how to integrate a Facebook application with a Facebook Page. Unfortunately, you can’t create a Facebook application using the identity of your Facebook Page. You MUST use your “authentic personal Facebook account” to create the application that is required to set up Facebook as an identity provider in the Azure ACS management portal (note that this is not a limitation of Azure ACS; it would apply whether you were writing a custom STS to support Facebook login, or even if you were using Facebook to log in to a web site that had nothing to do with SharePoint or IIS). That said, this restriction is something organizations need to keep in mind as they plan the management and governance of the Facebook application required to support logging in to their web site—SharePoint or otherwise.
Note that it IS possible to post things like status updates from SharePoint to a Facebook Page’s wall, as long as you request the manage_pages permission from users who log in using your application. Note that you would have to write additional code to retrieve a separate access_token for the Page (which would require the logged in user to be an administrator of that Page). If anyone out there tries this approach, please let me know how it works for you!
Here are the slides from my presentation:
Source code and/or a WSP for the web parts I demonstrated can be downloaded from CodePlex.
To learn more about Azure ACS, check out this page and sign up for your free Windows Azure trial.
Thanks again to everyone for such a great event!
Slides, Code, and More for my SPSBOS Session
Thanks to everyone who came out to SharePoint Saturday Boston yesterday! Once again, the organizers put together an outstanding event with well over 300 developers, administrators, and end users in attendance. Thanks, also, to all the sponsors who help to make such great events possible.
I had the great privilege of being able to speak at this event. I would like to extend a special thank you to everyone who attended my session on Claims-Based Identity, Facebook, and the Cloud yesterday morning. There were lots of great questions and discussions! Thanks to all of you for your participation. I hope you enjoyed the session and found the information presented to be valuable.
Below are links to my presentation, code, PowerShell script, and CloudShare environment. Additional background information can be found in my blog post Beyond Authentication: Deeper Facebook Integration with SharePoint.
Download presentation as .pptx
Web parts, source code, site template, and required certificates
PowerShell script to configure Azure ACS trusted identity provider
If you would like a copy of the CloudShare virtual machine I used for my demos, follow this link to obtain a 14-day free trial of CloudShare (if you don’t already have an account) and access a copy of the environment. I used the VM called SharePoint 2010 Enterprise SP1 for my demos. If you would like to know more about CloudShare (I love CloudShare!), please contact me.
Also, to take full advantage of the functionality shown in this demo, I strongly encourage you to sign up for a 90-day free trial of Windows Azure. This will give you access to the AppFabric Access Control Service (ACS) capabilities I demonstrated. If you already have a Windows Azure account, or if you choose to convert your trial to a full-blown account, the ACS features are free through December 1, 2012 (after this date, the charge will be $1.99 for every 100,000 transactions).
If you have any questions or issues deploying or running the code and/or scripts above, feel free to leave a comment below. Thanks again to everyone for such a fantastic event!
Beyond Authentication: Deeper Facebook Integration with SharePoint (with code!)
I had the privilege of speaking at SharePoint Saturday in Virginia Beach yesterday. This event is of particular significance each year within the community because the first ever SharePoint Saturday was held in Virginia Beach back in 2009 and SPSVB is seen as the “kickoff” for a new year of SharePoint Saturdays. As always, I learned so much at this event and had a great time meeting with and getting to know many of the speakers, volunteers, and attendees. I would like to thank each person who gave me 70 minutes of their time yesterday to learn more about Claims-based identity in SharePoint 2010 and see how we can do more than just log in to SharePoint with Facebook. I would especially like to thank those who provided me with feedback. I plan to refine and improve this presentation for future community events, so stay tuned!
Below is the slide deck I used in my session. In addition to introducing Claims-based identity in SharePoint 2010 and detailing some of the things to look out for when working with Claims, it illustrates how to configure Windows Azure AppFabric’s Access Control Services to support logging in to SharePoint with Facebook accounts. More detailed information about this process can be found here.
But we can do more than just log in…
Much of the feedback I received yesterday related to the various demonstrations of how I used the Facebook C# SDK to surface data from Facebook in SharePoint (and vice versa) using Facebook’s Graph API. When it comes to the potential of the integration of Facebook and SharePoint, the sky is truly the limit. The AccessToken claim that Facebook includes in the OAuth token it generates will provide your application with access to any data it requests (while still obeying the privacy settings you and everyone in your friends list have in place).
More about the Facebook C# SDK
You can download the Facebook C# SDK here. The “Assemblies only” version is all you need to get started, although it is interesting and informative to be able to see the source code. (Having access to the source code helped me troubleshoot this issue as well.) The SDK includes support for .NET Framework 3.5/4.0 and Silverlight. Obviously, we must use the .NET Framework 3.5 version in conjunction with our SharePoint development. The project is well documented and includes some great examples here and at Prabir’s blog here.
Data returned from the Facebook Graph API is in JSON format. To parse this data quickly and efficiently, my project includes the Json.NET framework.
If you download the source code for my demos here, you will see it includes a series of SharePoint project items. They include:
ClaimsWebPart
Largely based on this blog post, the Claims Web Part displays all of the claims included in the logged in user’s identity token in grid format. I added some Facebook-specific items in here for debugging purposes, such as displaying the user’s Facebook access token (parsed from the identity token), then using that token and the Facebook C# SDK to get the user’s current city, hometown, and Facebook user name.
The Claims Web Part is a great troubleshooting/debugging tool for developers and administrators who are new to working with Claims. It is a quick and easy way to verify the claim rules you configured when creating your Trusted Identity Provider are behaving the way they should.
SilverlightToFacebook
In my demo, a Silverlight application interfaces with the user’s webcam and saves snapshots to a SharePoint document library (hat tip to MossLover for that code). This class contains an event receiver that then takes those photos added to the SharePoint document library and uploads them to Facebook.
SPSVBDemos
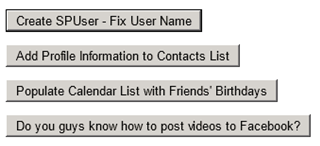
This web part is the “dashboard” I used to do a handful of quick proof-of-concept demos, including the following:
- Changing the display name of the currently logged in SPUser to match the name claim returned by Facebook (instead of the user’s email address or Claims-encoded username).
- Adding information from the user’s Facebook profile (name, city, birthday, employer, job title, etc.) to a contacts list.
- Populating a calendar list with recurring events for all of your friends’ birthdays (based on friends whose privacy settings allow sharing of this information).
- Uploading a video from the file system to the user’s Facebook profile.
StatusUpdateWebPart

This web part allows the user to update his/her Facebook status directly from SharePoint. Optionally, the user may also include a link (with image, caption, description, etc.) with each status update.
WeatherWebPart
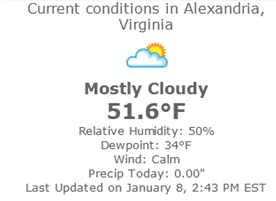
This web part determines the current user’s city from his/her Facebook profile, then constructs a request to the URL-driven Weather Underground API to retrieve the current weather conditions in that city. While many of these web parts may only have value in demos, I believe this web part represents a meaningful way for SharePoint site owners to provide a nice personalization experience to end users who log in to SharePoint with Facebook accounts.
Site Template
I also created a site template (SPSVB.WSP) that contains the custom lists and web parts I used in my demo. It is included in the code download.
Thanks again to everyone who helped to make SharePoint Saturday Virginia Beach such a great success! If you have any questions or suggestions about this code, please feel free to post them in the comments.
Download
Using Claims Authentication to Configure Multiple Authentication Providers in a CloudShare Environment
This post originally appeared in the CloudShare Community Blog on October 25th.
CloudShare’s very own Chris Riley recently shared an environment of mine in a blog post about network orchestration. This environment leverages some exciting new capabilities in SharePoint 2010: namely Claims Authentication in a SharePoint 2010 web application and the ability to configure multiple authentication providers in a single zone. These technologies offer exciting prospects to anyone who previously had to configure separate host headers and URLs for different extranet customers, depending on the mechanism required for each subset of users to log in.
How does this look to end users? To see Claims in action, fire up the “SharePoint 2010 (Clean Installation)” image from the shared environment, open Internet Explorer and navigate to http://intranet.contoso.com.
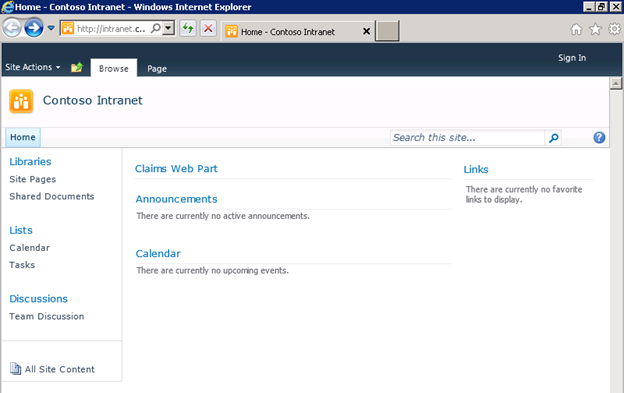
You’ll see an empty Team Site with a “Claims Web Part” at the top. Since anonymous access to the site is enabled, the Claims Web Part will initially be empty.

Press the “Sign In” link at the top right of the page. The page that appears, http://intranet.contoso.com/_login/default.aspx, is new in SharePoint 2010 and allows users to choose from all the different authentication providers configured for that web application. (As a side note, there are some exciting opportunities for custom code development here, including the ability to automatically redirect users to a specific authentication provider based on parameters such as their IP address, bypassing this page of options entirely! After all, not all end users are going to appreciate the distinction between “Windows Authentication” and “Forms Authentication.”)
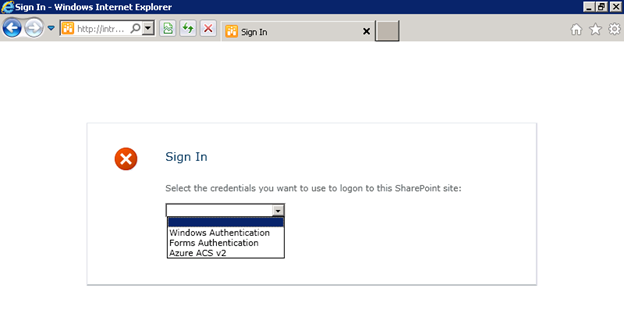
In this web application, I have configured the following providers:
- Windows Authentication – standard NTLM credentials.
- Forms-Based Authentication (FBA) – you may remember this option from MOSS. In this environment, I have created a custom membership provider that validates inputted credentials against a SQL Server database. In practice, FBA can be used to authenticate external users against Active Directory or any other account database.
- Azure Access Control Services (ACS) v2 – allows users to log in with credentials from Open ID providers such as Windows Live ID and Facebook.
For a more in-depth read about how to configure Azure ACS v2 as an authentication provider in SharePoint, including adding other Open ID providers such as Google and Yahoo, check out this blog post by Travis Nielsen.
If I choose Azure ACS v2 (this can be given a friendlier name when you set it up as a Trusted Identity Provider through PowerShell), I will see the following screen. Claims Authentication relies on a series of HTTP redirects to seamlessly direct users between SharePoint and external trusted identity providers such as Azure ACS to log them in. This page is hosted completely outside of my SharePoint environment:
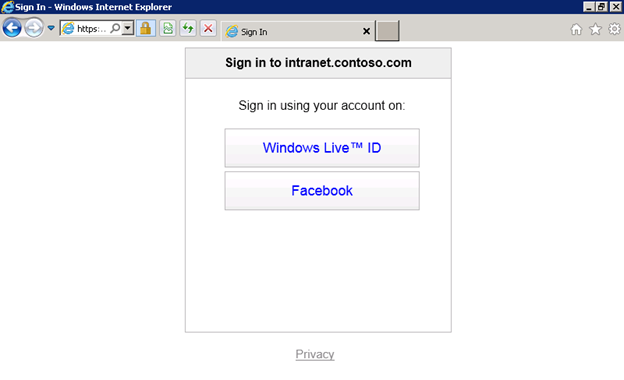
By choosing “Windows Live ID,” I will be redirected to https://login.live.com, where I will be prompted to enter my Windows Live ID credentials. (Similarly, you will be redirected to any of the other Open ID providers’ sites should you choose them instead.) After I sign in, another series of HTTP redirects takes place that eventually lands me back in my SharePoint environment, all logged in. The Claims web part on the page shows the various Claims that were sent by the Trusted Identity Provider in an XML-based Security Assertion Markup Language (SAML) token back to SharePoint:
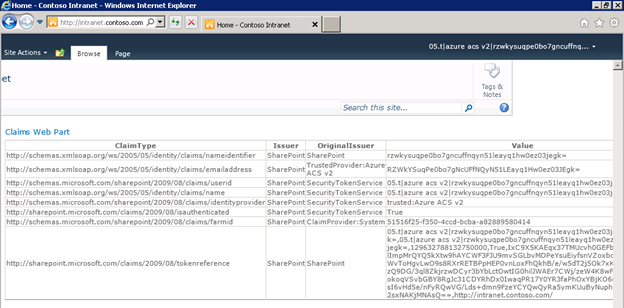
As an application developer, I can leverage these Claims (you see some examples of Claims in the screenshot above include nameidentifier, emailaddress, userid, name, etc.) to make various authorization (what resources may this authenticated user access) and personalization (how is this particular user or class of user’s experience customized) decisions about how to handle this user.
Claims-based authentication and Azure ACS offer exciting possibilities to application developers who are liberated from having to maintain (or even worse, design and develop!) a user management system and all the nightmares that go along with it (think about password resets, forgotten passwords, security requirements for maintaining account information, etc.) As Chris mentions in his blog post, the same paradigm can be applied using Active Directory Federation Services (AD FS v2) to support users logging in to a SharePoint environment using credentials from a trusted external domain.
That said, Claims-based authentication is not always as easy to set up and work with as it may seem. Using CloudShare, developers and IT professionals can focus their valuable time and energy on solving the issues surrounding the implementation of Claims-based identity in SharePoint 2010 and not be concerned with software licensing, hardware, or other infrastructure concerns.